My original posting for this started off as just an Extension Attribute. In the past 3 days, it has become a full blown workflow.
Here's that workflow.
JAMF Software Deployment: Nessus Agent for Apple Macintosh
INTRODUCTION
Tenable Network Security's Nessus software is currently being utilized for vulnerability scanning and vulnerability management within the enterprise.
JAMF Software's Casper Suite (JSS) is used to manage Apple Macintosh systems within the enterprise. This includes the deployment of software packages such as the Nessus agent.
This article describes the various elements and requirements as utilized by the Casper Suite in order to package and deploy the Nessus agent to Macintosh systems within the enterprise.
TOPICS
....Preparing for Deployment
........The Software
............Acquiring the Nessus agent
............Creating a Custom PKG Payload
................Acquiring and Installing Casper Composer
................Overview and Purpose of Creating a Custom PKG Payload
................Enabling Hidden Files and Folders in OS X
................Staging the Nessus Agent DMG File
................Using Casper Composer to Create a Custom Nessus Agent Installer PKG File
........Configuring the JSS
............Uploading the Custom Nessus Agent Installer PKG to the JSS Server
................Extension Attributes
................Nessus Agent Installation Status
................Nessus Agent Service Status
................Nessus Agent Version and Build Information
............JAMF JSS Computer Groups
................Creating Smart Computer Groups for the Nessus Agent
....................Nesus Agent - Installed
....................Nesus Agent - Not Installed
....................Nesus Agent - Installed - IT Department
....................Nesus Agent - Not Installed - IT Department
....................Nessus Agent Service - Running
....................Nessus Agent Service - Stopped
................Creating Static Computer Groups for the Nessus Agent
................IT Department
............JAMF JSS Computer Policies
................Creating Computer Policies for the Nessus Agent
................Nessus Agent - Installation
....Testing the Deployment
....Transitioning Into Production
........Re-scoping for Production
PREPARING FOR DEPLOYMENT
THE SOFTWARE
ACQUIRING THE NESSUS AGENT
The latest version of the Nessus agent for the Macintosh platform can be obtained from the following URL:
http://www.tenable.com/products/nessus/agent-download
An installer PKG file is contained within the downloaded DMG file. The installer PKG file has been designed by Tenable Network Security to perform an integrity check against itself. This self-check prevents the extraction and upload of a working version of the PKG to the JAMF JSS server.
NOTE - 2017-05-17: It seems the latest version of Tenable's Nessus Agent v6.10.5 may actually work as-is without all the fancy re-packaging. As the old mantra goes, "Test! Test! Test!" - YMMV!
The following work-around provides us with the necessary functionality.
OVERVIEW AND PURPOSE OF CREATING A CUSTOM PKG PAYLOAD
The JAMF JSS Server relies on PKG files to install 3rd Party software.
The JAMF JSS Server can not deploy DMG files that have not been created in Casper Composer.
By creating a custom PKG file using Casper Composer, we have the ability to:
- Deploy the DMG without disturbing it's integrity check as designed by Tenable Network Security
- Facilitate the use of a post-install script that performs a custom installation with full logging abilities
ACQUIRING AND INSTALLING CASPER COMPOSER
If you do not currently have the correct version of Casper Composer installed on your local system, please log into your JAMF Nation account by visiting the following URL:
https://my.jamfsoftware.com/products.html
If you do not have access to the JAMF assets, please contact your JAMF Administrator for further assistance.
If you do have access the JAMF Assets, please download the proper version of the Casper Suite for deployment on the Macintosh.
Once you have downloaded the appropriate Casper Suite DMG file to your local system perform the following steps:
01 - Double-Click the DMG file
02 - Drag the "Casper Suite" icon to the "Applications" Icon
ENABLING HIDDEN FILES AND FOLDERS IN OS X
Because we are creating a special deployment PKG file, we will want to use the /tmp folder on all of the target Macintosh systems. In order for Finder, and ultimately Casper Composer to see the /tmp folder, we need to enable hidden files and folders.
01 - Launch /Applications/Utilities/Terminal.app
02 - Type in the following commands, pressing the Enter/Return key after each line
defaults write com.apple.finder AppleShowAllFiles YES
killall Finder
03 - Open a Finder window and navigate to /tmp
STAGING THE NESSUS AGENT DMG FILE
Copy the Nessus Agent DMG file to /tmp
USING CASPER COMPOSER TO CREATE A CUSTOM NESSUS AGENT INSTALLER PKG
01 - Launch /Applications/Casper Suite/Composer.app
02 - If this is the first time you have launched Casper Composer
a. You may be presented with the ""Composer.app" is an application downloaded from the Internet" window
b. Click the "Open" button
c. If prompted, type in your password
d. You will be presented with the "Choose a method to create your package:" screen
e. Continue to Step 4
03 - If this is not your first time to launch Casper Composer you will be taken to the main Casper Composer screen
a. If prompted, type in your password
b. Click on the "New" icon
c.You will be presented with the "Choose a method to create your package:" screen
04 - Select "Normal Snapshot" icon
05 - Click the "Next" button
06 - Provide a "Package Name" (i.e. NessusAgent-6.5.5_Casper_Installer_v1.2.pkg)
07 - Casper Composer will begin taking a Snapshot of your system.
a. During this time, do not make any changes to your system
08 - Once Casper Composer has completed taking the Snapshot, click on the "Create Package Source" button
09 - Casper Composer will begin taking the "After Snapshot" of your system
10 -Once Casper Composer has completed taking the After Snapshot, you will be returned to the main Casper Composer screen
11 - Your newly created source container will reside in the left-hand pane
12 - Drag the Nessus Agent DMG file from /tmp to the right-hand pane of the Casper Composer Window
13 - This will create a tree structure depicting the path to the Nessus Agent DMG file
14 - In the left-hand sidebar, expand the Nessus Agent source
15 - Right-Click on "Scripts"
16 - Click on "Add Shell Script"
17 - Click on "Post Install"
18 - Click on "postinstall" in the left-hand pane
19 - Select all of the script contents within the right-hand pane and delete the contents
20 - Copy and paste in the following script
#!/bin/sh
## postinstall
# Nexus Agent Installation Script v1.2
# Written by Caine Hörr
# Written on Tue, Jan 26, 2016
# Updated by Caine Hörr
# Updated on Wed, Jan 17, 2016
# UPDATE LOG
# v1.2
# Replaced Username="$(whoami)" with Username="$(stat -f "%Su" /dev/console)" to correct issue of identifying root as the username
# v1.1
# Added line to unlink the Nessus Agent
# Automatically collect username and hostname to generate unique name
# Add unique name when linking to the Nessus Agent
# v1.0
# Initial Nexus Agent Installation script
# Mount the Nessus Agent DMG file
# Latest version can be downloaded from http://www.tenable.com/products/nessus/agent-download
echo "########## MOUNTING THE NESSUS AGENT DMG ##########" | logger
hdiutil attach /tmp/NessusAgent-6.5.4.dmg | logger
# Run the Nessus Agent installer PKG file
echo "########## INSTALLING THE NESSUS AGENT ##########" | logger
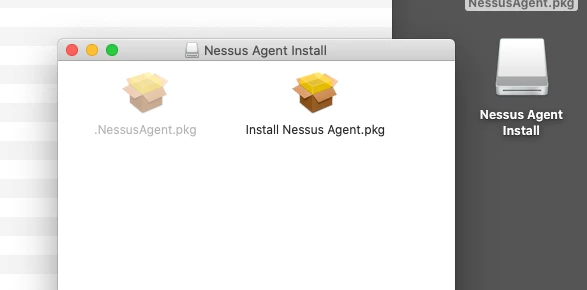
sudo installer -pkg /Volumes/Nessus Agent Install/Install Nessus Agent.pkg -target / | logger
# Check to see if Nessus Agent is installed
NessusAgentInstalled="$(ls /Library/NessusAgent/run/sbin/ | grep nessuscli)"
if [ "$NessusAgentInstalled" = "nessuscli" ]; then
echo "########## NESSUS AGENT INSTALLED ##########" | logger
# Identify the correct mount point for the DMG file
NessusAgentDMG="$(hdiutil info | grep "/Volumes/Nessus Agent Install" | awk '{ print $1 }')"
# Detach the DMG file
echo "########## UNMOUNTING THE NESSUS AGENT DMG ##########" | logger
hdiutil detach $NessusAgentDMG | logger
# Check to see if Nessus Agent is running
NessusAgentRunning="$(sudo launchctl list com.tenablesecurity.nessusagent | grep "PID" | awk '{ print $1 }' | tr -d '"')"
if [ "$NessusAgentRunning" = "PID" ]; then
echo "########## NESSUS AGENT IS RUNNING ##########" | logger
# Unlink the Nessus agent - Needed in case of upgrade or re-link…
echo "########## UNLINKING NESSUS AGENT ##########" | logger
sudo /Library/NessusAgent/run/sbin/nessuscli agent unlink | logger
# Acquire some personal data (currently logged in username and computer hostname)
Username="$(stat -f "%Su" /dev/console)"
Computername="$(hostname | sed 's/..*$//')"
Fullname="${Computername}_${Username}"
# Link the Nessus Agent to cloud.tenable.com
echo "########## CONFIGURING THE NESSUS AGENT ##########" | logger
sudo /Library/NessusAgent/run/sbin/nessuscli agent link --key=<your key goes here> --name=$Fullname --host=cloud.tenable.com --port=443 | logger
exit 0 # Success
else
echo "########## WARNING - NESSUS AGENT IS NOT RUNNING ##########" | logger
exit 1 # Failure
fi
else
echo "########## ERROR - NESSUS AGENT DID NOT INSTALL ##########" | logger
exit 1 # Failure
fi21 - In the left-hand sidebar, click the Nessus Agent source icon
22 - You will be prompted to save changes - Click the "Save" button
23 - Click the "Build as PKG" icon
24 - Select a destination to save the custom PKG file (ie Desktop)
25 - Click the "Save" button
CONFIGURING THE JSS
UPLOADING THE CUSTOM NESSUS AGENT INSTALLER PKG TO THE JSS SERVER
01 - Connect to https://jss.yourdomain.net:8443/
02 - Log in with your credentials
03 - Click on the "Settings" (gear) icon in the upper right corner
04 - Click on "Computer Management" within the left-hand pane
05 - Click on the "Packages" icon within the "Computer Management" group
06 - Click on the "Plus" button
07 - Type in a "Display Name" (ie NessusAgent-6.5.5_Casper_Installer_v1.2.pkg)
08 - Select "Security" from the "Category" drop down menu
09 - Click on the "Upload Package File" button
10 - Click on the "Choose File" button
11 - Navigate to the location of your custom Nessus Agent PKG file
12 - Select your custom Nessus Agent PKG file
13 - Click the "Open" button
14 - Click the "Upload" button
15 - Add any additional Info or Notes to the relevant fields
16 - Click the "Save" button
EXTENSION ATTRIBUTES
Extension attributes are used to augment the functionality of the JAMF Casper Suite.
Because the Nessus Agent is not a typical Macintosh application that resides in /Applications, we need to build a set of custom controls to gather the necessary information about the status of the Nessus Agent on the client systems that are deployed within the enterprise.
With custom designed Extension attributes, we can gather the following information:
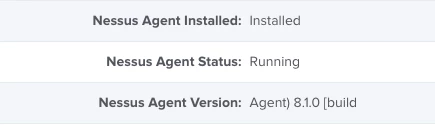
- Nessus Agent Installation Status: Installed | Not Installed
- Nessus Agent Service Status: Running | Stopped
- Nessus Agent Version and Build Information
NESSUS AGENT INSTALLATION STATUS
01 - Connect to https://jss.yourdomain.net:8443/
02 - Log in with your credentials
03 - Click on the "Settings" (gear) icon in the upper right corner
04 - Click on "Computer Management" within the left-hand pane
05 - Click on "Extension Attributes" icon within the "Computer Management - Management Framework" group
06 - Click on the "Plus" button
07 - In the "Display Name" field, type in the following: Nessus Agent Installation Status
08 - In the "Description" field, type in the following: Check to determine if the Nessus Agent is installed.
09 - In the "Data Type" drop down, select "String"
10 - In the "Inventory Display" drop down, select "Operating System"
11 - In the "Input Type" drop down, select "Script"
12 - Click on the "OS X" button
13 - In the "Script" text field, copy and paste in the following script:
#!/bin/sh
# Check to see if Nessus Agent is installed
NessusAgentInstalled="$(ls /Library/NessusAgent/run/sbin/ | grep nessuscli)"
if [ "$NessusAgentInstalled" != "nessuscli" ]
then
 echo "<result>Not Installed</result>"
else
 echo "<result>Installed</result>"
fi
14 - Click the "Save" button
NESSUS AGENT SERVICE STATUS
01 - Connect to https://jss.yourdomain.net:8443/
02 - Log in with your credentials
03 - Click on the "Settings" (gear) icon in the upper right corner
04 - Click on "Computer Management" within the left-hand pane
05 - Click on "Extension Attributes" icon within the "Computer Management - Management Framework" group
06 - Click on the "Plus" button
07 - In the "Display Name" field, type in the following: Nessus Agent Service Status
08 - In the "Description" field, type in the following: Check to determine if the Nessus Agent Service is running.
09 - In the "Data Type" drop down, select "String"
10 - In the "Inventory Display" drop down, select "Operating System"
11 - In the "Input Type" drop down, select "Script"
12 - Click on the "OS X" button
13 - In the "Script" text field, copy and paste in the following script:
#!/bin/sh
# Check to see if Nessus Agent is running
NessusAgentRunning="$(sudo launchctl list com.tenablesecurity.nessusagent | grep "PID" | awk '{ print $1 }' | tr -d '"')"
if [ "$NessusAgentRunning" = "PID" ]
then
 echo "<result>Running</result>"
else
 echo "<result>Stopped</result>"
fi
14 - Click the "Save" button
NESSUS AGENT VERSION AND BUILD INFORMATION
01 - Connect to https://jss.yourdomain.net:8443/
02 - Log in with your credentials
03 - Click on the "Settings" (gear) icon in the upper right corner
04 - Click on "Computer Management" within the left-hand pane
05 - Click on "Extension Attributes" icon within the "Computer Management - Management Framework" group
06 - Click on the "Plus" button
07 - In the "Display Name" field, type in the following: Nessus Agent Version
08 - In the "Description" field, type in the following: Determine the version of the Nessus Agent that is currently installed.
09 - In the "Data Type" drop down, select "String"
10 - In the "Inventory Display" drop down, select "Operating System"
11 - In the "Input Type" drop down, select "Script"
12 - Click on the "OS X" button
13 - In the "Script" text field, copy and paste in the following script:
#!/bin/sh
# Check to see if Nessus Agent is installed
NessusAgentInstalled="$(ls /Library/NessusAgent/run/sbin/ | grep nessuscli)"
if [ "$NessusAgentInstalled" != "nessuscli" ]
then
 echo "<result>N/A</result>"
else
 NessusAgentVersion="$(/Library/NessusAgent/run/sbin/nessuscli -v | awk 'NR==1{print $3 " " $4 " " $5}')"
 echo "<result>$NessusAgentVersion</result>"
fi
14 - Click the "Save" button
JAMF JSS COMPUTER GROUPS
The JAMF JSS provides two kinds of Computer Groups.
- Smart Computer Groups
- Static Computer Group
Smart Computer Groups include logic statements that determine how Policies, Configuration Profiles, Extension Attributes and other resources are applied. Smart Computer Groups provide a mechanism by which the JSS can determine which actions to take and when.
Static Computer Groups are manually assigned systems without any form of logic work flow. Static Computer Groups are perfect for deploying systems within small, isolated test and lab groups thereby reducing any major impact on a production environment.
CREATING SMART COMPUTER GROUPS FOR THE NESSUS AGENT
NESSUS AGENT - INSTALLED
01 - Click on the "Computers" icon
02 - Click on "Smart Computer Groups"
03 - Click on the "Plus" button
04 - In the "Display Nam"e field, type in the following: Nessus Agent - Installed
05 - Click on the "Criteria" tab
06 - Click on the "Plus" button
07 - Click the "Choose" button for All Criteria
08 - Click the "Choose" button for Nessus Agent Installation Status
09 - Change the "Operator" drop down to is
10 - In the "Value" field, type in Installed
a. This value corresponds with the value as defined in the script associated with the Nessus Agent Installation Status Extension Attribute
11 - Click the "Save" button
NESSUS AGENT - NOT INSTALLED
01 - Click on the "Computers" icon
02 - Click on "Smart Computer Groups"
03 - Click on the "Plus" button
04 - In the "Display Name" field, type in the following: Nessus Agent - Not Installed
05 - Click on the "Criteria" tab
06 - Click on the "Plus" button
07 - Click the "Choose" button for "All Criteria"
08 - Click the "Choose" button for "Nessus Agent Installation Status"
09 - Change the "Operator" drop down to "is not"
10 - In the "Value" field, type in "Installed"
a. This value corresponds with the value as defined in the script associated with the Nessus Agent Installation Status Extension Attribute
11 - Click the "Save" button
NESSUS AGENT - INSTALLED - TEST GROUP
01 - Click on the "Computers" icon
02 - Click on "Smart Computer Groups"
03 - Click on the "Plus" button
04 - In the "Display Name" field, type in the following: Nessus Agent - Installed - Test Group
05 - Click on the "Criteria" tab
06 - Click on the "Plus" button
07 - Click the "Choose" button for "All Criteria"
08 - Click the "Choose" button for "Nessus Agent Installation Status"
09 - Change the "Operator" drop down to "is"
10 - In the "Value" field, type in "Installed"
a. This value corresponds with the value as defined in the script associated with the Nessus Agent Installation Status Extension Attribute
11 - Click the "Save" button
NESSUS AGENT - NOT INSTALLED - TEST GROUP
01 - Click on the "Computers" icon
02 - Click on "Smart Computer Groups"
03 - Click on the "Plus" button
04 - In the "Display Name" field, type in the following: Nessus Agent - Not Installed - Test Group
05 - Click on the "Criteria" tab
06 - Click on the "Plus" button
07 - Click the "Choose" button for "All Criteria"
08 - Click the "Choose" button for "Nessus Agent Installation Status"
09 - Change the "Operator" drop down to "is not"
10 - In the "Value" field, type in "Installed"
a. This value corresponds with the value as defined in the script associated with the Nessus Agent Installation Status Extension Attribute
11 - Click the "Save" button
NESSUS AGENT SERVICE - RUNNING
01 - Click on the "Computers" icon
02 - Click on "Smart Computer Groups"
03 - Click on the "Plus" button
04 - In the "Display Name" field, type in the following: Nessus Agent Service - Running
05 - Click on the "Criteria" tab
06 - Click on the "Plus" button
07 - Click the "Choose" button for "All Criteria"
08 - Click the "Choose" button for "Nessus Agent Service Status"
09 - Change the "Operator" drop down to "is"
10 - In the "Value" field, type in "Running"
a. This value corresponds with the value as defined in the script associated with the Nessus Agent Service Status Extension Attribute
11 - Click the "Save" button
NESSUS AGENT SERVICE - STOPPED
01 - Click on the "Computers" icon
02 - Click on "Smart Computer Groups"
03 - Click on the "Plus" button
04 - In the "Display Name" field, type in the following: Nessus Agent Service - Stopped
05 - Click on the "Criteria" tab
06 - Click on the "Plus" button
07 - Click the "Choose" button for "All Criteria"
08 - Click the "Choose" button for "Nessus Agent Service Status"
09 - Change the "Operator" drop down to "is not"
10 - In the "Value" field, type in "Running"
a. This value corresponds with the value as defined in the script associated with the Nessus Agent Service Status Extension Attribute
11 - Click the "Save" button
CREATING STATIC COMPUTER GROUPS FOR THE NESSUS AGENT
NESSUS AGENT TEST GROUP
01 - Click on the "Computers" icon
02 - Click on "Static Computer Groups"
03 - Click on the "Plus" button
04 - In the "Display Name" field, type in the following: IT Department
05 - Click on the "Assignments" tab
06 - Select each individual system to be included within the group
07 - Click the "Save" button
JAMF JSS COMPUTER POLICIES
CREATING COMPUTER POLICIES FOR THE NESSUS AGENT
NESSUS AGENT - INSTALLATION
01 - Click on the "Computers" icon
02 - Click on "Policies"
03 - Click on the "Plus" button
04 - In the "Display Name" field, type in the following: Nessus Agent - Installation
05 - Select the "Enabled" checkbox
a. Selecting "Enabled" commits the policy once the "Save" button has been clicked. By not enabling the policy, the policy will not run.
06 - Change the "Category" drop down to "Security"
07 - Select the "Enrollment Complete" checkbox
08 - Select the "Recurring Check-In" checkbox
09 - Change the "Execution Frequency" drop down to "Once per computer"
10 - Click on the "Packages" icon
11 - Click on the "Configure" button
12 - Click the "Add" button that corresponds to the Nessus Agent Installer PKG file
13 - Click on the "Maintenance" icon
14 - Click on the "Configure" button
15 - Click on the "Scope" tab
16 - Click on the "Plus" button
17 - Click on the "Computer Groups" button
18 - Click the "Add" button that corresponds to "Nessus Agent - Not Installed - IT Department"
19 - Click the "Done" button
20 - Click the "Save" button
a. Clicking the "Save" button commits the policy if the policy is Enabled.
TESTING THE DEPLOYMENT
Once the policy has been enabled and saved, all systems that have been assigned to the Nessus Agent Test Group Static Computer Group will download and run the policy during their next check in period.
You can expedite this process by running the following commands on the command line (/Applications/Utilities/Terminal.app) of a target system:
sudo jamf manage

sudo jamf policy
TRANSITIONING TO PRODUCTION
To transition to a final production run for all target systems within the enterprise, you only need to re-scope the Computer Policy entitled "Nessus Agent - Installation".
RE-SCOPING FOR PRODUCTION
01 - Click on the "Computers" icon
02 - Click on "Policies"
03 - Click on the "Nessus Agent - Installation" policy link
04 - Click on the "Scope" tab
05 - Click on the "Edit" button
06 - Click on the "Remove" button that corresponds with the "Nessus Agent - Not Installed - Test Group Smart Computer Group"
07 - Click on the "Plus" button
08 - Click on the "Computer Groups" button
09 - Click on the "Add" button associated with the "Nessus Agent - Not Installed" Smart Computer Group
10 - Click the "Done" button
11 - Click the "Save" button
a. Clicking the "Save" button commits the policy if the policy is Enabled.