

Overview
This document walks through how to configure and use temporary privilege elevation on macOS using Self Service+.
End users can request temporary local administrator rights directly from the Self Service+ app, authenticate via Touch ID or password, provide a business reason, and receive time-limited elevation, all without IT intervention.
The elevation duration, reason requirements, authentication requirements, and permitted reasons are all administrator-controlled via a Jamf Connect configuration profile deployed through Jamf Pro.
Prerequisites
Updated: 3/6/25- To add clarification to Prerequisites
Before following this guide, ensure the following are in place:
- Self Service+ v2.0 of greater installed on the target Mac.
- Jamf Pro access to create and deploy configuration profiles.
- The target Mac is enrolled in Jamf Pro.
- A valid Jamf Connect licence assigned to the device or user.
Walkthrough
Step 1: Configure the Jamf Connect Preference Domain in Jamf Pro
In Jamf Pro, create a new configuration profile targeting your Mac devices. Add the Jamf Applications payload and select com.jamf.connect as the application domain. Set the version to 3.10.0 (or the version you have deployed) and select the Jamf Connect.json variant.

Step 2: Configure Privilege Elevation Settings (Preference Domain Properties)
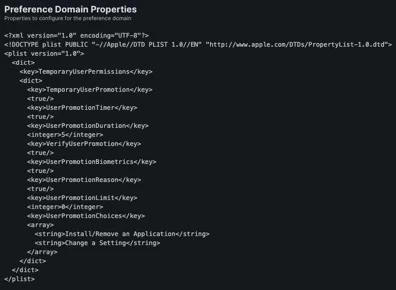
Within the com.jamf.connect Preference Domain in the configuration profile, add the TemporaryUserPermissions key with the settings shown below.
The example configuration enables temporary promotion with a 5-minute duration, biometric or password authentication, a mandatory reason and pre-defined reason choices.
Key settings in the example plist:
- TemporaryUserPromotion: true — enables the feature.
- UserPromotionDuration: 5 — elevation lasts 5 minutes before automatic demotion.
- VerifyUserPromotion: true — user must authenticate to proceed.
- UserPromotionBiometrics: true — Touch ID can be used for authentication.
- UserPromotionReason: true — user must provide a reason.
- UserPromotionLimit: 0 — no limit on the number of promotions.
- UserPromotionChoices: "Install/Remove an Application" and "Change a Setting".
Step 3: End-User Experience
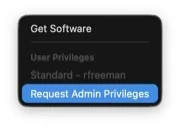
Once the configuration profile is deployed, users with a Standard account will see a "Request Admin Privileges" option in Self Service+. The user's current privilege level is displayed.
- Click on the Self Service+ icon in your menu bar.

- Click on Request Admin Privileges.
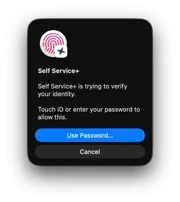
- After tapping "Request Admin Privileges", Self Service+ prompts the user to verify their identity using Touch ID or their account password. This ensures only the legitimate account holder can request elevation.
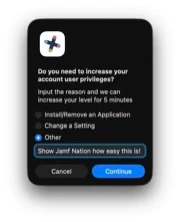
- The user is then asked to select or enter a reason for needing elevated privileges. The available choices (configured via the profile above) are "Install/Remove an Application", "Change a Setting", or "Other" with a free-text field. Providing a reason ensures there is an auditable justification for each elevation event.
- Once the user completes authentication and submits their reason, the Self Service+ Agent sends a macOS notification confirming that the user is now a local administrator. The elevation is time-limited to the configured duration (5 minutes in this example).


- When the elevation timer expires, the Self Service+ Agent automatically reverts the user to a Standard account and sends a confirmation notification. No administrator action is required.

It’s as simple as that! No third party software needed.
Summary
This workflow enables IT administrators to provide a secure, auditable, self-service privilege elevation experience on macOS without granting permanent admin rights. Self Service+ delivers a user friendly experience whilst maintaining security posture.
To learn more information about Privilege Elevation with Self Service+, please visit Jamf’s Documentation.
Where to go from here?
Knowing that privilege elevation occurred is useful but knowing that what the user did with these privileges is where Jamf provides additional value. In the follow up we will walkthrough:
· How to leverage Jamf to capture Unified Logs on macOS during an elevation window.
· Configure Jamf to alert on relevant log events.
· Reporting on privilege elevation activity across your fleet for compliance and security operations.
This information is all documented, please visit Jamf's Documentation


