Creating a Netboot Image (the easy way)

pmcgurn
New Contributor III

I know this is "technically" a duplicate of this KB article, but I found the article to be a bit weak for people not already familiar with the Netboot image process. So, I'm crafting the below as a getting started guide, using community tools to make the process as easy as possible.

Pre-requisites/assumptions
- You will be hosting the netboot process on a Mac running OS X Server. I'd recommend a Mac Mini, dedicated to this.
- You do not require any customization of the Netboot image, such as customizing accessibility settings
- You will use the newest hardware you have on hand, as this will negate any potential compatibility issues later on. When Apple does major hardware support changes, you'll simply repeat this process from that newer hardware.

Required software
- OS X Server Link ($19.99)
- AutoDMG Link
- AutoCasperNBI Link
- Install OS X <version>.app from the app store
- Casper Imaging app from the Casper Suite that matches the version of your JSS

Creating a never-booted OS install DMG
For this process, we'll use AutoDMG. This tool makes it dead-simple to create a pristine OS install image.

  1. Launch AutoDMG
  2. Drag your Install OS X <version>.app into AutoDMG
  3. Optionally, choose any OS updates that are detected as missing
  4. Create your image

8dbdd05083db47649fed5b07eb96812c

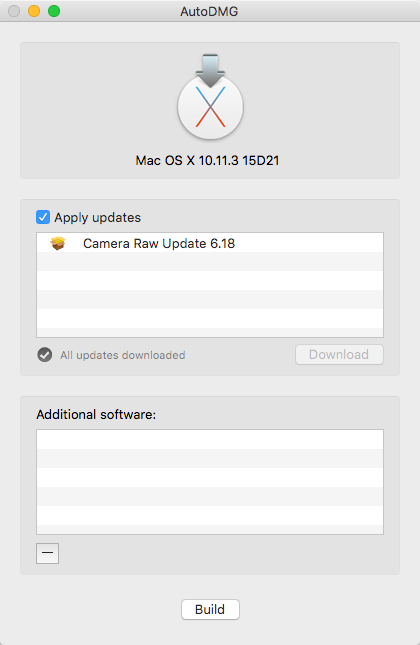
Note The image creation will take a bit (10-20 minutes on newer hardware), as it's essentially installing the OS into that DMG it's creating.

Creating a Netboot Image
To create a Netboot image, we'll use the DMG created in the previous section, with AutoCasperNBI
1. Launch AutoCasperNBI
2. Select the DMG image you created in the previous section
3. Select the appropriate version of Casper Imaging to match your JSS
4. Enter the URL for your JSS. For JAMFCloud, you'll use https://<name>.jamfcloud.com , no :8443 is needed (on-prem installs probably need :8443). It should detect your JSS version if the format is correct.
5. You can set additional Options as needed, but the default settings are usually fine for most use cases.
6. Create your NBI

46c665c89b0a43938207901a5f331cdd

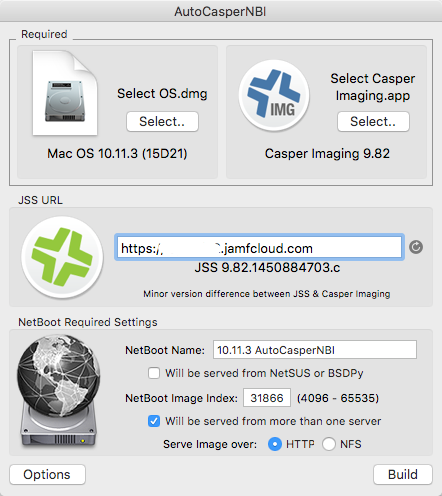
Note The creation process takes a while, as it is copying the contents of yoru DMG into a sparsebundle file. This is usually another 10-20 minutes, depending on hard drive speed.

Setting up OS X Server for Netboot
For this process, we'll be using Server.app
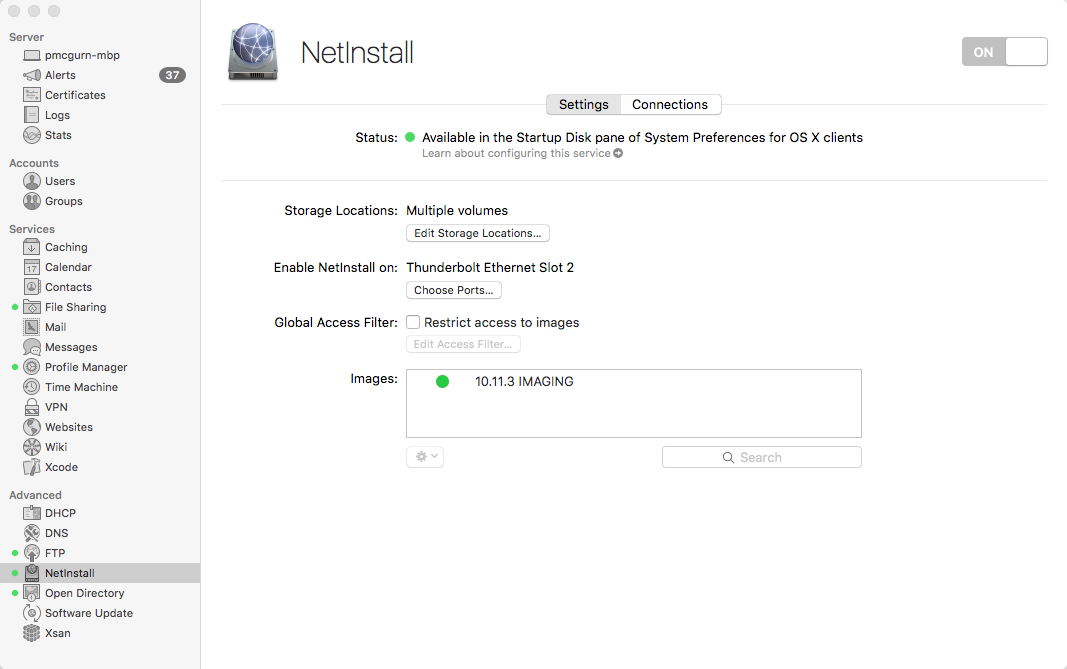
1. On the Mac that will be hosting the Netboot images, launch Server.app
2. Click the Netinstall section under Advanced
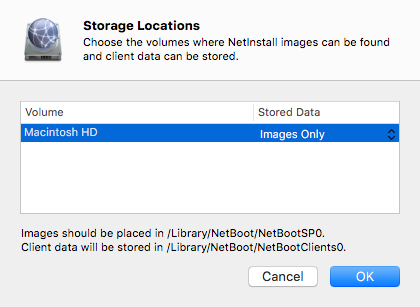
3. Click Edit Storage Locations...
4. If your Mac has multiple partitions, you can configure which ones you want to host NBI's from here. If you only have one, just toggle the setting to either Images Only or Images & Client Data
5. For Macintosh HD partitions, this should create a folder in /Library/ called NetBoot. If not, you can create it. You "might" need to fix the permissions of the NBI and child files/folders if you created it on a different machine.
6. Copy your NBI to /Library/NetBoot/NetBootSP0
7. In Server.app, toggle the Netinstall service to On

16c2bf5613884530ba71e925362d0e92
71f416a2156d4b368be25ad884cf1543

At this point, you should have a working Netboot process. If not, there are several great troubleshooting articles online.

https://static.afp548.com/mactips/netboot.html
https://support.apple.com/en-us/HT203437

12 REPLIES 12

Visualarchitect
New Contributor

Great article and super easy to understand! ;-)

JKling
New Contributor III

I am sure I am missing something easy but when I use this process, what is the OS login and password. I created AutoDmg, then ran the AutoCasperNBI with default settings. It boots but then asks for a login password.

I am sure I am just being thick but any help appreciated.

tjhall
Contributor III

@JKling Did you use the default Apple installer with AutoDMG? Sounds like you used another image.
Try downloading the latest OS X installer from Apple again, dump it into Autodmg and then follow the process above. Has worked for me.

kowsar_ahmed
Contributor

It should auto login for you as AutoCasper NBI automatically makes it login are root by itself. Might be worth adding:

If you want to add more dock items as it is minimal you need to capture it from the root library and add it onto autocasper (I add diskutil, terminal for example) Also if you have multiple netboot instances change the index file as required.

monaronyc
Contributor

HI! Questions about AUTODMG. Hoping someone can clarify. Getting mixed information...

1) We read that the version of the OS on the host computer needs to be the same as the version of OS being created with AUTODMG. Yes?
2) If so, from Q1, when we create the AUTODMG image, will the image only work on the flavor of computer we're creating it on? or across ALL Macs? Regardless of hardware.
3) We still run SATA capable hard drive Macs in our company. AUTODMG is APFS by default now. So we've read. APFS isn't really supported on SATA capable drives. So we've also read. Is there a way to still create an HFS+ image using this tool?

robertojok
Contributor

1) Yes it is true that creating clean OS using AutoDMG requires the host to have the same OS as the dmg you are attempting to create.
2)As far as working across all Macs will depend on when you downloaded the latest OSX build. Newer models generally tend to come with a newer build of the OS. So the best thing to do is always check the build of your latest Macs and download the latest OSX from the App store and use that for your AutoDMG; that will ensure that you are covered for all models.
3) I downloaded the latest version of AutoDMG and created a DMG which I have been able to deploy to SATA computers and it worked well using Deploystudio...

kowsar_ahmed
Contributor

As @robertojok mentioned above, that works fine.

If you wanted to specify what format depending on which type of drive there is have a look here: https://www.jamf.com/jamf-nation/discussions/25509/macos-high-sierra-upgrade-methods-options

This applies if you are rolling out High Sierra.

monaronyc
Contributor

@robertojok @kowsar.ahmed Thanks for the response! This is great! Totally helps with creating images now especially in High Sierra. Thanks again guys!

bbot
Contributor

@pmcgurn Does this process wipe the disk before installing the OS? I'm looking for a way to setup a Mac just as it were out of the box so I can have DEP image it.

kowsar_ahmed
Contributor

@bbot You will wipe the disk before applying the this never booted image to it. When you say DEP image on it I take it a fresh install? DEP will kick in during the activation window if the machine has already been enrolled.

Thanks

basavaraj_kamba
New Contributor

HI,

Using the same steps I have created 2 Images on 10.11 and one more 10.13

10.11 Image boots up and allow to select all option and when we start installing installing will complete in 10 mins or less.
after the process it will again boot to netboot or show folder with ? mark symbol.

10.13 Image never completes booting process.

Need help.

Note: Both images are created in defferant set of casper, autoDMG and AutoCasperNBI

Regards,
Basavaraj

skipthompson81
New Contributor II

10.13 changes file system to apfs. in my experience.... also. my macs need a firmware update to be able to get above 10.11.