

During JNUC2020 I opened my BIG MOUTH (I do that some times) and mentioned that I manage my Network Printers with Jamf Self Service.
It seems that many people want to know my secret sauce for making this happen. So I promised a write up. Time to make good on that promise!
Without further ado, here's the write up...
Managing Network Printers with Jamf Computer Policies and Self Service Policies
You're going to need a few tools to make this happen...
- A network printer
- Printer drivers for said Network Printer
- A computer (Preferably a Mac running OSX/macOS)
- A text editor (I prefer Sublime but you can use whatever makes you feel warm and fuzzy inside)
- A copy of ppdOptionsDiff.command (this script is mana from Heaven I tell you!)
- A working Jamf Pro environment that you have more than read-only access to (DUH!)
SECTION 01 - Be The Hunter / Gatherer That Your Dog Thinks Your Are
PART 01 - Gather Your Tools, You Tool
01 - Create a folder called "Printer Stuff" (you can call it whatever you want really) on your Desktop (or somewhere convenient for yourself).
02 - Download ppdOptionsDiff.command into the Printer Stuff folder you just created.
03 - Open Terminal and navigate to Printer Stuff
04 - Make ppdOptionsDiff.command executable
chmod 755 ppdOptionsDiff.command05 - If you don't already have them handy, download the appropriate printer drivers for your printer.
PART 02 - The Devils are in the Details, Mr. Keyser Söze
This part isn't so straight forward as each printer vendor has a different method for describing their hardware.
For example, if you have a Ricoh MFP with a Finisher and Lower Paper Trays, you're going to need to go take a physical look at the printer to identify the Finisher details (they are usually printed on a small sticker on the inside of the Finisher access panel/door). The same goes for collators, and any other add-on/bolt-on expansions and upgrades that you might have for your printer.
NOTE: You can however ignore all these minute details by going vanilla (don't worry, I won't judge your life decisions) and let your employees bug you via support tickets, Slack, email, phone calls, or unannounced stalker-esque visits to your home at odd hours of the morning because they can't tell their print job to auto-staple and reverse collate on the printer that's 5000 miles away in another time zone. The choice (truly) is yours.
Now go get your devils, er... details... I'll wait...
SECTION 02 - Release the Let's Get Crackin' Kraken!
PART 01 - Install! Install! You Must Install!
01 - Install the printer driver
02 - Configure the printer (Set up all the extras, ie Finisher, Lower Paper Trays, etc.)
03 - Save the configuration in System Preferences > Printers
PART 02 - More Research, Ya Monkey
01 - Double-click on the ppdOptionsDiff.command
02 - Drag in the unmodified PPD from /Library/Printers/PPDs/Contents/Resources
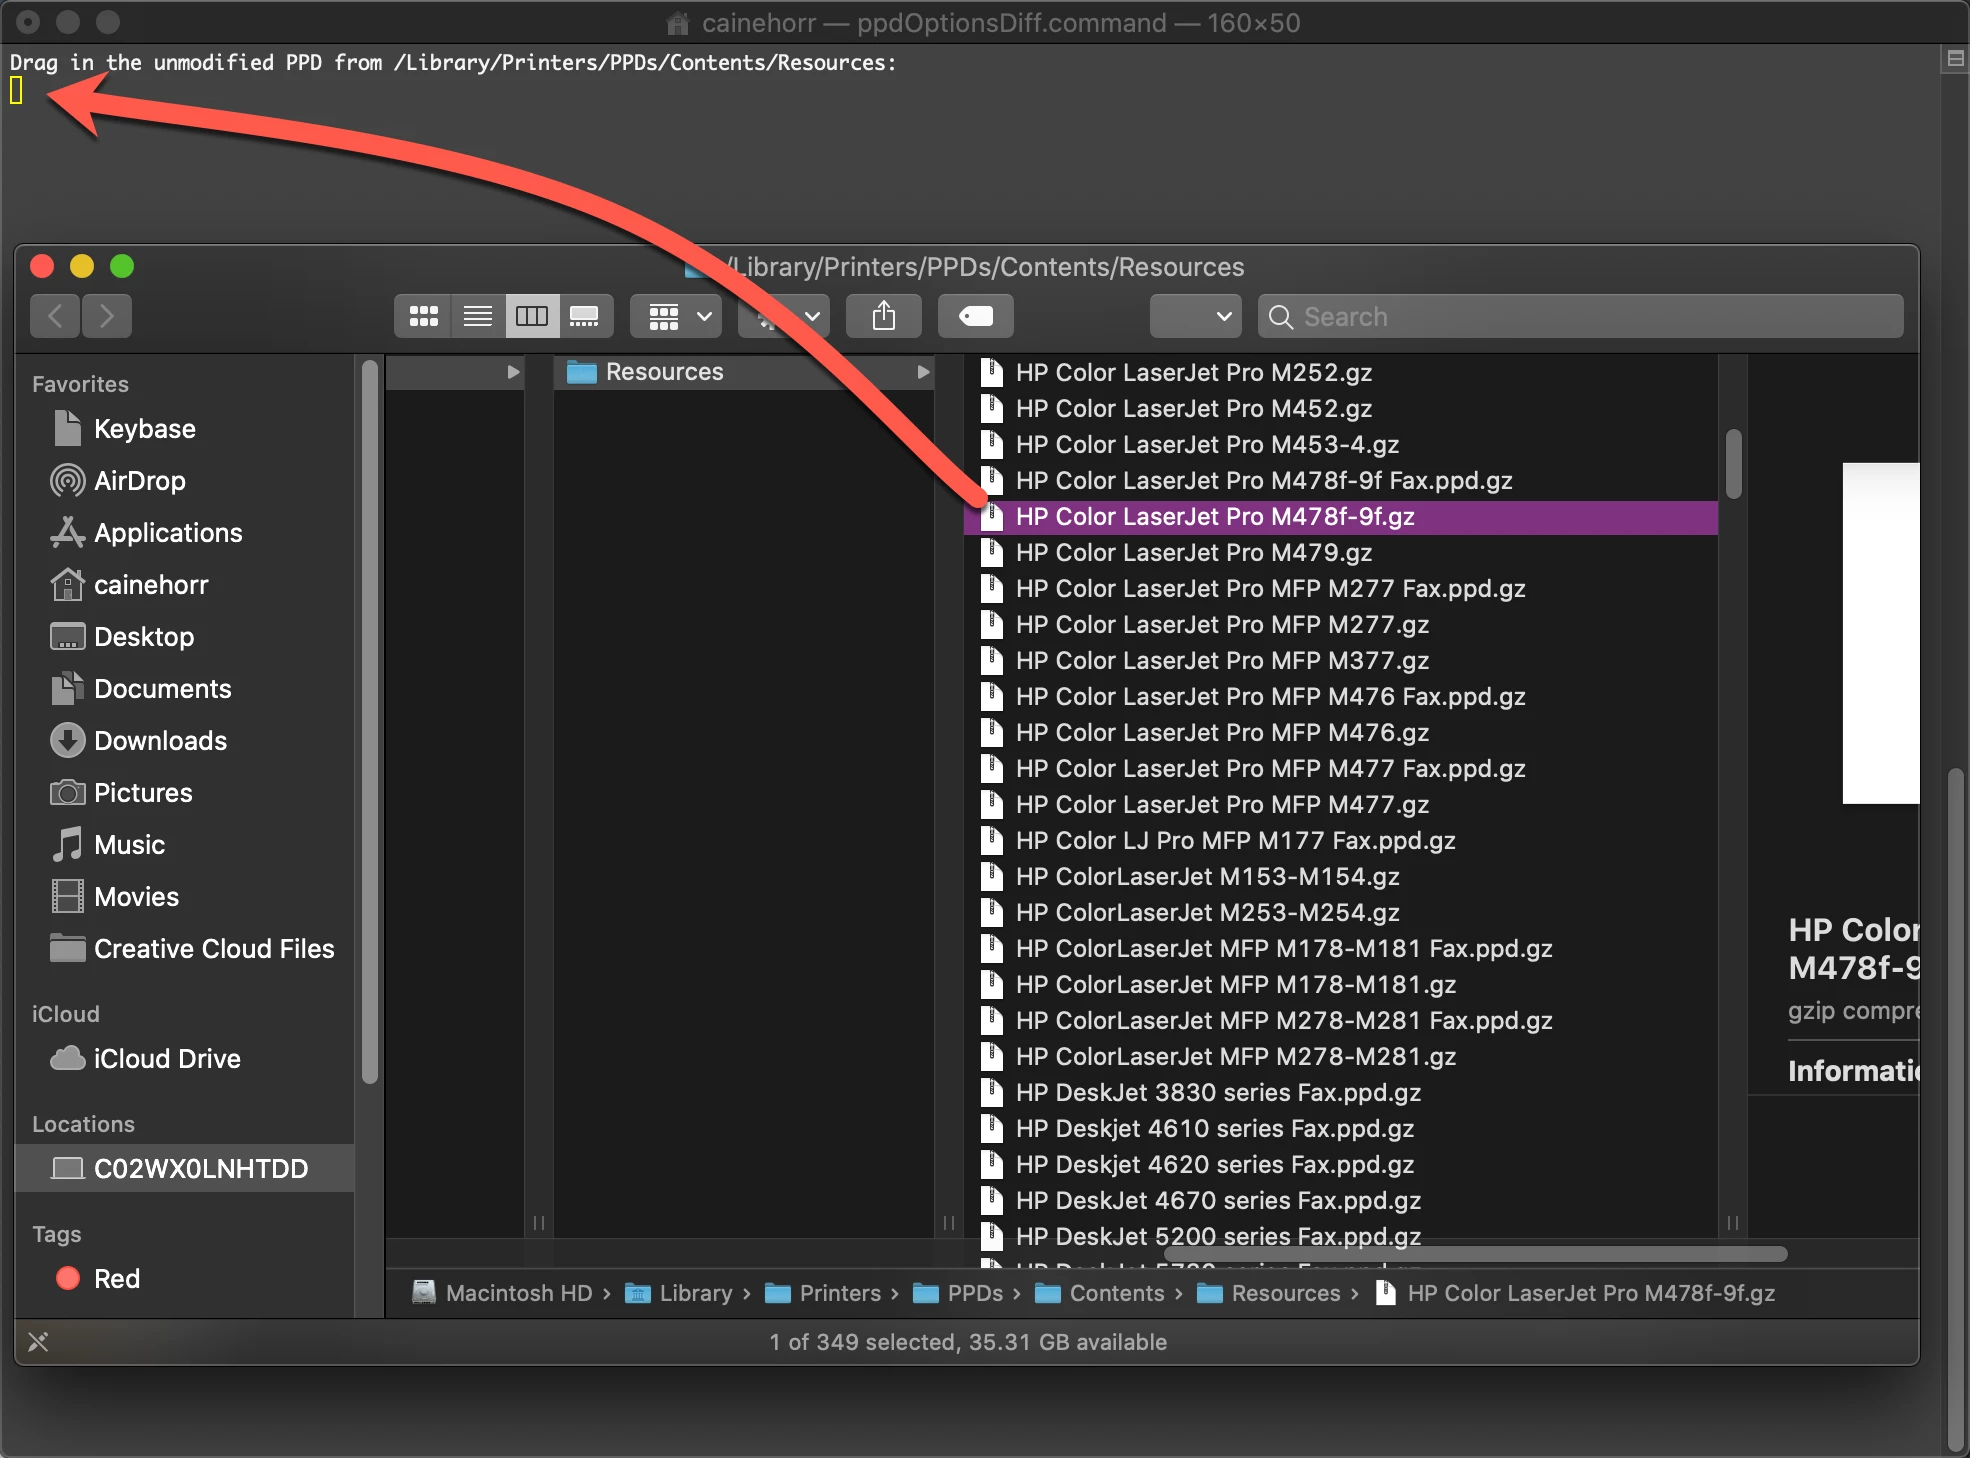
03 - Press enter in the Terminal window
04 - Drag in the corresponding PPD from /etc/cups/ppd
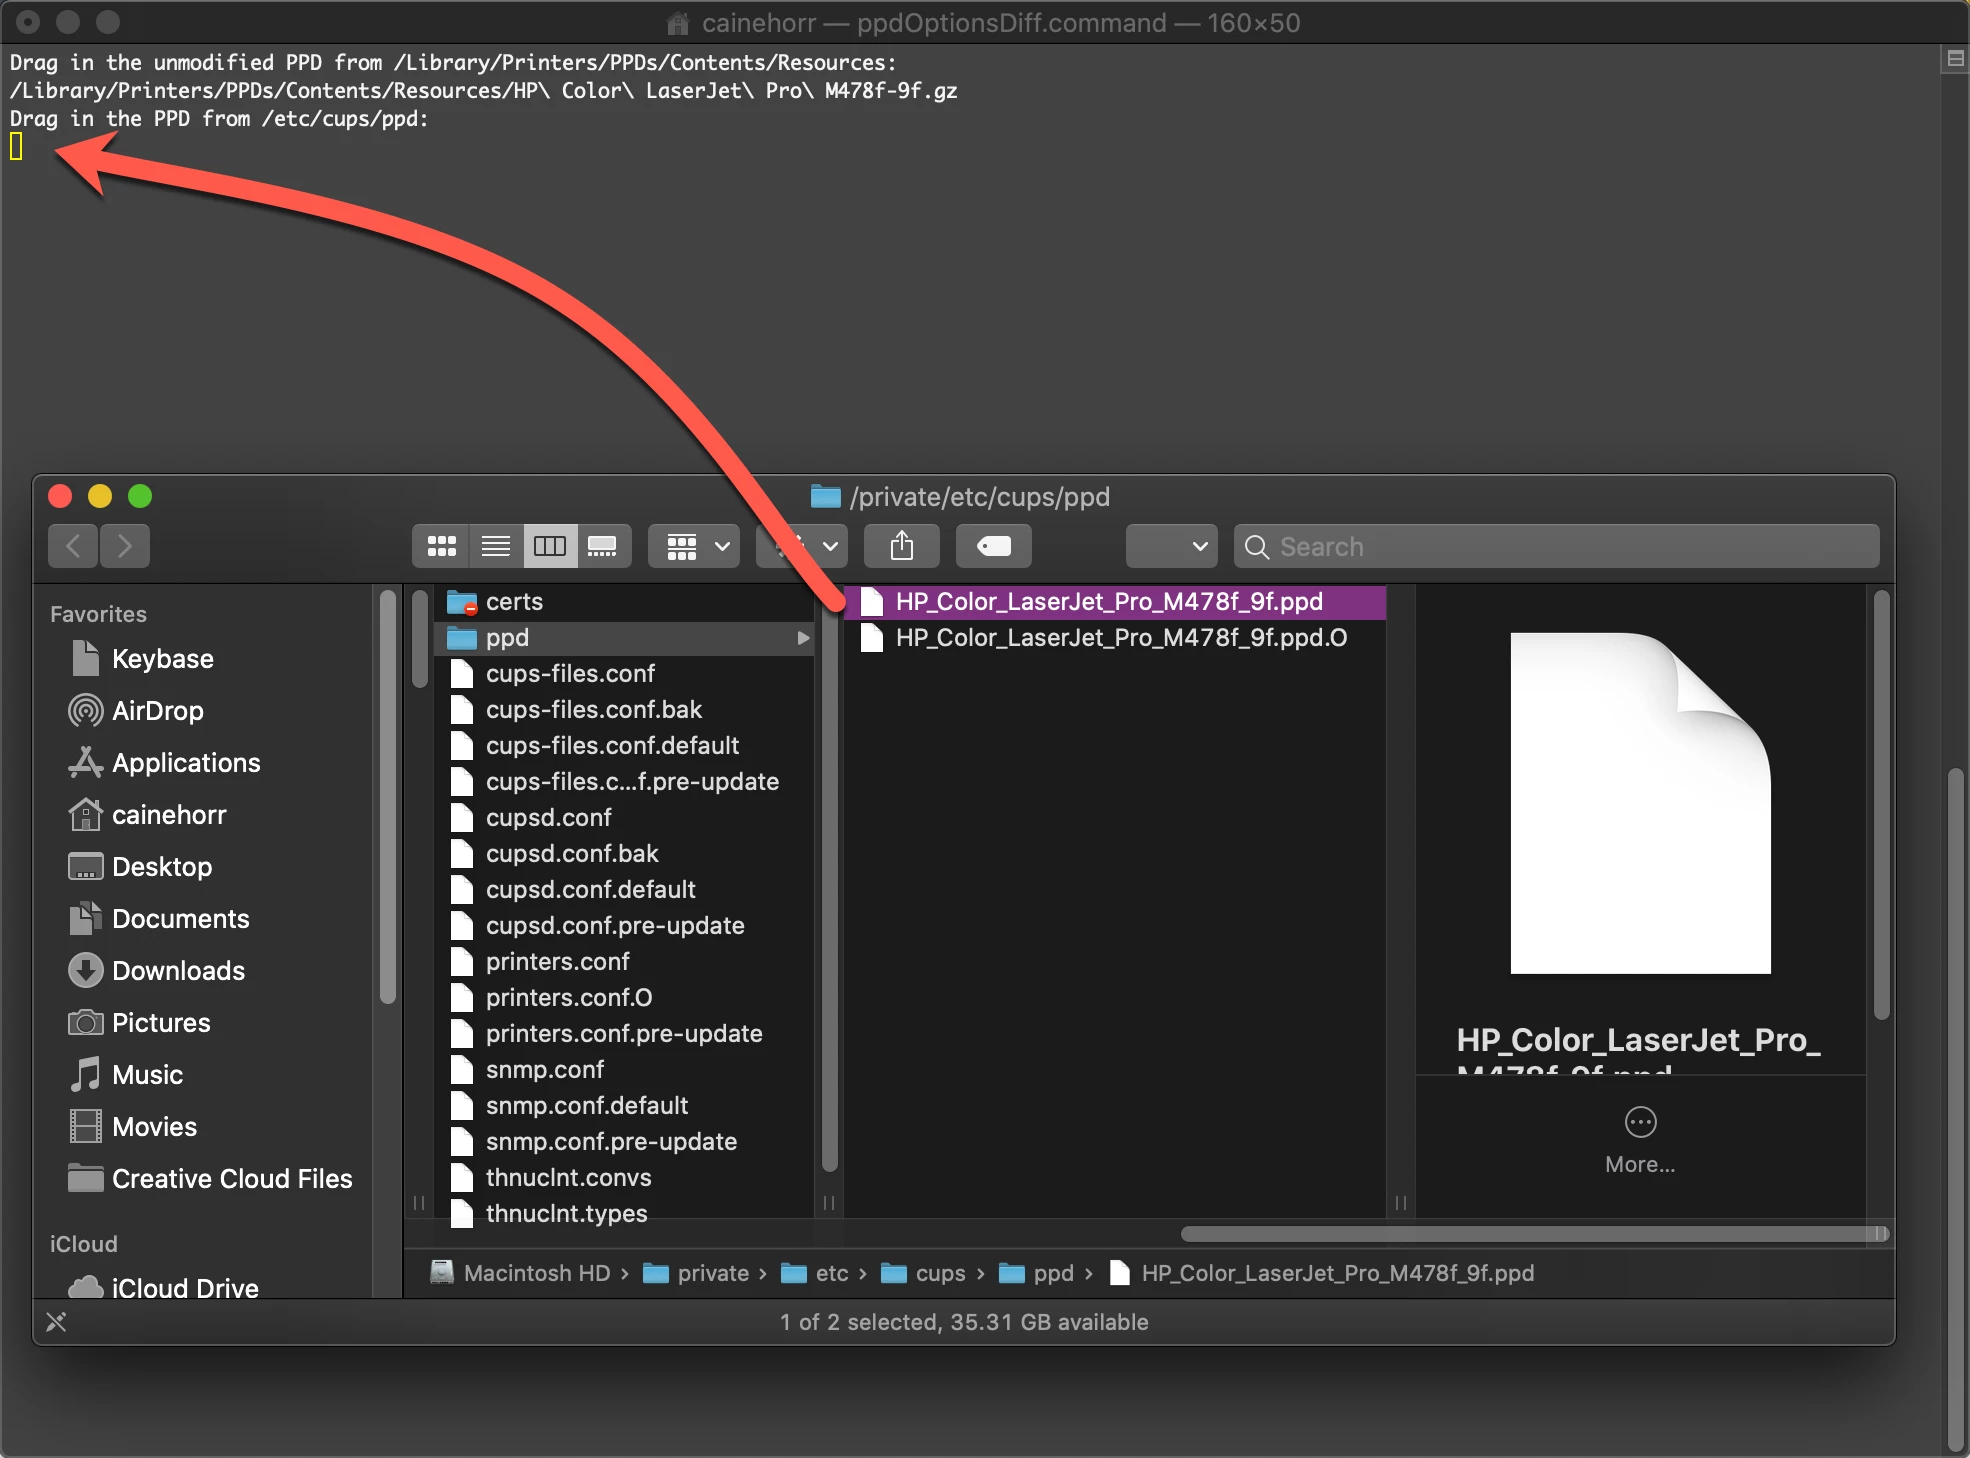
05 - Press enter in the Terminal window
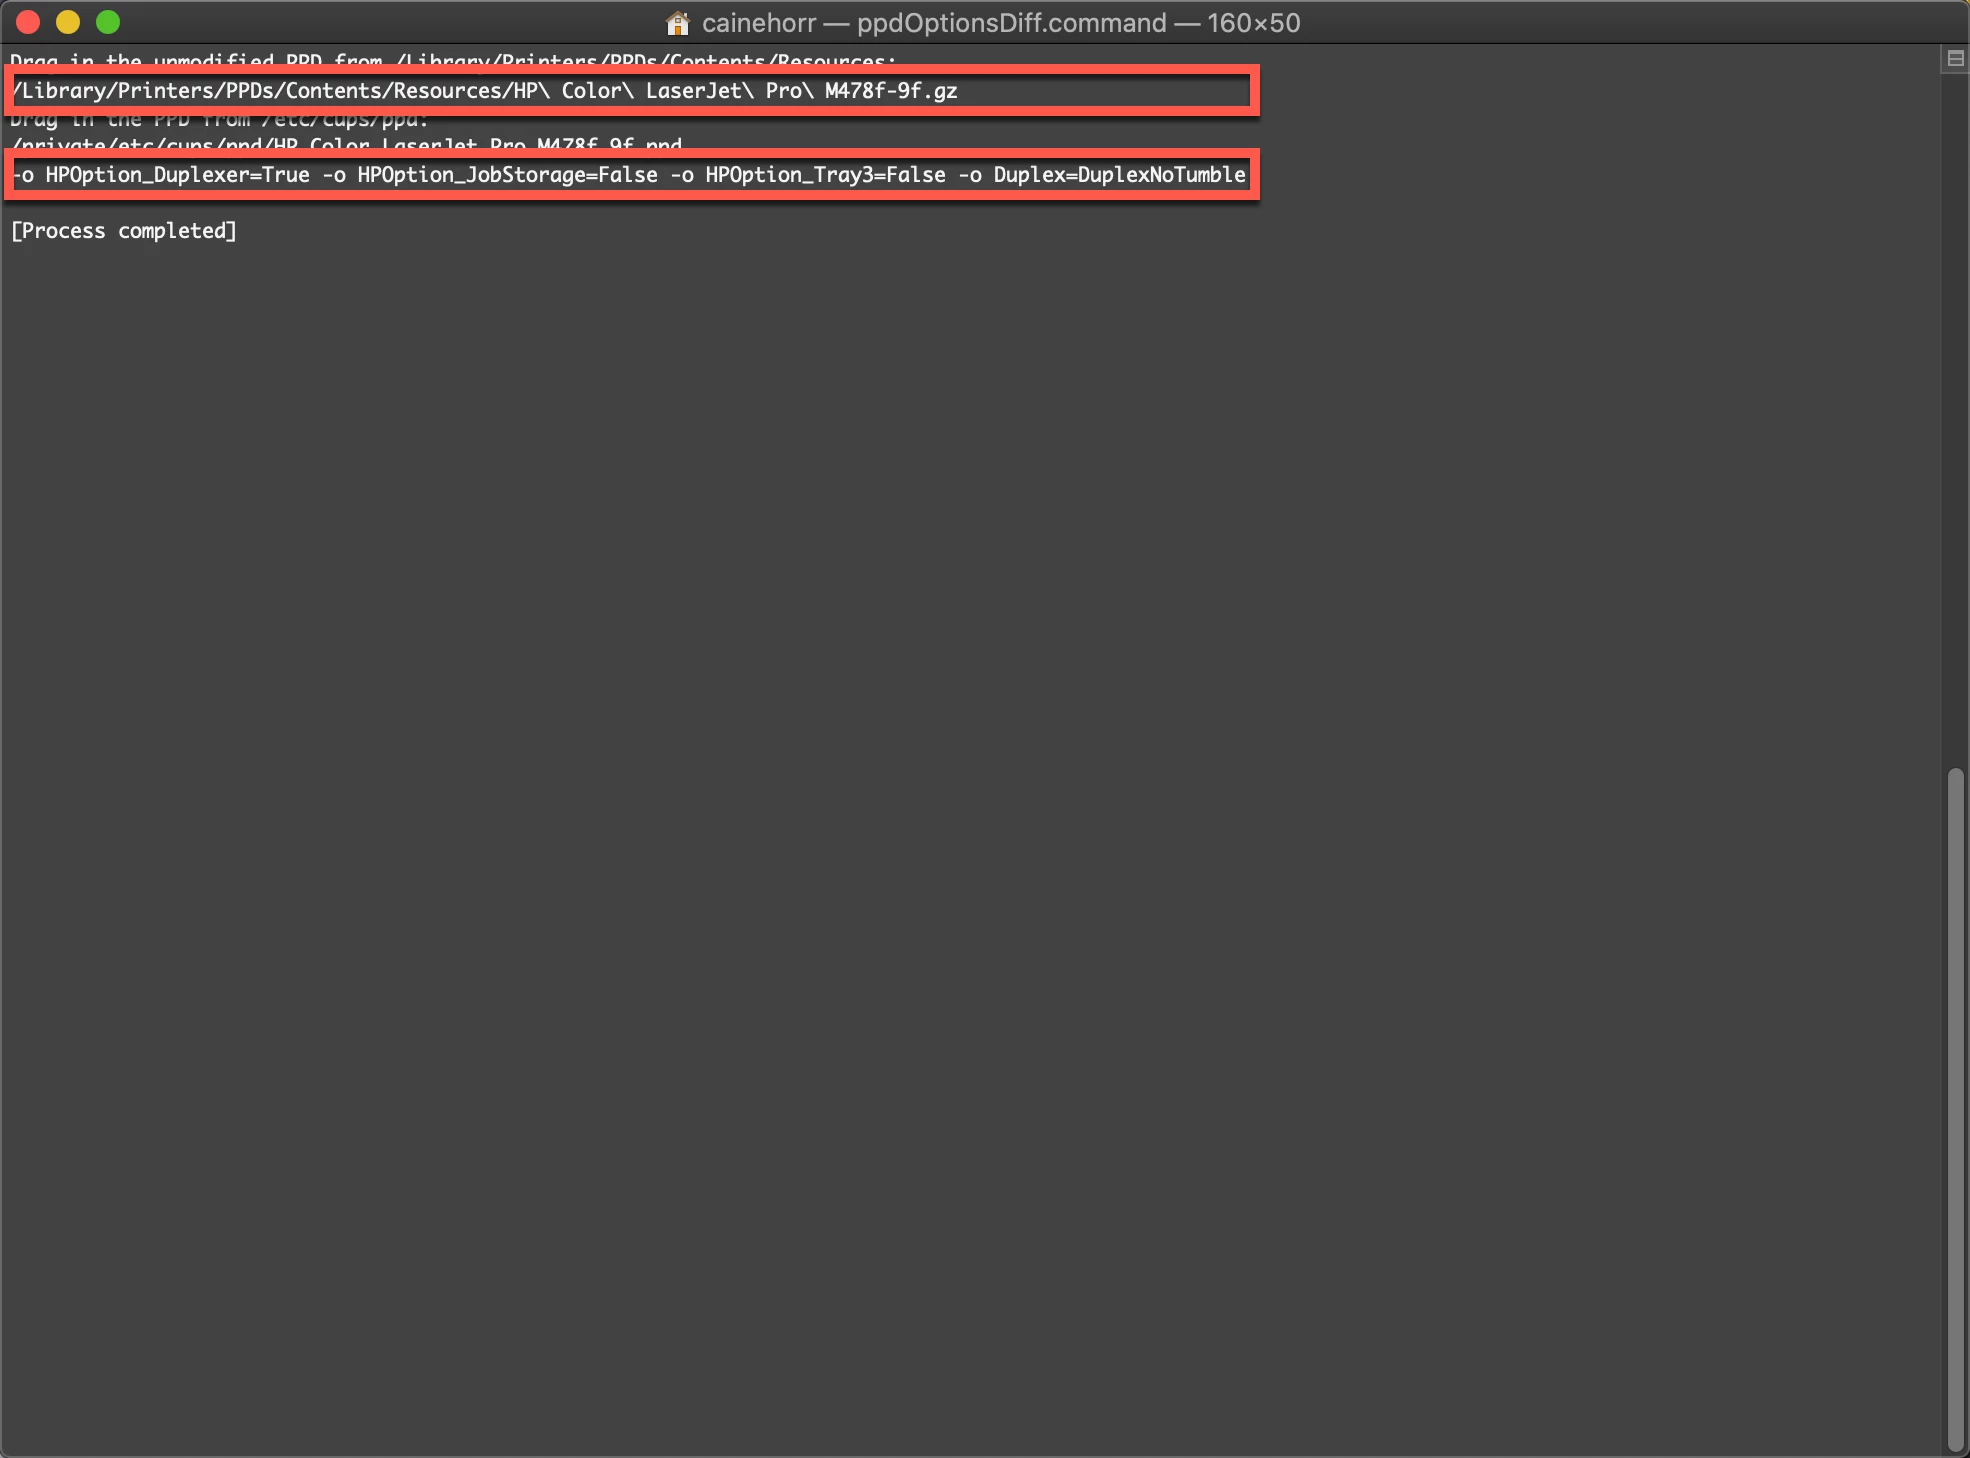
06 - Don't close the Terminal window - We're going to need this output for "PART 3"
PART 03 - Avast Ye Matey! Thar Be Scripts In Them Thar Waters
Below is a script that does the heavy lifting for the printer installation and configuration. You're going to need to customize a few things to reflect your environment.
01 - Copy line 02 of the ppdOptionsDiff.command output from Terminal and paste it into line 73 of the following script
02 - Copy line 05 of the ppdOptionsDiff.command output from Terminal and paste it into line 74 of the following script
03 - Change all other areas of the script to reflect your particular environment
#!/bin/sh

#
# Printer Installation Script
#

#
# Office Location: 123 Printers Suck Road, 1st Fl, San Francisco, CA, USA
#

#
# Change Control
#
#   2018-12-31
#       Updated by Caine Hörr
#           Cleaned up comments
#
#   2017-08-09
#       Updated by Caine Hörr and Hubert Tan
#           Added $6 to array to allow for additional -o option flags
#           Enabled CUPS web interface
#
#   2016-09-27
#       New code by Brandon Modesitt (Interlaced) <support@interlacedit.com>
#           Made use of a function and the guts therin
#
#   2014-01-01
#       Original script written by Caine Hörr

# LEGEND
#   1. CUPS Name (-p $1)
#   2. Physical Address Location (-L $2)
#   3. Protocol and FQDN Address (-E -v $3)
#   4. Description as seen by the user (-D $4)
#   5. Path to PPD file (-P $5)
#   6. Additional printer configuration options ($6)

#   For Line 6...
#       Obtain all additional -o options via ppdOptionsDiff.command script
#       http://www.brunerd.com/blog/2012/03/13/getting-and-setting-ppd-options-via-command-line-for-use-with-lpadmin-in-os-x/

# Enable CUPS web interface
cupsctl WebInterface=yes

# Add printer function
addPrinter() {

    # Refer to LEGEND...
    lpadmin -p "$1" -L "$2" -E -v "$3" -D "$4" -P "$5" "$6"

    # Printer installation error checking
    if [ $? -ne 0 ]; then
        echo "ERROR: Failed to add $1. Verify that the correct printer driver has been installed."
    else
        echo "Successfully added $1."
    fi
}

# Printers to be configured
IFS=$'
'

#
# PRINTER MAKE/MODEL: HP Color LaserJet Pro M478f-9f
# IP ADDRESS: 192.168.42.50
# DNS: printer01.domain.name.com
#

# Refer to LEGEND...
printer01="printer01.domain.name.com
123 Printers Suck Road, 1st Fl, San Francisco, CA, USA
lpd://printer01.domain.name.com
SF - 4th Floor - HP Color LaserJet Pro M478f-9f
[ *** Copy line 02 of the ppdOptionsDiff.command output from Terminal and paste it here *** ]
-o printer-is-shared=false [ *** Copy line 05 of the ppdOptionsDiff.command output from Terminal and paste it here *** ]"

# Call to add printer function
addPrinter $printer01

exit
NOTE: You can add additional printers to this script by adding additional calls to $printerXX. This is handy for deploying large batches of printers in a single go.
04 - Save the script somewhere safe
05 - Upload the script into Jamf > Settings > Computer Management > Scripts
06 - Name it appropriately. Scripts are like people - they like good names
07 - In the Script > Options tab, set the script to run "After"
08 - Save it. Because saving is caring.
SECTION 03 - Getting Jamfy With It
Now that your script is uploaded into Jamf you can use it any way you like.
When creating your policies, you need to define two things...
01 - Install the appropriate printer drivers first (you did upload the printer driver pkg file to Jamf didn't you?)
02 - Run the printer installation script.
Here are a few ideas to get you started. Go wild!
- Create a policy workflow to auto-install printers on newly deployed devices during the enrollment process
- Create a policy workflow to auto-install printers based on the subnet a user has connected to
- Create a policy workflow to auto-install printers based on the building a user has connected to
- Create a Self Service policy workflow that allows users to cherry-pick the printers they want the most
SECTION 04 - Hack That Script!
Some ideas... These are totally optional and you're on your own - extra credit style without the recognition...
- One script to rule them all. Define the 6 key areas of the script as $4 through $9 so you can set the values in your policies.
- Write a script sub-routine that checks to see if the required printer driver is installed. If not, call to a custom trigger, install, then continue with the printer configuration.
SECTION 05 - Bonus Content
I configure the following scripts within Self Service so both my users and IT Support can run with scissors!
Your CUPS runneth over... And you might just need access to the CUPS web interface every now and again. What was that terminal command anyway? Oh nevermind... Here's a Self Service Script to help you forget even more command line nonsense...
Printer_Launch_CUPS_Web_Interface.sh
#!/bin/sh

# Printer_Launch_CUPS_Web_Interface.sh

# Get currently logged in user details...
echo "Identifying currently logged in user..."
currentUser=$(/usr/bin/stat -f "%Su" "/dev/console")
echo "Currently logged in user: $currentUser"

# Set default browser to Google Chrome
echo "Setting Google Chrome as default web browser..."
sudo -u $currentUser open -a "Google Chrome" --args --make-default-browser

# Enable CUPS web interface
echo "Enabling CUPS Web Interface..."
sudo -u $currentUser cupsctl WebInterface=yes

# Open CUPS Web Interface
echo "Launching CUPS Web Interface in default web broswer..."
sudo -u $currentUser open http://127.0.0.1:631/printers

exit
Need to quickly purge all the printers on a device and start over? Here's a script for that too! Toss this into Self Service and let the fun begin. Don't say I didn't warn you... I mean, the warning is kinda in the script name after all!
Printer_Remove_All.sh
#!/bin/sh

# Printer_Remove_All.sh

lpstat -p | awk '{print $2}' | while read printer; do
    echo "Deleting Printer:" $printer
    lpadmin -x $printer
done
MULTI-SHELL SCRIPTING PRO TIP: You might have noticed that I use #!/bin/sh within my scripts these days. This is to provide some semblance of compatibility between bash and zsh.
Anyhoo - That's all for now. Ask em if ya got em!
Cheers!

