Jamf announced in January that the Jamf Pro Classic API will no longer support basic authentication in a future release. Classic API scripts can still run—administrators just need to make a simple change in how they authenticate.
Let’s look at why this change is coming and how to convert Classic API scripts to use bearer tokens for authentication instead of usernames and passwords. The token obtained during this workflow will allow authentication to either the Classic API or the more modern Jamf Pro API. We’ll cover:
- How bearer tokens improve security
- Request the first token
- Parse the token
- Use the token to send an API command
- Expire the token
- Renew the token
How bearer tokens improve security
This change to move away from supplying usernames and passwords as credentials for authenticating to Jamf Pro is a good thing.
Bearer tokens improve security by reducing the number of times credentials are sent to the server. Instead of sending them with every request, a token is sent instead, which expires automatically after 30 minutes. And they’re ephemeral—not stored on disk like credentials in a database, but rather kept only in memory.
They also mean nothing to anyone other than the Jamf Pro server that generates them. Unlike usernames and passwords, which might be used to also access other network resources, bearer tokens are just meaningless strings of characters to anyone who might intercept them.
Keep in mind a script still needs to transmit a username and password to first acquire a bearer token, but all following requests are done using a short-lived token instead.
Request the first token
Consider using a scripting application like CodeRunner to see how the following snippets work.
If your Classic API script hasn’t yet been updated to use bearer tokens, it’s using “basic” authentication. The username and password it’s sending is still secure during transit to the server because its SSL certificate is providing encryption along the way.
Here’s what the start of the old script may look like. It may assign a username, password, and Jamf Pro server URL to some variables at the beginning to let us specify them once.
#!/bin/zsh

# server and credential information
jamfProURL=https://talkingmoose.jamfcloud.com
username="jamfadmin"
password="P@55w0rd"
We’ll keep this.
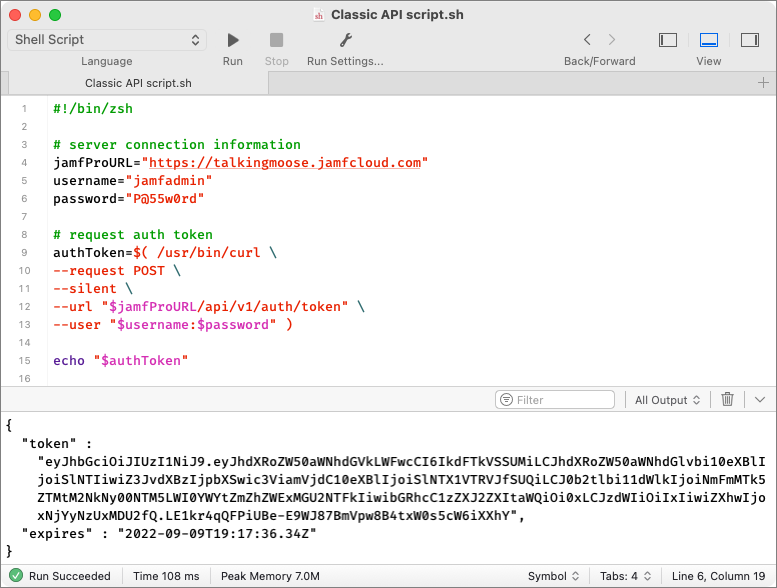
What we need to do next is use our credentials to request a token from the Jamf Pro server. Paste this after the server and credential information above:
# request auth token
authToken=$( /usr/bin/curl \\
--request POST \\
--silent \\
--url "$jamfProURL/api/v1/auth/token" \\
--user "$username:$password" )

echo "$authToken"
When we run this in CodeRunner with an echo at the end to print our results, it displays the token information returned from the server.
Parse the token
Notice the token information we received contains two pieces of information—“token” and “expires”. Only the token is important if we know the script will run very quickly (less than 30 minutes). Doing something like updating device asset tags from a spreadsheet could take longer than 30 minutes, so we’ll want to make sure we renew the token before it expires. We’ll talk about renewing the token a little later.
For now, we need to separate what we’ve received into useable pieces of information. Let’s put the token information into a “token” variable. Let’s put the “expires” information into a “tokenExpiration” variable. And let’s put a converted form of the expiration information into a “localTokenExpirationEpoch” variable. Paste this next:
# parse auth token
token=$( /usr/bin/plutil \\
-extract token raw - <<< "$authToken" )

tokenExpiration=$( /usr/bin/plutil \\
-extract expires raw - <<< "$authToken" )

localTokenExpirationEpoch=$( TZ=GMT /bin/date -j \\
-f "%Y-%m-%dT%T" "$tokenExpiration" \\
+"%s" 2> /dev/null )

echo Token: "$token"
echo Expiration: "$tokenExpiration"
echo Expiration epoch: "$localTokenExpirationEpoch"
The last three lines echo the results of what we parsed.
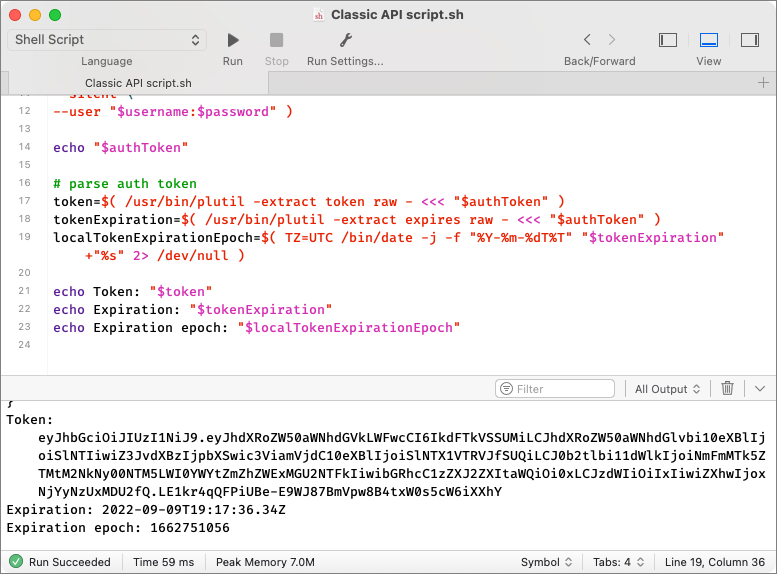
First, we get “Token” by itself.
Second, we get the “Expiration” by itself (2022-09-09T19:17:36.34Z). This is an expiration date for when the token will no longer be valid and it’s always 30 minutes into the future.
Finally, we convert the “Expiration” information into something called an epoch date. A Unix epoch date is literally the number of seconds since January 1, 1970. The “Expiration epoch” date is “1662751056”. When we have a straightforward number like this, we can do math calculations very easily.
Note the “TZ=UTC” item in front of the date command for the localTokenExpirationEpoch variable. This is a time zone environment variable and it’s defining the date as Universal Coordinated Time (+0000). It’s the same as the GMT+0 prime meridian that defines the starting point for time zones in the world.
The server is responding with an expiration date in the UTC time zone, not our local time zone. But the expiration date doesn’t say that. By providing the environment variable, we’re telling the date command the originating time zone and it’ll automatically convert to our local time zone when giving us the epoch date.
We can confirm this in Terminal by running /bin/date -r 1662751056. It converts the epoch date back to a date we can read: Fri Sep 9 14:17:36 CDT 2022. This shows a corrected time that is five hours different from the UTC time the server sent. Without this correction, our calculations could be up to 12 hours off. And it works regardless of whether Daylight Saving Time is in effect.
Use the token to send an API command
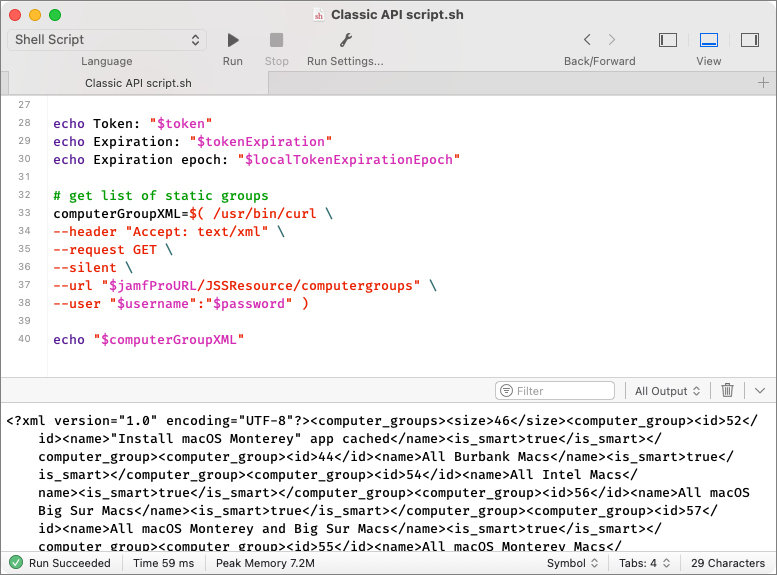
With basic authentication, the username and password are sent each time to the server when we use the curl command to request or change information. Here’s an example of what might come next in an unconverted Classic API script where we want to get a list of computer groups. Go ahead and paste this next:
# get list of static groups
computerGroupXML=$( /usr/bin/curl \\
--header "Accept: text/xml" \\
--request GET \\
--silent \\
--url "$jamfProURL/JSSResource/computergroups" \\
--user "$username":"$password" )

echo "$computerGroupXML"
If we run the entire script so far, we should get a string of XML that denotes several computer groups.
Now, let’s convert the command to use the bearer token instead of basic authentication. It’s simple to do. We’ll replace:
--user "$username":"$password"
with
--header "Authorization: Bearer $token"
and run the script again to test. We should get the same thing.
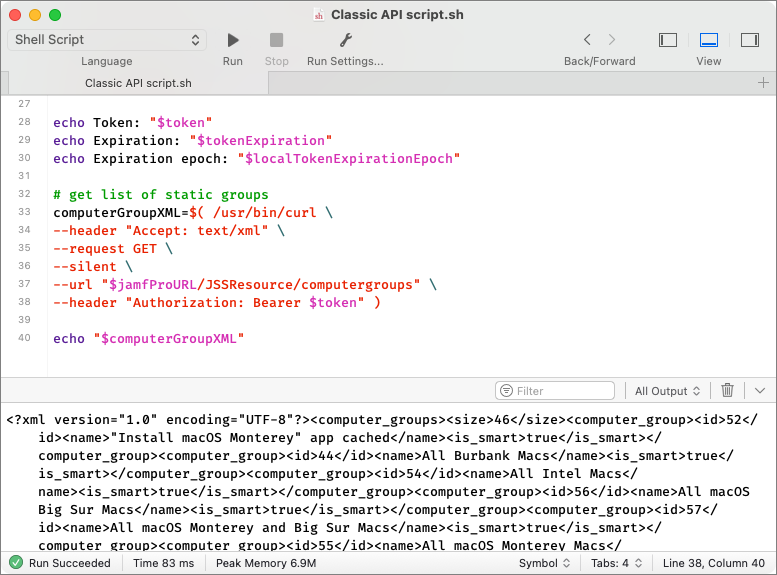
That’s it! That’s the basic change we need to make. We’re keeping our username, password, and server information that we had originally. But we used it instead to ask for a token and then simply replaced our credentials with the token when sending the API command. All we need to do is update all our other scripts to do the same thing.
We’re not done yet, though.
Expire the token
Remember, the token is valid for 30 minutes. If all we’re going to do is make a one-time Classic API call that takes just a few seconds to run and finish, we don’t need the token anymore. A good practice is to expire the token at the end of the script. Paste this near the end of your script where no further API calls will be made:
# expire auth token
/usr/bin/curl \\
--header "Authorization: Bearer $token" \\
--request POST \\
--silent \\
--url "$jamfProURL/api/v1/auth/invalidate-token"
We don’t see anything change when we run the script again. But we also don’t see any errors.
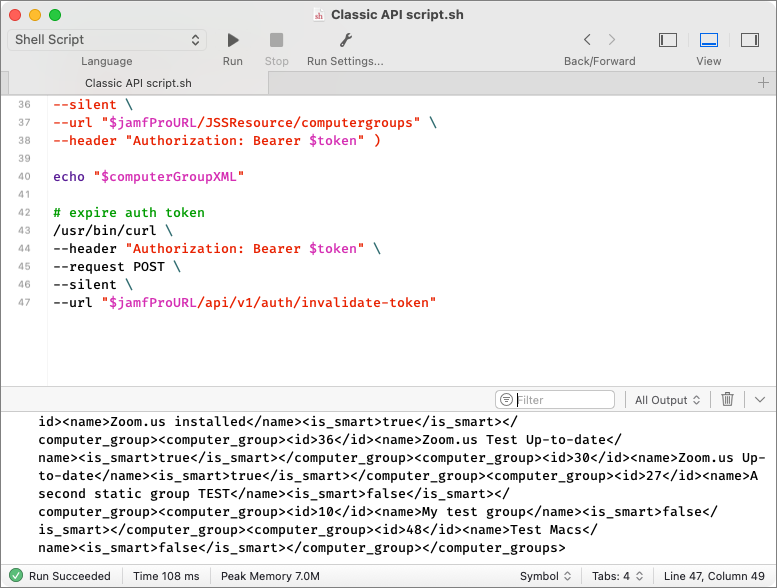
Did it work?
Normally, we can rely on this working, but just to test this one time (or if you’d like to always test), we can add a command to verify whether the token is still valid. Paste this after the command expiring the token:
# verify auth token is valid
checkToken=$( /usr/bin/curl \\
--header "Authorization: Bearer $token" \\
--silent \\
--url "$jamfProURL/api/v1/auth" \\
--write-out "%{http_code}" )

tokenStatus=${checkToken: -3}
echo Token status: "$tokenStatus"
This runs one more API command, which attempts to authenticate with the bearer token. At the end, it includes a --write-out argument. Every command we’ve sent to the server has returned an HTTP status code. Here’s a list of some that we might receive:
200 Request successful
201 Request to create or update object successful
400 Bad request
401 Authentication failed
403 Invalid permissions
404 Object/resource not found
409 Conflict
500 Internal server error
The --write-out argument instructs the curl command to show us the code returned from our API call. When we run the script with the additional code to check our token status, we see the result on the last line.
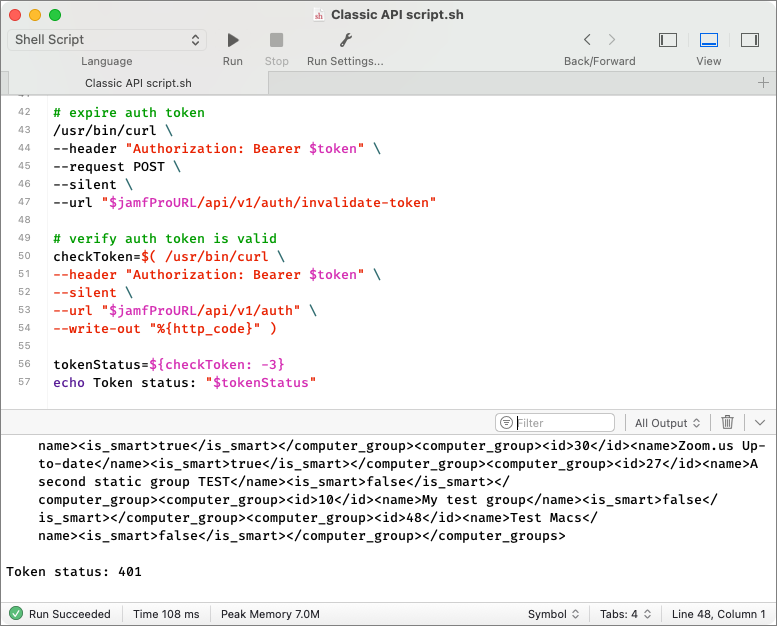
A 401 code lets us know “Authentication failed” or that our bearer token is expired and no longer works.
Renew the token
What if our script is still running after 30 minutes? Won’t the token expire?
Yes, it will, and the script will stop working. This is where getting the expiration date of the token and the converted epoch date is useful. What we need to do is add something that’s tracking the time and will renew the token just before it expires. We can do that with an “if” statement and a function.
First, we need to include in our script everything above that we’ve added: requesting and parsing the token, using it to make a Classic API command, and then expiring it. Now, we’ll add some more code to check for the pending expiration and renew the token.
The reason a script may take longer than 30 minutes to complete is that it’s probably looping through something in Jamf Pro. Let’s assume it’s looping through devices without an asset tag and updating each device with an asset tag from a spreadsheet. That part of the script may look something like this:
while IFS= read aDevice
do
# run Classic API commands here
# to update a device
# and keep looping
done <<< "$listOfDevices"
The commands to update the device aren’t important here—just their location within the while loop.
What we need to do with each iteration of the loop is verify whether the token is close to expiring. Instead of waiting until the last minute, though, we need to renew it with a little time to spare. Let’s choose 5 minutes before it expires. Paste this above the while loop:
# subtract five minutes (300 seconds) from localTokenExpirationEpoch
renewalTime=$(( $localTokenExpirationEpoch - 300 ))
We’ll renew the token around 25 minutes instead of 30. Calculating the renewal time is as simple as subtracting 300 (5 minutes) from the epoch date.
How many times will we need to renew the token? Once? A few times? We don’t know. So, something like this is best handled as a function in our script that we can call any time we need it. Let’s name that function “renewToken” and add it inside the while loop with some additional code. Here’s what we’ll have so far.
# subtract five minutes (300 seconds) from localTokenExpirationEpoch
renewalTime=$(( $localTokenExpirationEpoch - 300 ))

while IFS= read aDevice
do
	now=$( /bin/date +"%s" )

	if [[ "$renewalTime" -lt "$now" ]]; then
	   renewToken
	fi

# run Classic API commands here
# to update a device
# and keep looping
done <<< "$listOfDevices"
As the script loops through our list of devices to update their asset tags, the first thing it’ll do is verify whether the token’s renewal time is less than the time right now. That won’t happen for about 25 minutes, so the loop will carry on updating the device’s asset tag.
After 25 minutes of updating asset tags, the renewal time arrives! That’s when the script calls the “renewToken” function that we’ll add next. A function is like a mini script within the script. With just one word, we can call that mini script any time we’d like.
Here’s the function; paste it anywhere in the script so long as it’s somewhere before the while loop.
renewToken()	{

	# renew auth token
	authToken=$( /usr/bin/curl \\
	--header "Accept: application/json" \\
	--header "Authorization: Bearer $token" \\
	--request POST \\
	--silent \\
	--url "$jamfProURL/api/v1/auth/keep-alive" )

	# parse auth token
	token=$( /usr/bin/plutil \\
	-extract token raw - <<< "$authToken" )

	tokenExpiration=$( /usr/bin/plutil \\
	-extract expires raw - <<< "$authToken" )

	localTokenExpirationEpoch=$( TZ=GMT /bin/date -j \\
	-f "%Y-%m-%dT%T" "$tokenExpiration" \\
	+"%s" 2> /dev/null )

	# update the renewal time for another 25 minutes
	renewalTime=$(( $localTokenExpirationEpoch - 300 ))

}
It looks like a lot of the same code we’ve already been using. And it is for the most part.
The biggest difference is the command at the top for renewing the auth token. It’s using the old token to request a new one! That means the script has still only ever sent the username and password credentials to the server just one time.
The rest of the function parses for the token and new expiration date, generates the expiration epoch date, and updates the renewal time for another 25 minutes.
Although renewing the Classic API token is really for scripts that could take longer than 30 minutes to complete, you can still add the code for it to your shorter existing scripts. It’ll make your scripts longer and more complex; however, sometimes having just one “template” script to maintain can be easier than trying to determine when you need just some or all the code. As you gain experience with the Classic API and scripting, you’ll know when to omit unnecessary code.
Some closing thoughts
Because of how some websites format their content, copying snippets and pasting them into scripts or script editors may not always work. Verify that single and double dashes like the ones in front -f or --header haven’t been automatically converted to other characters like long em dashes. Retype them if you need. Also, quotes should be straight " not curly “”. And wherever you see a backslash at the end of a line in the examples above, that just means the command has been split onto multiple lines to make it easier to write here.
Something like this:
/usr/bin/plutil \\
-extract expires raw - <<< "$authToken"
is the same as:
/usr/bin/plutil -extract expires raw - <<< "$authToken"
You might say, “I’m not a scripter. I just use what I find online.” That’s OK, but what you find may be an outdated script that’s still using basic authentication. In the future, that script won’t work—only because it can’t authenticate correctly with your Jamf Pro server. Updating it to use bearer token authentication isn’t difficult and should be mostly copy/paste from what’s presented here.
If you don’t like showing username and password credentials in your scripts, you can use base64 to obfuscate them. This isn’t encryption. Anyone can still reverse the encoding and see the credentials. But it may give you a little extra piece of mind.
Once you’ve converted all your scripts to use bearer tokens for authentication, do one more thing to improve security. In Jamf Pro, go to the Settings cog > System Settings > Jamf Pro User Accounts & Groups > Password Policy. Disable the option to allow basic authentication for your Classic API scripts.
In the future, Jamf will remove this option altogether. For more information about this change, see the Classic API Authentication Changes page in the Jamf Developer Portal.


