

|
Note: A newer version of this article is available on the Jamf Blog. |
Jamf added support for LAPS in April’s Jamf Pro 10.46.0 release.
What is LAPS?
LAPS is short for Local Administrator Password Solution. It was coined by Microsoft in May 2015 as a solution for automatically rotating passwords of shared IT administrator accounts on end users’ computers. Since then, it’s become a standard industry term used across platforms.
Desktop administrators have added shared IT admin accounts to their end users’ computers for decades for those times when they need to sit in front of a computer or remotely control it and log in. But this practice introduces a few major security problems:
- Typically, these accounts share the same username and password across computers. If the credentials are ever exposed to unauthorized persons, the entire fleet is vulnerable to attack.
- Multiple people know these shared IT admin credentials and they’re easy to reshare to anyone without any means of controlling access.
- Because multiple people know the credentials, end user privacy and sensitive data are at risk without any way to audit who and when someone uses them to access a computer.
- And if a desktop administrator leaves the organization, someone must change the credentials on all the computers and share the updated password with the remaining administrators.
LAPS solves these problems.
While Microsoft may have developed the LAPS workflow, Jamf Pro is using Apple’s technology in its implementation. Jamf Pro’s LAPS supports all recommended macOS versions listed in Jamf Pro’s System Requirements.
Let’s look at how to use LAPS with Jamf Pro. We’ll cover how to:
- Define the admin account in a PreStage enrollment
- Review and enable LAPS settings in Jamf Pro
- Apply LAPS settings to a computer
- Verify LAPS is applied to a computer
- Retrieve the local admin username and password
- Audit LAPS access
- Disable LAPS
Define the admin account in a PreStage enrollment
Automated Device Enrollment must create the local admin account during enrollment.
When Automated Device Enrollment creates the local admin account, it becomes the sole managed Apple admin account. That means LAPS in Jamf Pro can only manage one local admin account.
Jamf Pro administrators define the name of this account in Computers > PreStage Enrollments. Each PreStage enrollment may have its own unique admin username, but computers are still limited to just one managed Apple admin account.
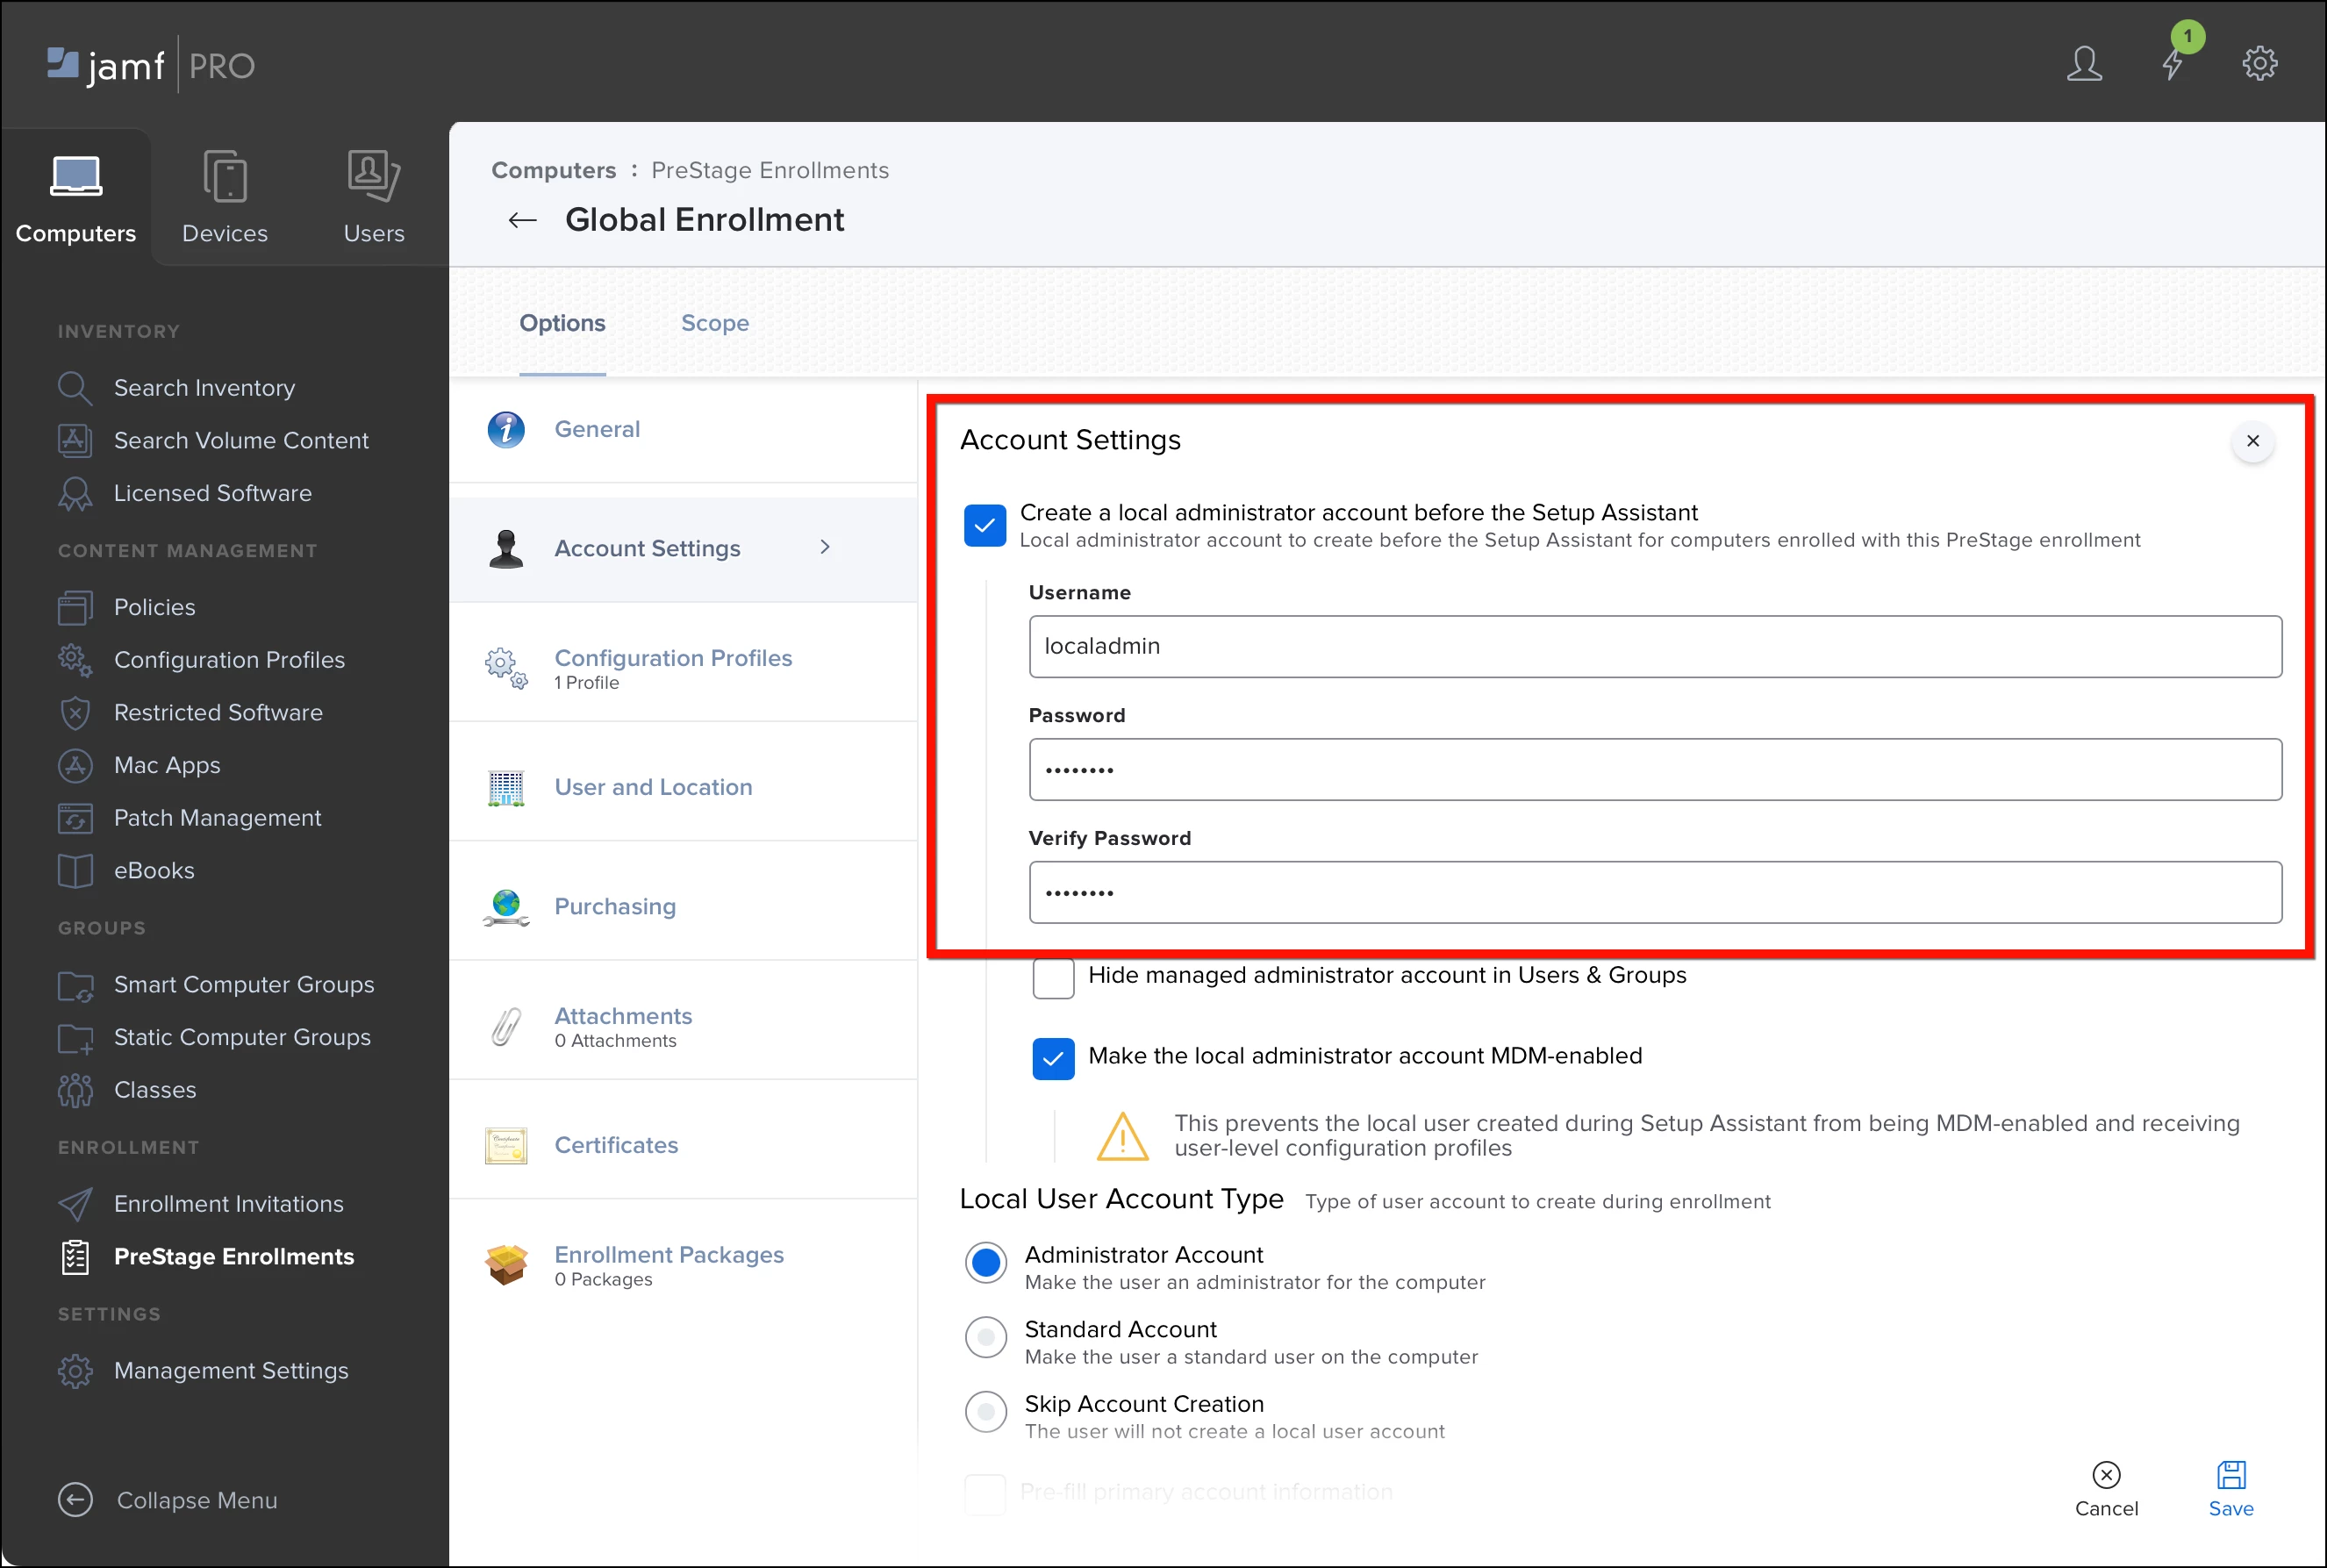
To configure a PreStage enrollment with a managed Apple admin account:
- Create a new PreStage enrollment or edit an existing PreStage enrollment.
- In the Account Settings payload, enable Create a local administrator account before the Setup Assistant.
- Set Username to something like “localadmin” or any single name without spaces.
- Set the Password and Verify Password fields to a known password. (Later, we’ll attempt to authenticate with the known password to verify whether LAPS has rotated it.)
- Choose whether to hide the account and whether to make it MDM-enabled. These settings don’t affect LAPS management.
- Scope and save the PreStage enrollment.
Computers already enrolled using an existing PreStage enrollment are eligible for LAPS management after a Jamf Pro administrator enables the feature.
Review and enable LAPS settings in Jamf Pro
In its initial release, LAPS in Jamf Pro is only available to configure and review via the Jamf Pro API. Jamf will later make LAPS available in the Jamf Pro GUI after refining its feature set. This doesn’t mean administrators need to learn scripting to use LAPS. They can do everything in Jamf Pro’s API pages.
Before setting LAPS, administrators should ensure their Jamf Pro account’s Privilege Set is set to “Administrator”. If the privilege set of their account is set to “Custom”, they should verify they have two new privileges enabled under the Privileges tab > Jamf Pro Server Actions:
- View Local Admin Password
- View Local Admin Password Audit History
Let’s see how LAPS is configured by default:
- Open Jamf Pro server in a web browser and append “/api” to the end of the URL (e.g. https://talkingmoose.jamfcloud.com/api).
- Click the Jamf Pro API’s View button.
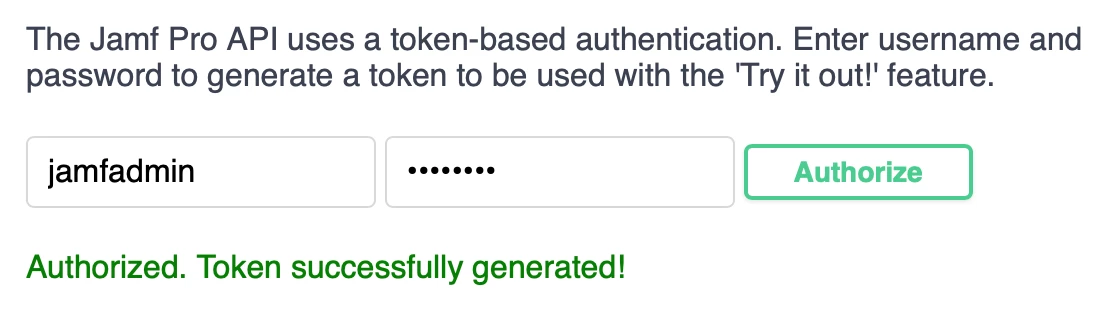
- At the top of the Jamf Pro API page, provide a Jamf Pro username and password (with LAPS privileges) and click Authorize. The account is authorized for 30 minutes before needing to reauthorize.
- Scroll down and click local-admin-password to review its six new endpoints. (Older v1 endpoints may appear, but they’re deprecated and Jamf will remove them later.)
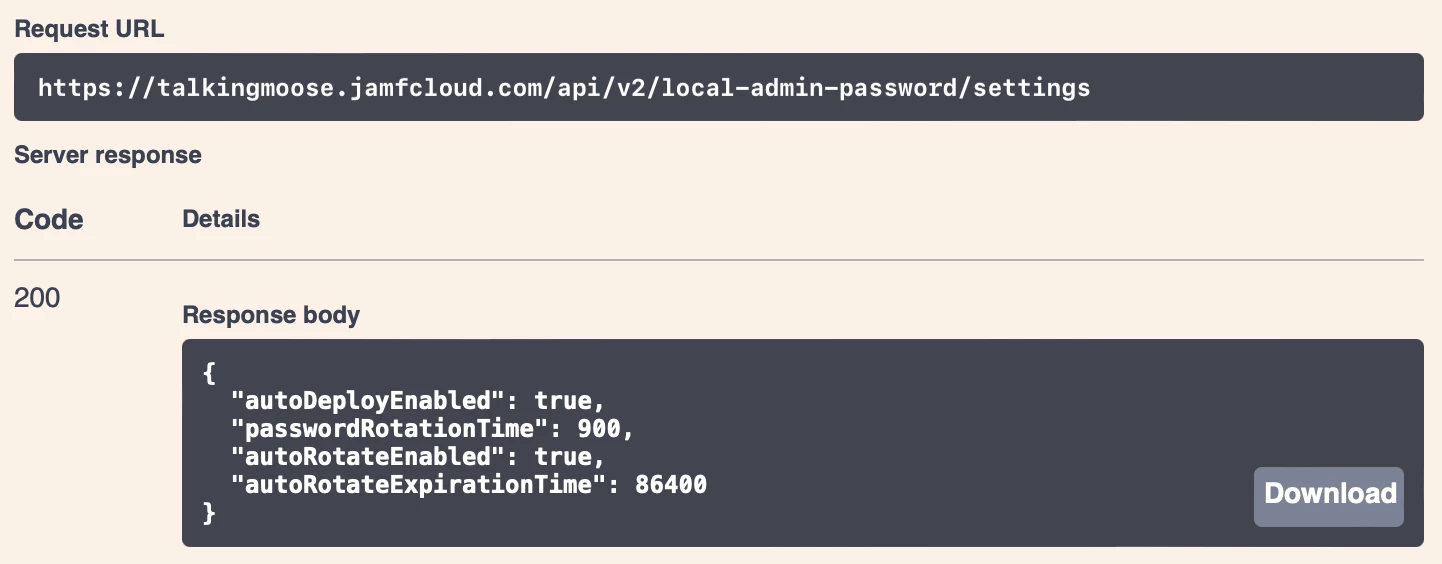
- Click GET /v2/local-admin-password/settings, click Try It Out, and click Execute.
- In the Responses section just below, locate the response body. It’ll display Jamf Pro’s current LAPS settings.
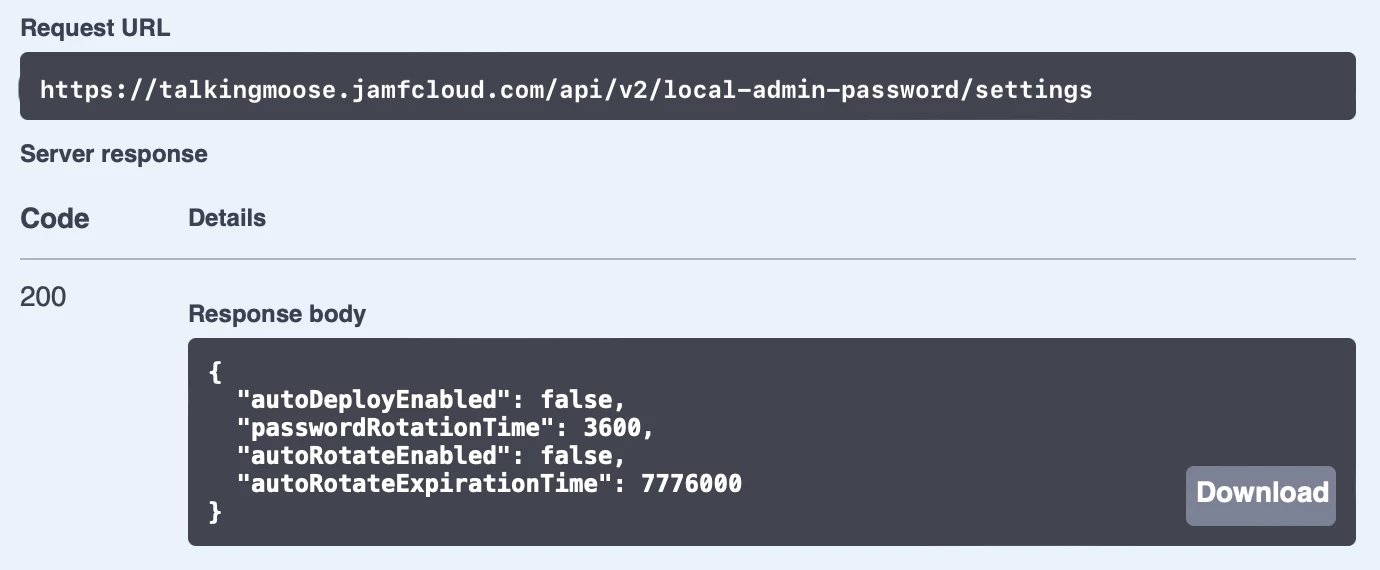
By default, LAPS is turned off (autoDeploymentEnabled is set to “false)”. When LAPS is enabled, It’ll rotate passwords on computers once every three months (autoRotationExpirationTime is set to “7776000” seconds). And it’ll rotate a computer’s managed Apple admin account password automatically one hour after it’s been viewed (passwordRotationTime is set to “3600” seconds).
Let’s turn on LAPS:
- Scroll down and click the next endpoint PUT /v2/local-admin-password/settings.
- Click Try It Out.
- The LAPS settings to update field displays the current settings. It’s editable.
- To enable LAPS, set both autoDeployEnabled and autoRotateEnabled to “true”. To adjust the frequency of each setting, enter new values in seconds.
- Click Execute.
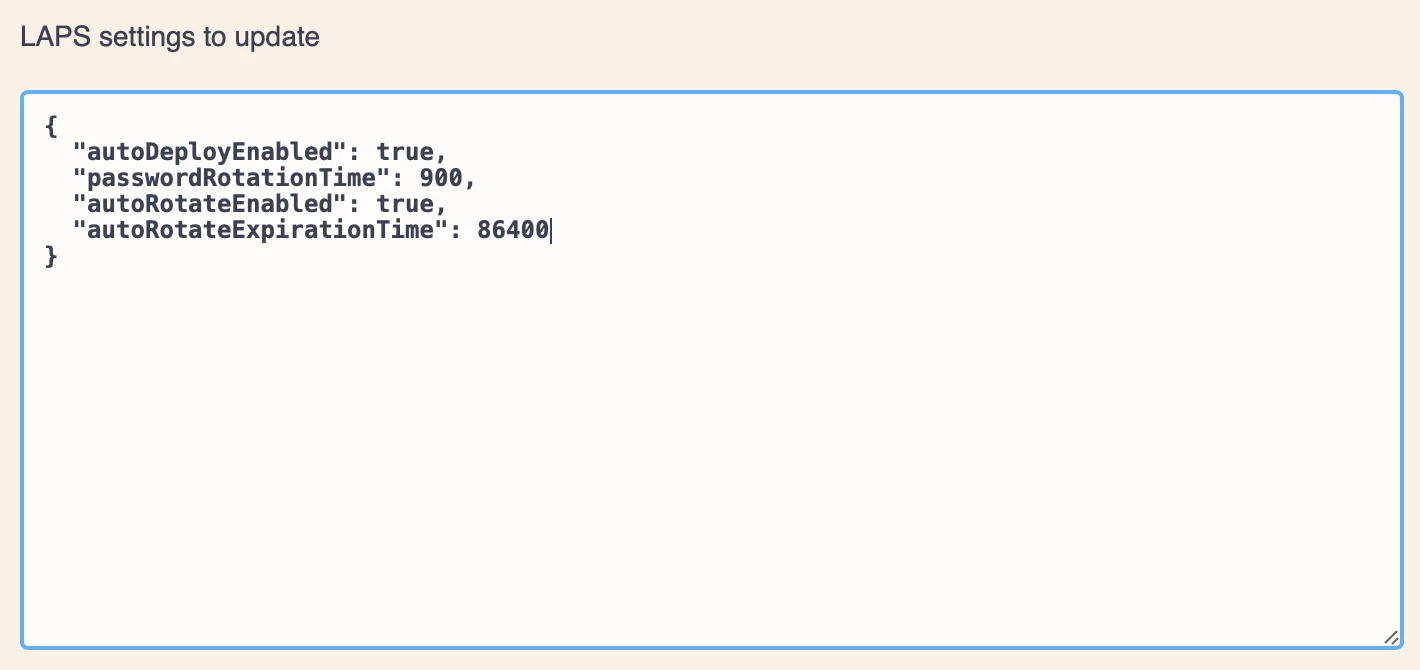
- The response body shows the updated settings. Jamf Pro will rotate a computer’s managed Apple admin account password 15 minutes (900 seconds) after viewing it, and it will automatically rotate all passwords every day (86400 seconds).
Apply LAPS settings to a computer
Before Jamf Pro applies its LAPS settings, computers must submit an inventory report. By default, they submit inventory once per week.
To force an inventory update on a test computer, open its Terminal application and run the following command:
sudo jamf recon
Alternatively, create a new Jamf Pro policy and enable Update Inventory in the Maintenance payload. In the General payload, set Trigger to “Recurring Check-in” and Execution Frequency to “Once per computer”. Scope the policy to a test computer and save. The computer will update its inventory as soon as it checks in with Jamf Pro. (This is also a quick way to apply LAPS to a group of computers or an entire fleet.)
Verify LAPS is applied to a computer
How does an administrator know LAPS is working?
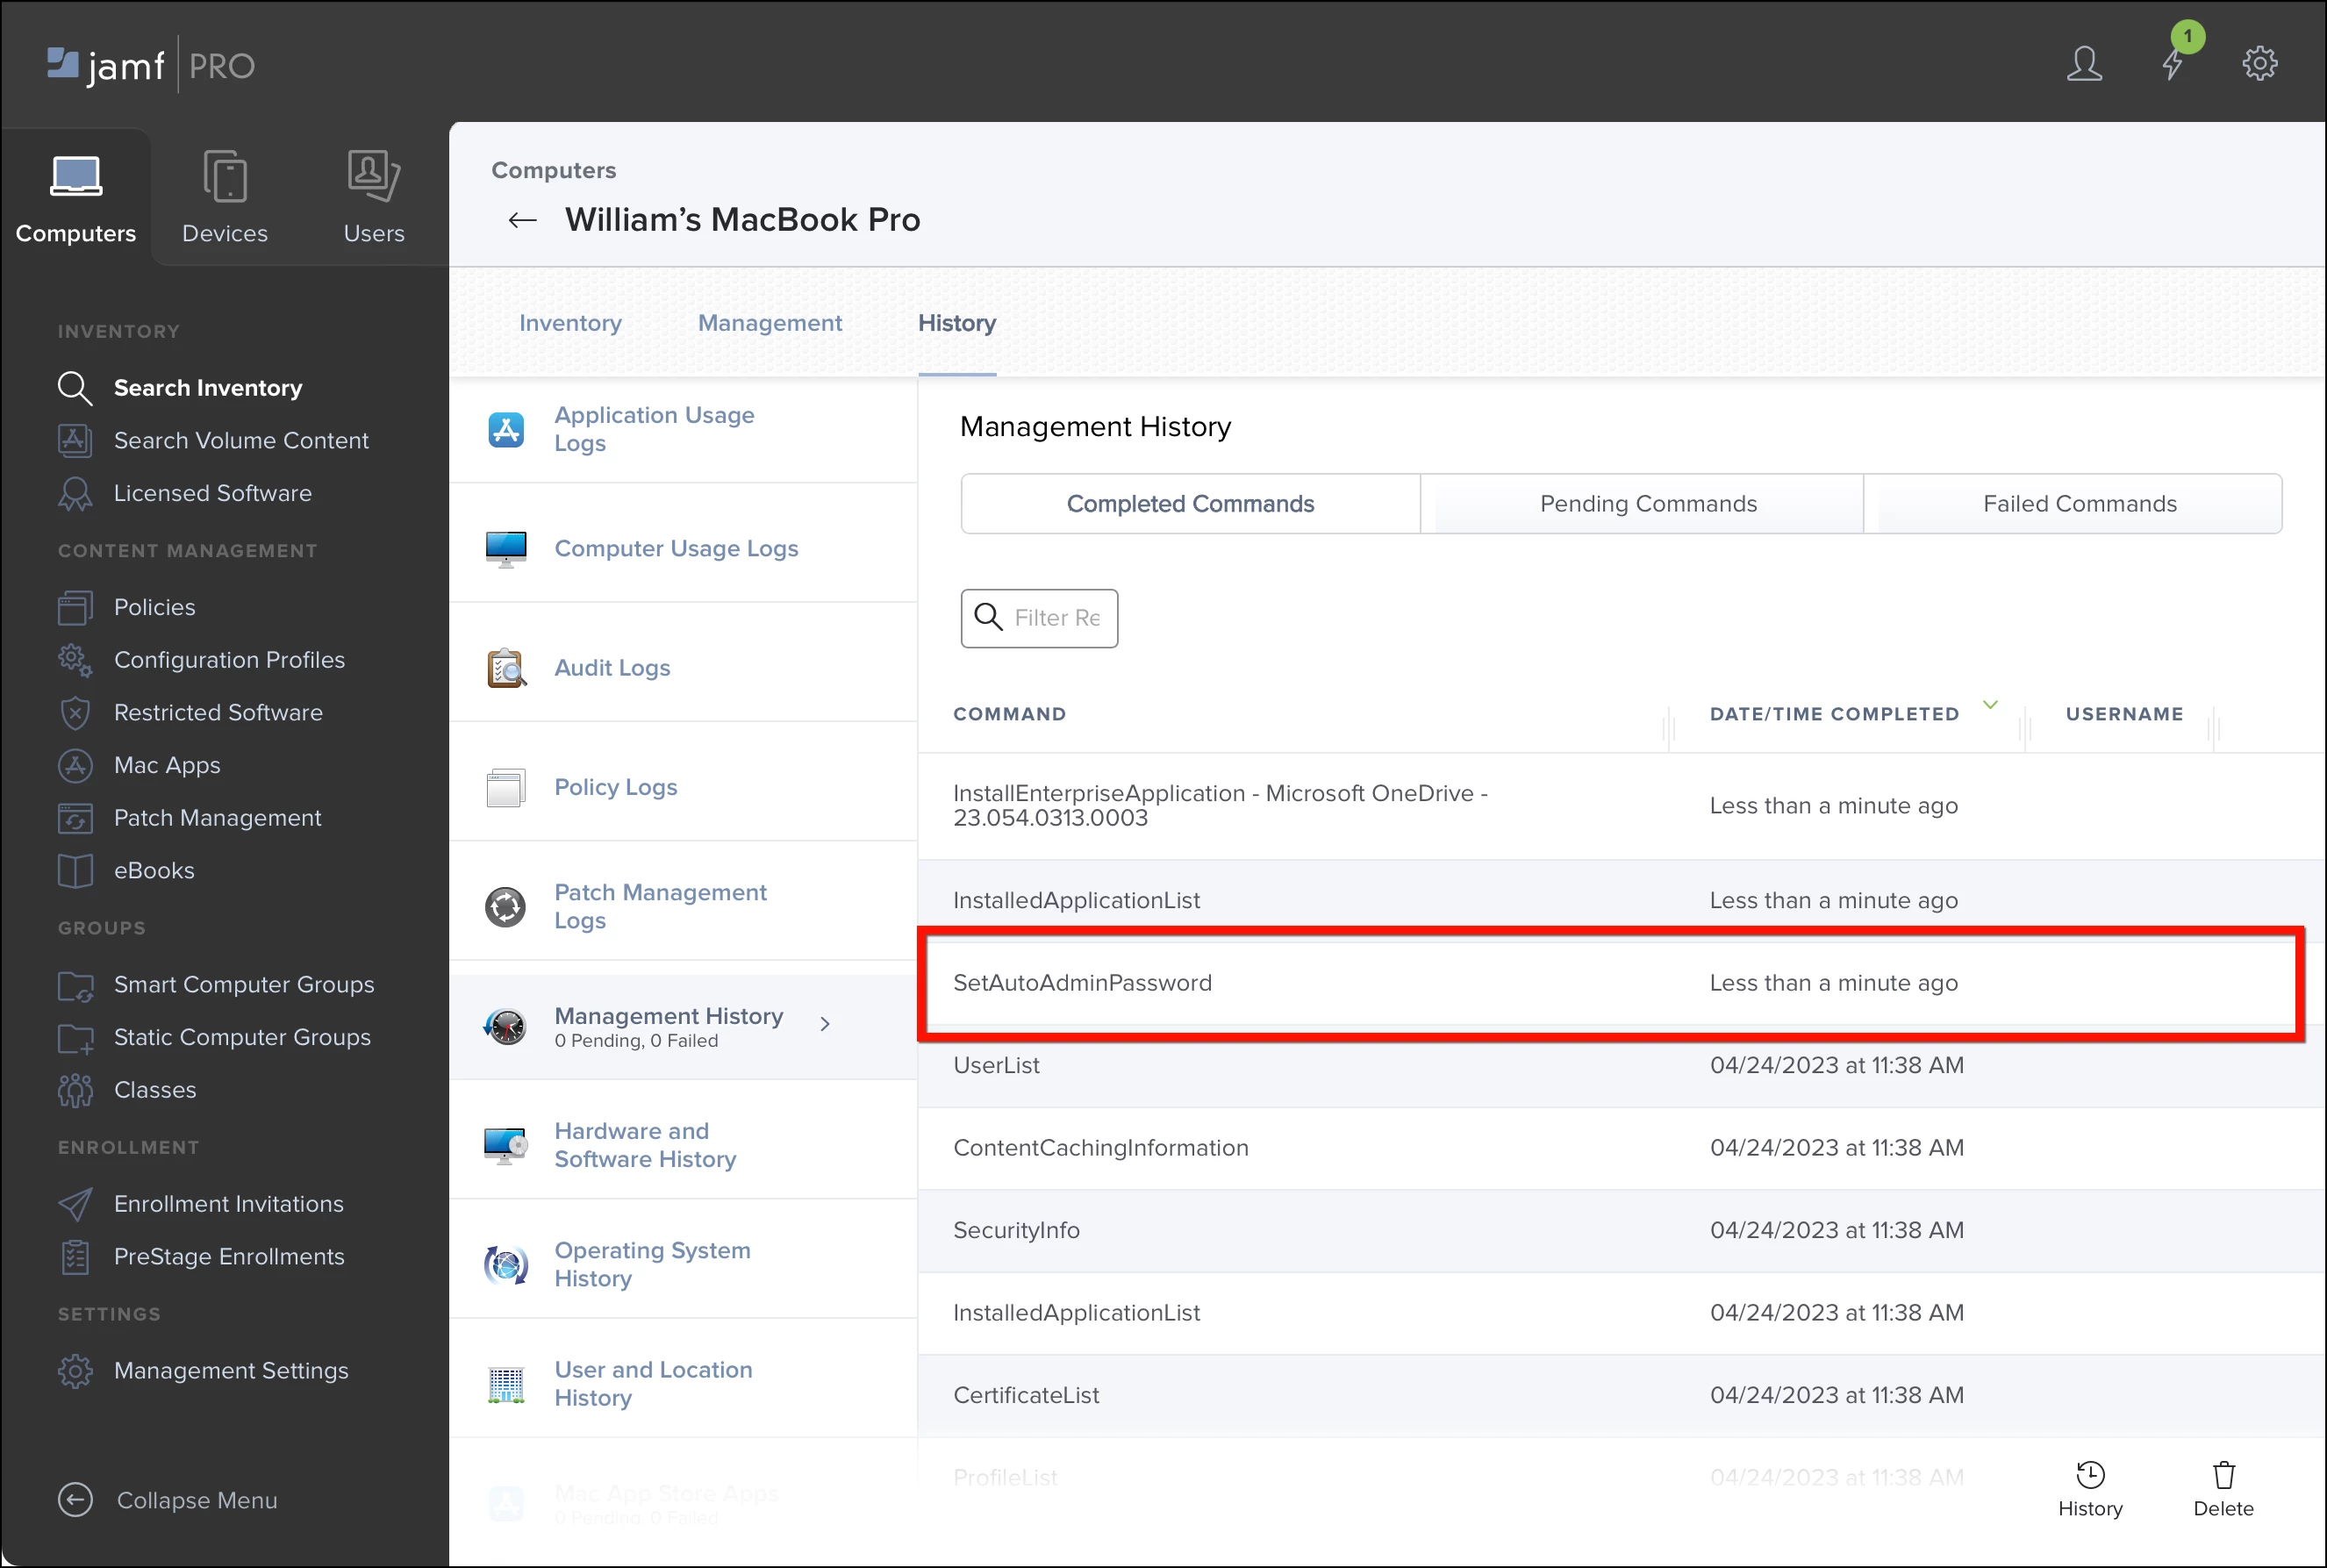
Jamf Pro uses the Apple Push Notification service (APNs) command SetAutoAdminPassword to change the account’s password. Within seconds of submitting an inventory report, Jamf Pro should send the command to the computer and receive a response.
To verify the command, click Computers > Search Inventory. Click the computer name to view its inventory. Then click History > Management History. The SetAutoAdminPassword command should appear under Completed Commands.
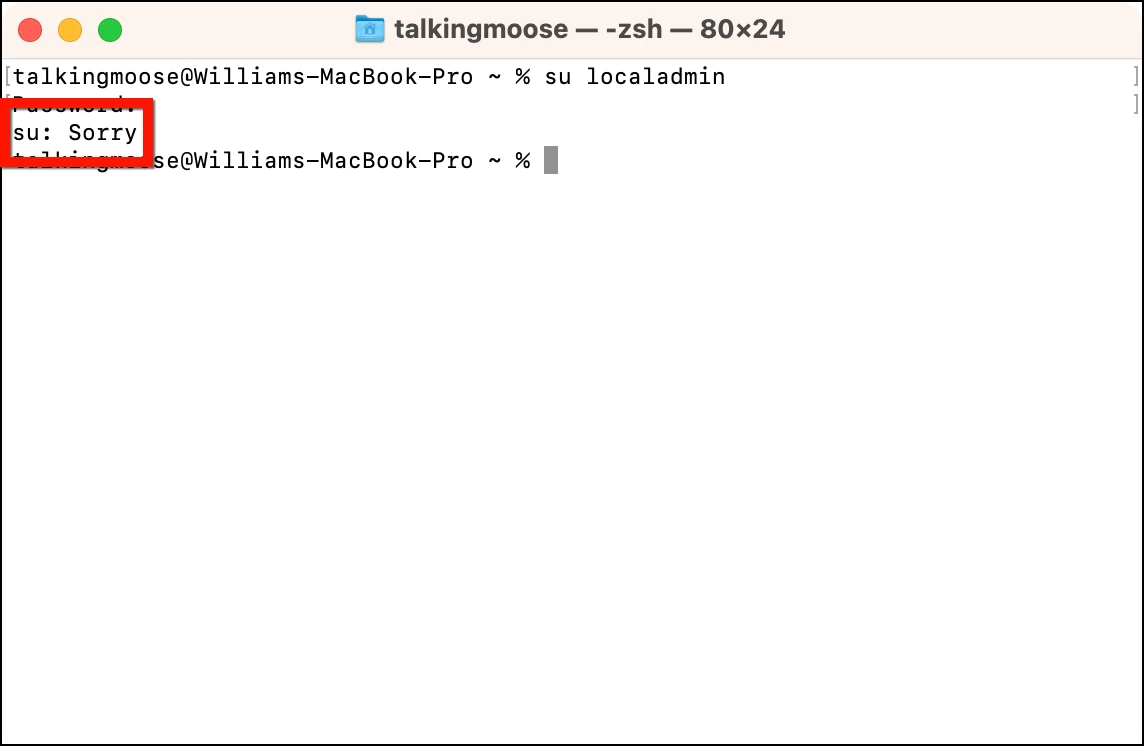
Another way to verify Jamf Pro applied LAPS to a computer is to test authenticating to the local admin account. The easiest way to do this is to use Terminal again to attempt to log in as the account. Run the su (substitute user) command on the computer using the name of the managed Apple admin account:
su localadmin
When prompted, enter its known password. If Terminal responds with “Sorry”, the known password is no longer valid, indicating Jamf Pro has changed it.
Note: The computer itself isn’t aware it’s being managed by LAPS. As far as it knows, it received a command telling it to change the password for the managed Apple admin account.
Retrieve the local admin username and password
Viewing the current LAPS password requires putting a few pieces together.
First, the Jamf Pro administrator must retrieve the computer’s management ID. This is an ID created at the time of enrollment and it’s unique to each computer. It’s only stored in Jamf Pro and only visible using the Jamf Pro API.
- In the computer’s inventory record in Jamf Pro, click Inventory > General and note the Jamf Pro Computer ID. (This is not the management ID, but computer ID helps identify the computer next.)
- Return to the Jamf Pro API by appending “/api” to the end of the Jamf Pro server’s URL and reauthorize if necessary.
- Scroll down and click computer-inventory to view its endpoints.
- Click GET /v1/computers-inventory-detail/{id}, click Try It Out, and enter the Jamf Pro computer ID from inventory.
- Click Execute.
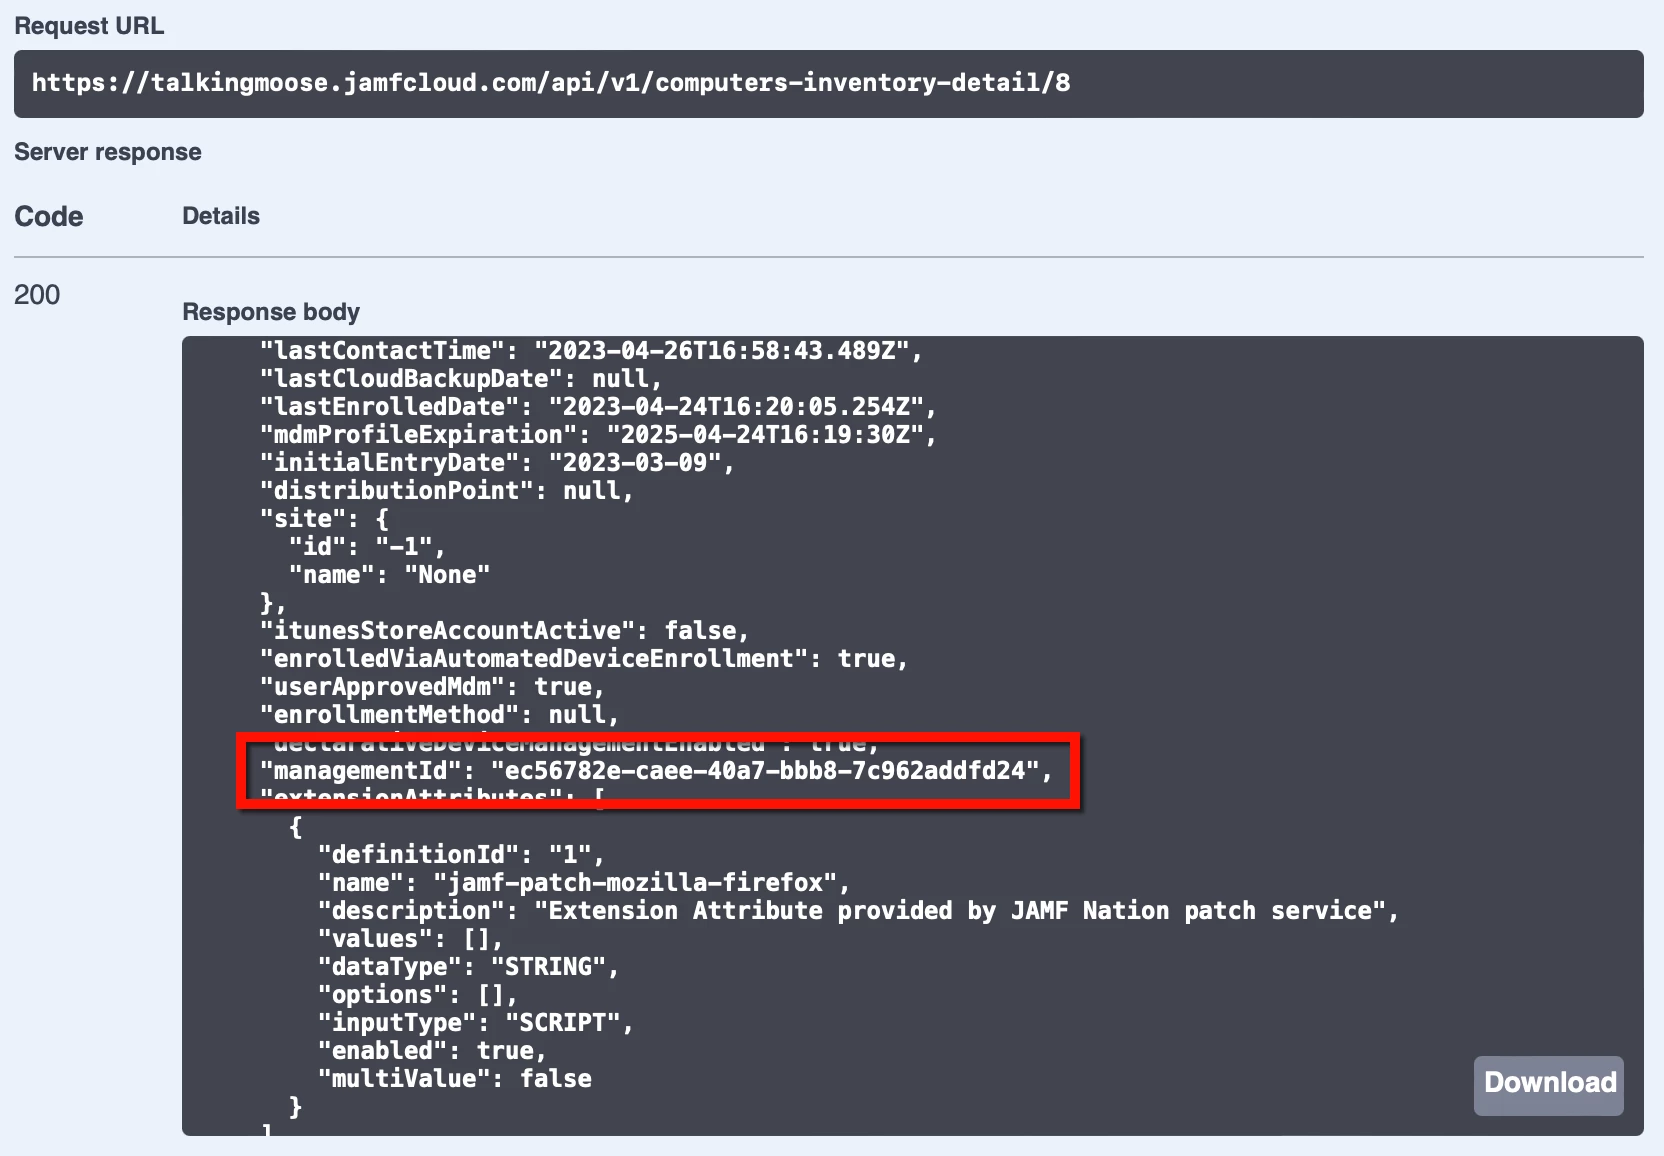
- In the Responses section just below, locate the response body. It’ll display information about the computer.
- Scroll down the response body slightly and locate managementId. Copy its value.
- Scroll down the Jamf Pro API page back to local-admin-password.
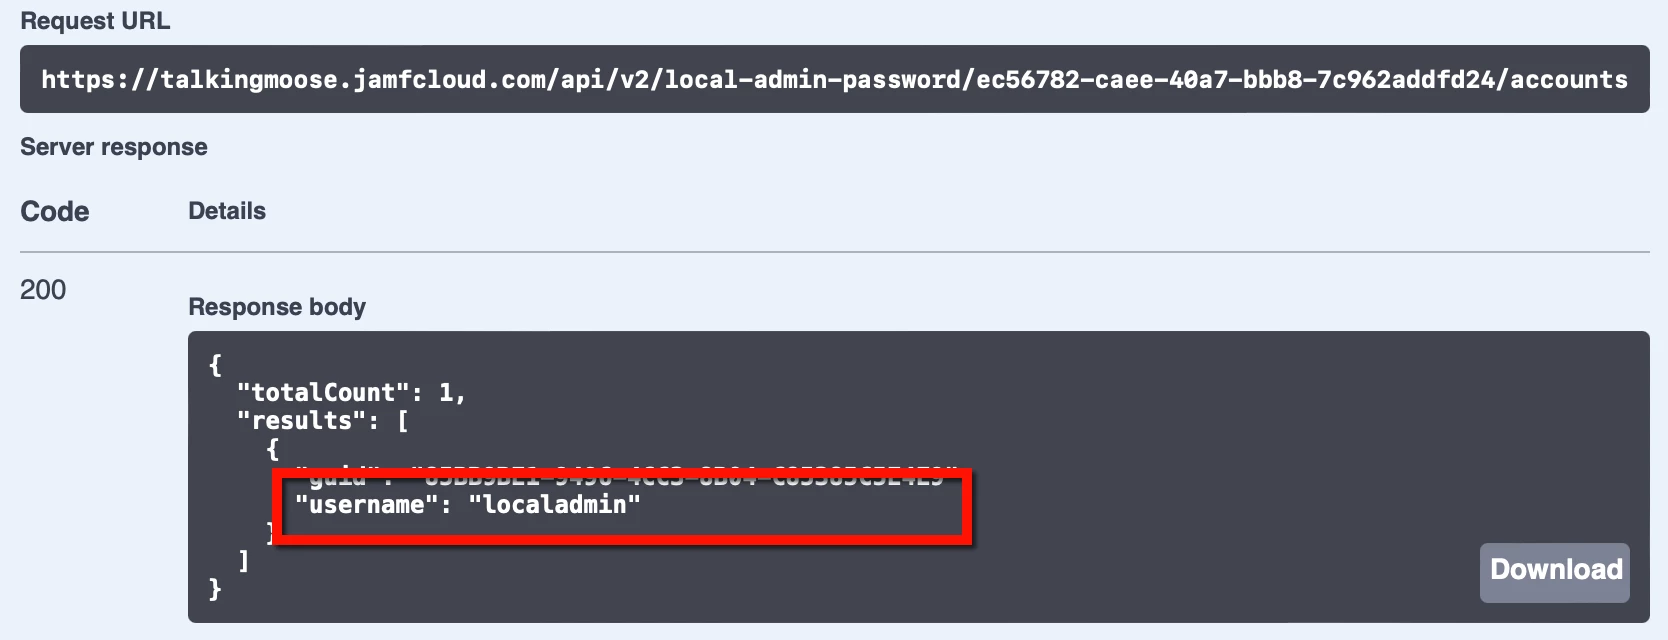
- Click GET /v2/local-admin-password/{clientManagementId}/accounts, click Try It Out, and paste the management ID into the clientManagementId field.
- Click Execute.
- In the Responses section just below, locate the response body. It’ll display the username of the managed Apple admin account. (This is the same admin account username from the PreStage enrollment.)
- To retrieve the LAPS account’s password, scroll up the Jamf Pro API page just slightly.
- Click GET /v2/local-admin-password/{clientManagementId}/account/{username}/password, click Try It Out, and paste the management ID into the clientManagementId field, and enter the local admin account username in the username field.
- Click Execute.
- In the Responses section just below, locate the response body. It’ll display the password of the managed Apple admin account.
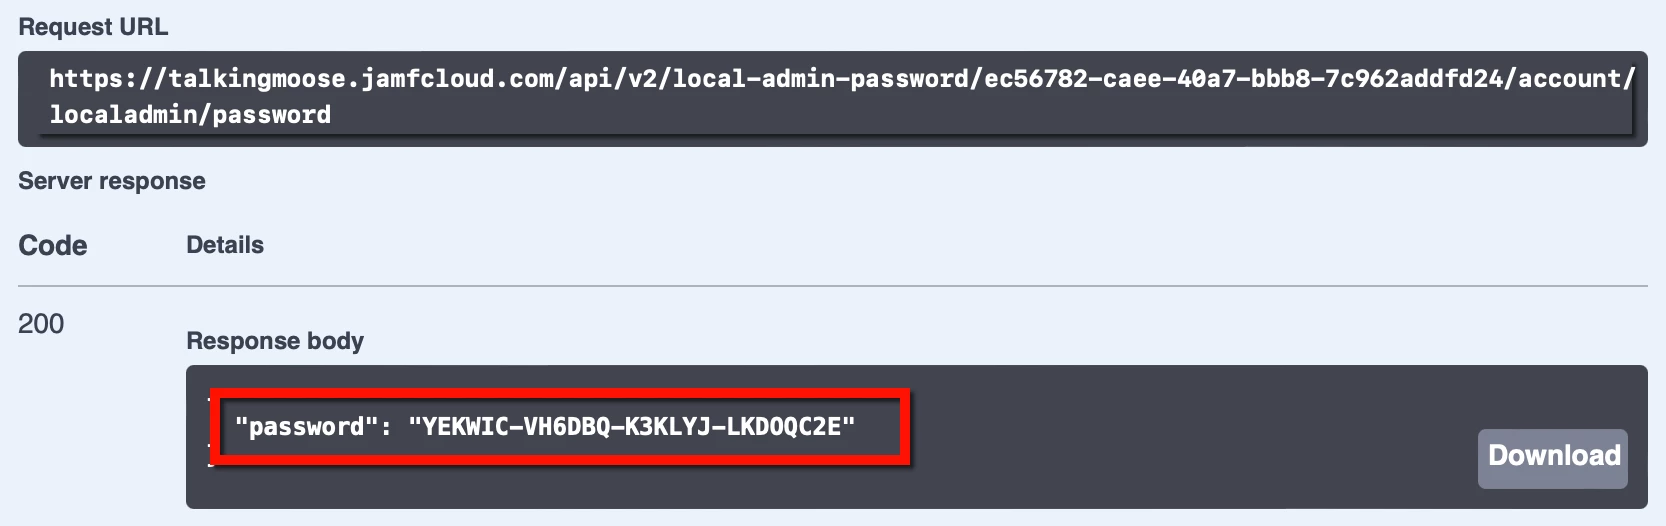
Remember, this password is valid only for the length of time specified for passwordRotationTime when enabling LAPs. Work quickly.
Audit LAPS access
Protecting data end user privacy requires knowing who accessed a password and when. Jamf Pro’s LAPS implementation provides auditing to disclose this information.
For successful auditing, Jamf Pro administrators themselves must never use a shared user account when logging into the server. Instead, one administrator should set a long and complex password that only one person knows and keeps in a secure location. (Consider also enabling Jamf Pro’s Password Policy feature to enable that account for password recovery, just in case.) Then each server administrator should use a uniquely identifiable username with necessary privileges.
To audit who’s accessed a computer’s LAPS-managed password:
- Return to the Jamf Pro API by appending “/api” to the end of the Jamf Pro server’s URL and reauthorize if necessary.
- Scroll down and click computer-inventory to view its endpoints.
- Click GET /v1/computers-inventory-detail/{id}, click Try It Out, and enter the Jamf Pro computer ID from inventory.
- Click Execute.
- In the Responses section just below, locate the response body. It’ll display information about the computer.
- Scroll down the response body slightly and locate managementId. Copy its value.
- To audit who’s accessed a computer’s LAPS password, scroll down and click local-admin-password to view its endpoints.
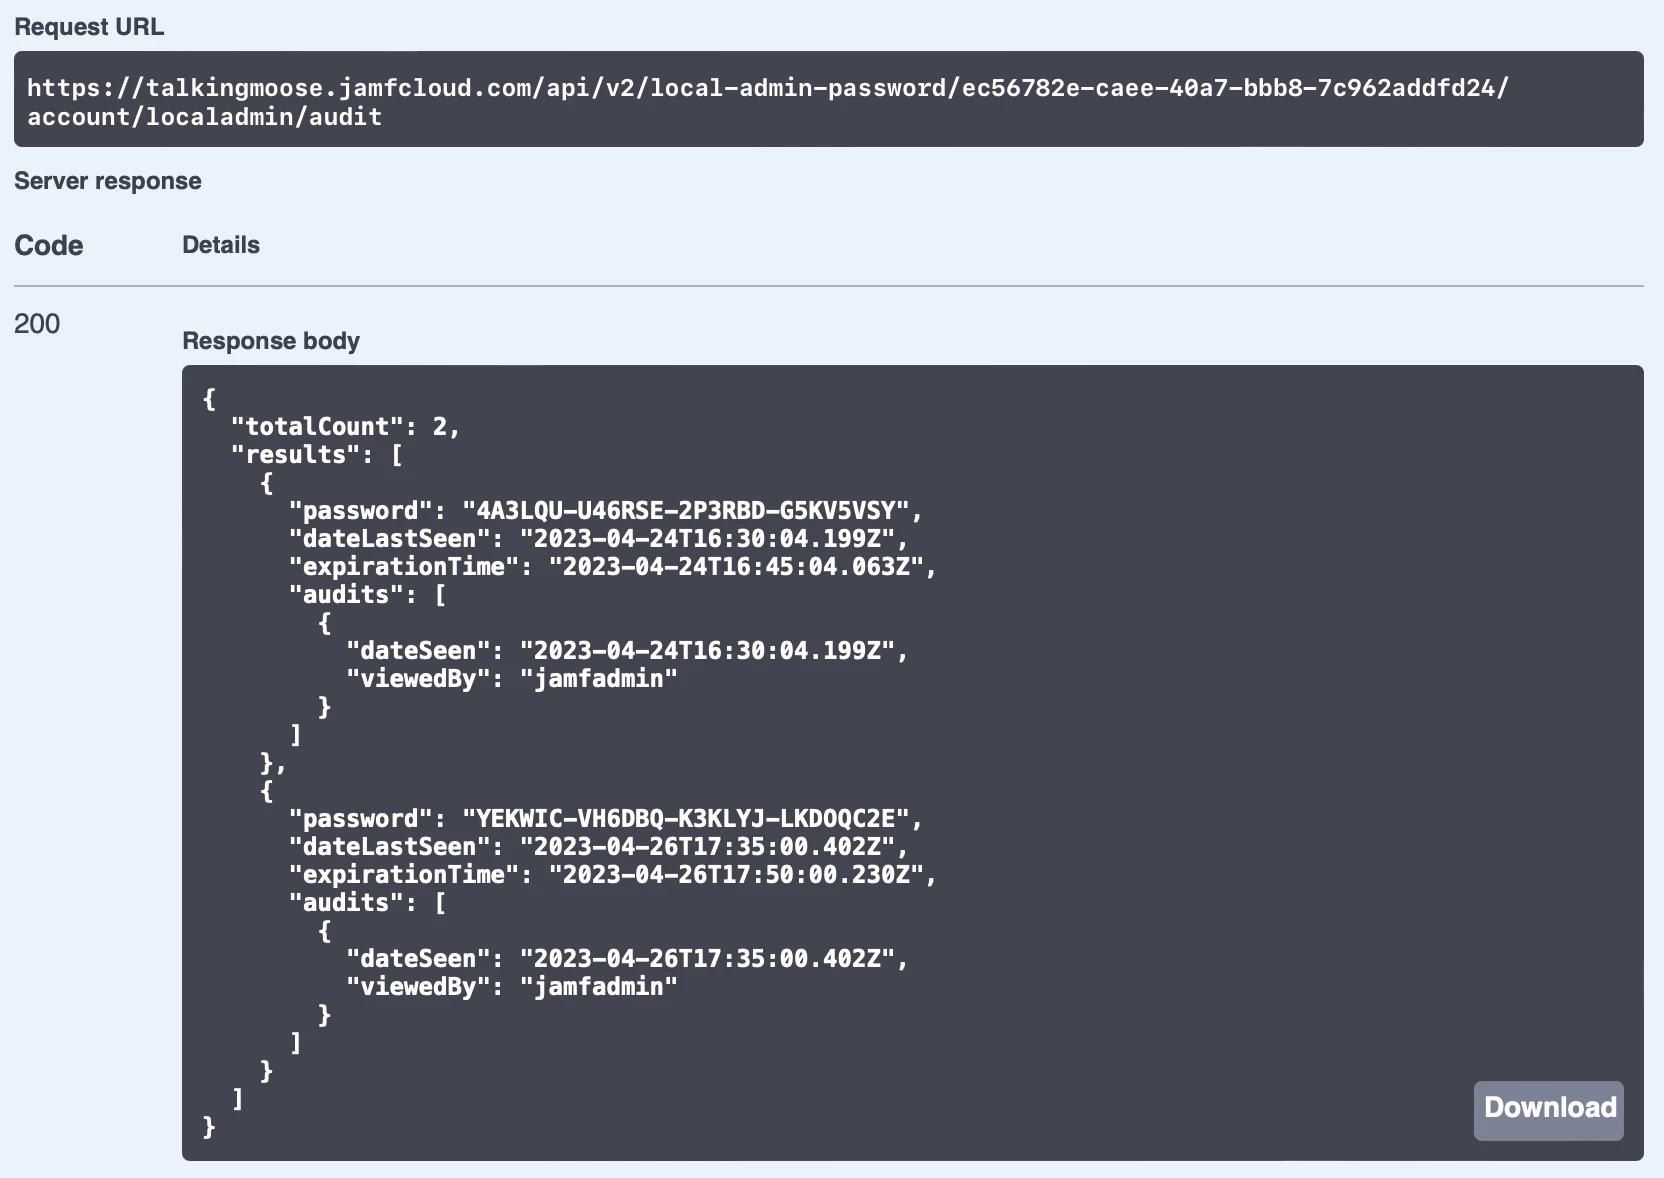
- Click GET /v2/local-admin-password/{clientManagementId}/account/{username}/audit, click Try It Out, paste the management ID into the clientManagementId field, and enter the local admin account username in the username field.
- Click Execute.
- In the Responses section just below, locate the response body. It’ll display the audit history for the LAPS account including the name of the accounts viewing the passwords, the passwords themselves, and when the Jamf Pro administrator viewed them.
Disable LAPS
Jamf Pro’s LAPS feature is global. It affects all computers with a local admin account created during Automated Device Enrollment. Therefore, administrators can’t easily apply LAPS settings to just a subset of computers.
A desktop administrator could disable LAPS for an existing computer by deleting the managed Apple admin account. Recreating the account with the same name won’t reenable it for LAPS because it’ll have a different UUID.
To disable LAPS globally, the Jamf Pro administrator should follow a specific order of operations to keep from losing access to the local admin account:
- Return to the Jamf Pro API by appending “/api” to the end of the Jamf Pro server’s URL and reauthorize if necessary.
- Scroll down and click local-admin-password to view its endpoints.
- Click PUT /v2/local-admin-password/settings, and click Try It Out.
- The LAPS settings to update field displays the current settings.
- Set autoRotateEnabled to false to disable and further password changes.
Keep in mind LAPS can’t restore the original local admin account passwords on computers and each will have a unique password. While Jamf Pro offers a PUT /v2/local-admin-password/{clientManagement}/set-password endpoint, it’s only available to set one computer at a time. The Jamf Pro administrator will need to create a Jamf Pro API script to set every computer password using LAPS. Only after ensuring all passwords are changed to known passwords should the administrator turn off LAPS:
- Return to the Jamf Pro API by appending “/api” to the end of the Jamf Pro server’s URL and reauthorize if necessary.
- Scroll down and click local-admin-password to view its endpoints.
- Click PUT /v2/local-admin-password/settings, and click Try It Out.
- Set autoDeployEnabled to false to disable LAPS.
- Click Execute.
Testing
Now is the time for customers to test LAPS and give Jamf feedback while it’s in its early stages. Any customer can register for the Jamf Pro Customer Feedback Program and gain access to the private beta forums. Betas are a great opportunity to see what’s coming next and test critical workflows before Jamf releases new versions. Customers planning to use LAPS in their environments should participate.
Administrators should carefully consider whether LAPS is a fit for their environment. Ideally, each Jamf Pro administrator’s account is secured using some combination of a strong password policy, Single Sign-On with a randomized failover URL, and limited access to other administrators' account settings. And while products like Jamf Connect and Jamf Pro’s LAPS are compatible with each other, both can offer secure and auditable admin access to a computer. Implement one or the other for the sake of simplicity and ease of auditing.
Jamf Cloud customers should test LAPS in their free-of-charge Jamf Cloud sandbox instances before enabling LAPS on their production server. Customers can create their sandbox instances in their Jamf Account or by contacting their Customer Success Manager.
And it’s worth repeating that LAPS is an API-first feature. That means it’s only available in the API until Jamf has completed the LAPS feature set. Later, it should move to the Jamf Pro GUI for those who aren’t comfortable with the API.


