

Death by PowerPoint started in the living room
Willis H. O’Brien was a famous Hollywood special effects artist known for his pioneering work in stop-motion cinematography. While we may look at his special effects in the movie King Kong from 1933 as outdated compared to the special effects we see in contemporary movies, his work is still relevant.

He gave his audience the illusion that a giant gorilla not only moved but climbed the Empire State Building, then the tallest building in the world. And he did it one frame at a time.
Unlike stop-motion, though, special effects are nowhere near as tedious with today’s tools. Whereas O’Brien spent 150 hours to create one minute of animation on film, today, we have tools like Magic Move that generate animated transitions between slides in just a few seconds.
Transitions and animations important for presentations. Why?
A transition is a change from one slide to another. It signals a change in thought to the audience. But a good transition shouldn’t be noticeable unless you have good reason to make it noticeable. And an animation helps draw the audience’s attention to a detail or area on your slide.
In a technical presentation, animations let us simulate actions in an environment without needing a live environment. Seeing how something works leads to better understanding and retention of your information because movement catches the eye.
Let’s talk about a few simple but very effective things you can do to add movement to your presentation.
Keynote is not a slide projector
Death by PowerPoint didn’t start on a computer. It started in your parents’ or grandparents’ living room. Before big screen TVs and wireless computer connections, there was the slide projector.
My dad loved to take pictures with his SLR camera, and at one point in his hobby he discovered slides. He could command the attention of a roomful of people by bringing out a folding screen, several cartridges of slides, and his slide projector. Because his slides had no audio, he narrated everything we were seeing. And each slide transitioned from one to the next with a clunk of the projector, a momentary absence of light, and then a new picture.
However, there was no music. No movement. No special effects. Did anyone complain? No, because that would’ve been rude. My dad’s captive audience endured hours of the slide projector for his sake.
Give your audience signals
If you’re not careful, your presentation could turn into a boring slide show. A few simple tweaks can give your audience the cues it needs to follow what you’re saying and help you guide them through your story. Transitions are a good place to start.
Do your audience a favor and set your slides to use Dissolve. There’s no way to set Dissolve as the default transition in Keynote, but if you set it on your first slide, you can duplicate slides as you go, which also duplicates the transition. Or select all your slides in the Navigator on the left and choose Dissolve to apply to all of them.
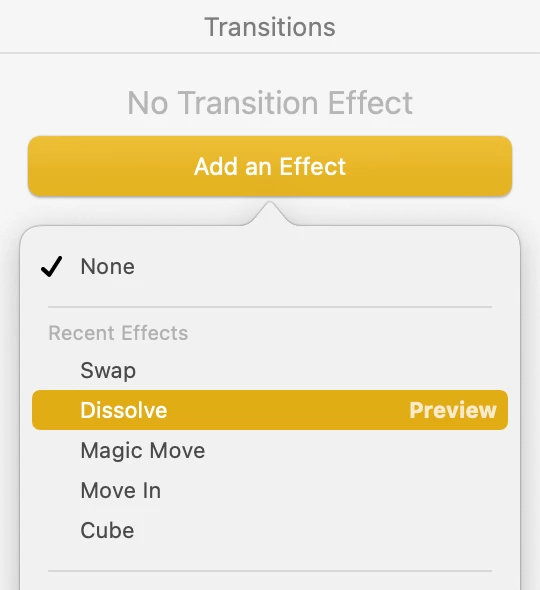
This is a simple way to avoid the jarring sensation of switching between two slides. Here’s an example of a dissolve transition I used in a recent webinar about exploring AI for scripting.

Sometimes, I’ll use a different transition like Move In, Reveal or Cube, because I want the transition to be noticeable. Cube is probably one of my favorites because I’ll use it when I’m changing the subject altogether. It’s big and blocky and makes a noticeable statement on screen.

Attention!
Sometimes, I want to call attention to just a part of a slide.
Here’s an example where the Wipe transition is especially effective. I wanted to give the illusion the audience was seeing something change on the screen. What’s really happening is I’m changing from one slide to the next. The slides are nearly identical, and when I apply the Wipe transition (from left to right), nothing appears to change except the section of text in the middle.

Transitions like Wipe, Move In, Reveal, and Cube also allow me to slow the duration of the transitions to ensure the effect is noticeable.
Sometimes, though, I just want to call out something on the slide without changing the content. The simplest tools are Keynote’s shapes.
Shapes includes lines, arrows, circles, and squares as well as silhouettes of every day objects. You’ll find them under the Shapes tool in the toolbar at the top.
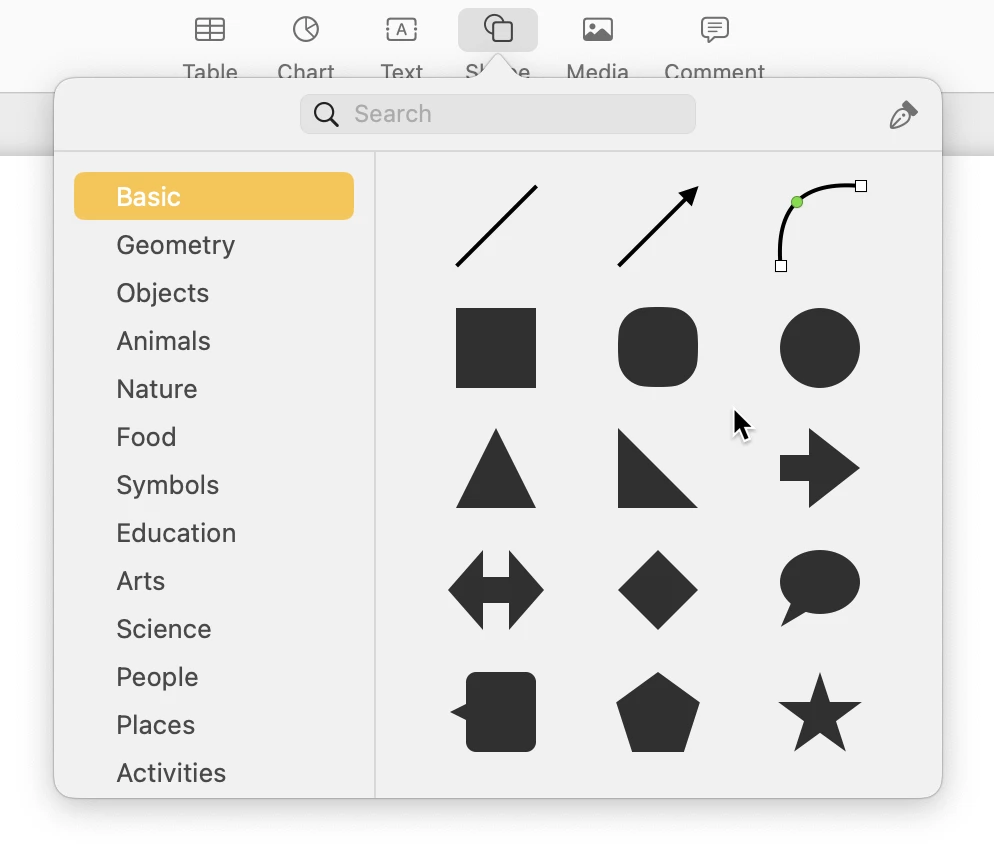
Here’s an example from one of my JNUC 2022 sessions where I used two types of lines — one straight to underline the words “echo” and the other using the pen tool in the upper right corner to draw a circle around specific words.

To animate them, I used the Line Draw effect under the Build In tab. Using Build In makes the shape appear. I could use Build Out to make it disappear too.
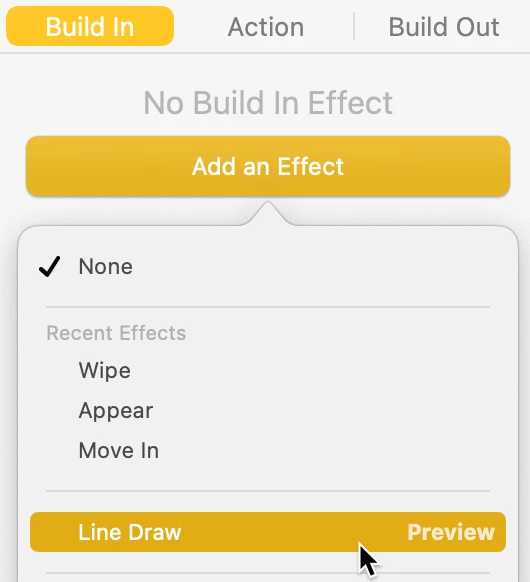
And just like I could use the Dissolve or Wipe effect to transition between two slides, I can apply these effects to an object on a slide. I used both here. I applied the Dissolve effect under the Build In tab to make an app window appear in the middle of the slide. Then used the Line Draw effect under Build In to draw two arrows showing direction from one window to another.

Step-by-step
Some technical presentations include step-by-step instructions to demonstrate how to configure settings or use a feature. Nothing beats video and your Mac is a video-making machine! But how do you coordinate what you want to say with the video as it’s playing on the big screen?
It’s not as difficult as it may appear, but it does require some attention to detail to make it look seamless. Be sure you don’t bite off more than you can chew — or rather — record just one demonstration at a time. And you can do it with the tools you already have on your computer.
Let’s demonstrate to the audience how to change the desktop wallpaper on a computer.
Step 1
If necessary, write down each step you’ll follow in your demonstration. This is especially important when you’re going to be opening or closing windows, switching between multiple tabs, or scrolling through menus.
Step 2
If you have a Retina Display laptop computer, record your demonstration on it instead of an attached monitor. The resolution will improve the quality of your video. Then prepare your screen.
Remove clutter such as files and folders and close unnecessary windows.
Practice running through your steps and update your list of steps as needed. Center windows and close and reopen them to ensure they appear where you’d like. Get an idea for where to place your cursor or how far to scroll.
When you’re ready to record, reset your screen to just before your first step.
Step 3
Press Shift + Command + 5. This invokes the macOS Screenshot app, which lets you record video with some configurable options.

The middle section shows two icons with “recording” circles in the lower left corners. The first icon records the entire screen. The second allows you to record a portion of the screen.
Explore the choices in the Options list. Turn off audio recording.
Selecting one of the recording options changes the Capture button to Record. When you’re ready, press Record.
Step 4
Follow your list of steps for your demonstration. Try to make each step smooth but don’t be too concerned about how much time you take between each step. Your goal is to record this portion of the demonstration from beginning to end.
If you make a mistake, just reset your screen and start over. There’s no need to restart the recording because we’ll use QuickTime to trim the beginning and end of the video.
Step 5
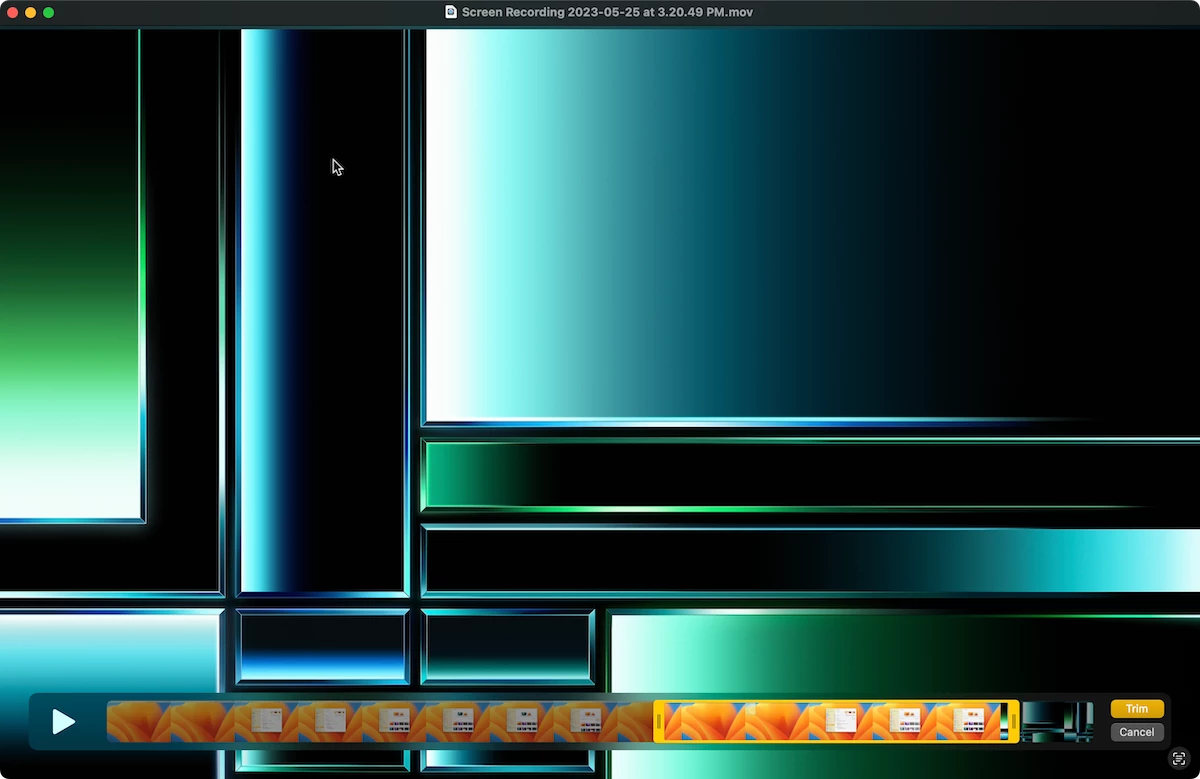
By default, macOS saves the screen recording to your desktop. Open the recording in QuickTime.
Click Edit > Trim to display the yellow trim area at the bottom of the window. Drag the left edge of the trim area to remove any of the recording from the beginning you don’t want to keep. Drag the right edge to remove any of the recording from the end (such as when you move the mouse to the menu bar to stop the recording).
Click the Trim button to the right and save your recording.
Step 6
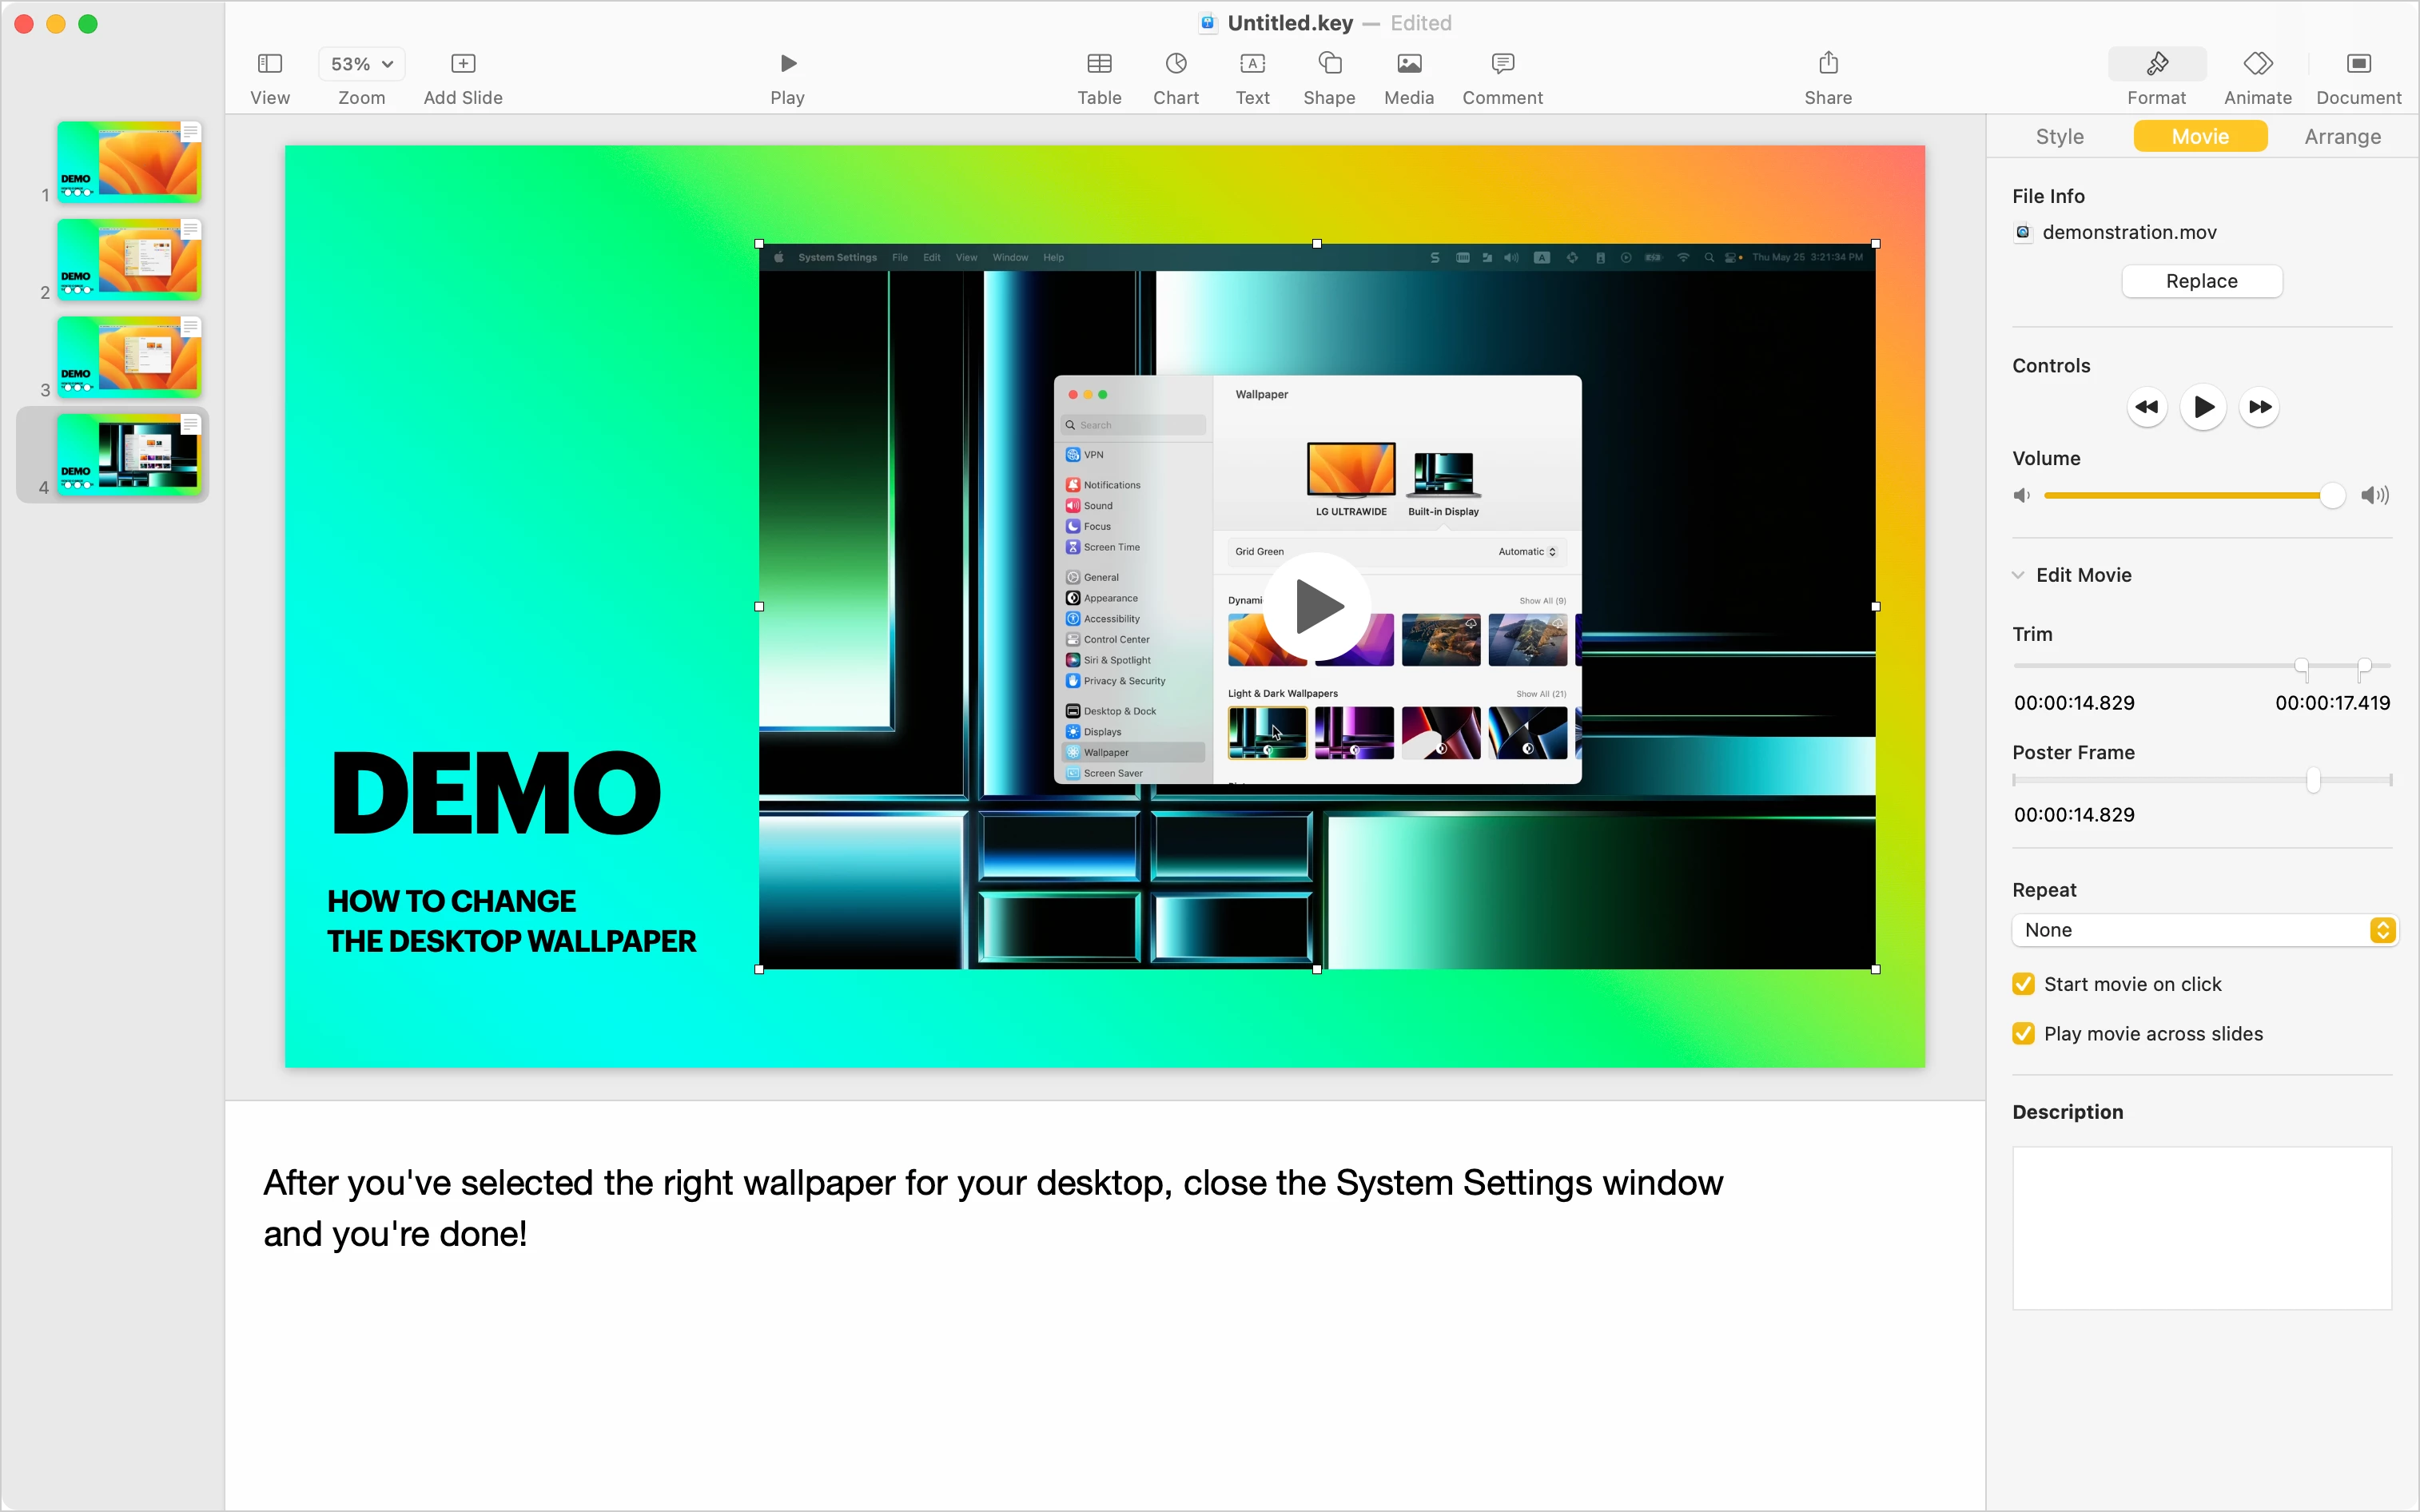
In Keynote, click the slide where your demonstration begins and drag the recording onto the slide to insert it. Use the handles around the recording to adjust the size and then move it in place.
Note: This is the time to make sure the recording is in exactly the right place. We’ll be duplicating slides as we go and we don’t want the recording to appear to shift or move as we transition between slides.
Step 7
Select the recording on the slide.
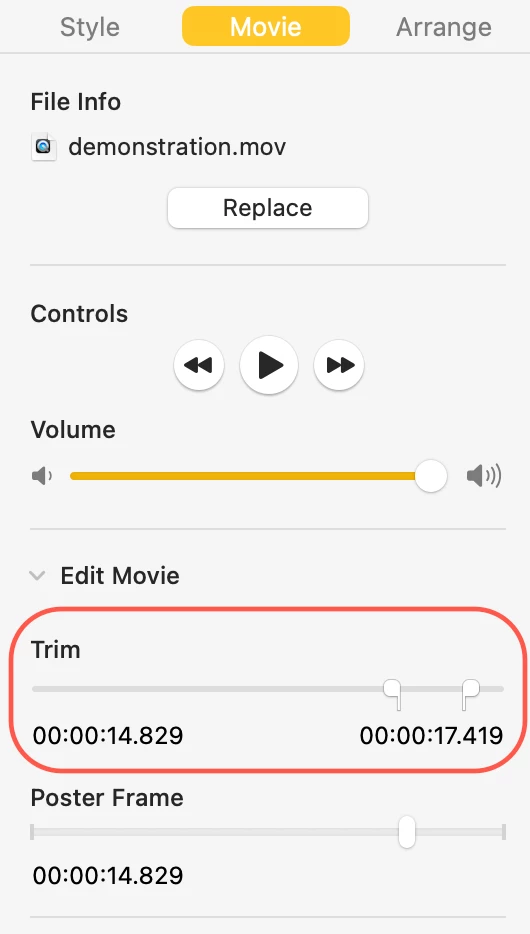
Then, on the right click Format > Movie. Notice it has a Trim feature too. It currently shows the recording will play its full duration. However, we want to show the demonstration step-by-step and be able to speak to our audience at the same time.
Drag the righthand Trim slider to the left until it stops just after the first step. Watch the recording’s preview as you do this.
Now, select the current slide on the left and click Edit > Duplicate Selection. This will duplicate the slide and automatically select the new one.
Select the recording on this slide.
Then, drag the left Trim slider all the way to the right Trim slider.
Drag the right Trim slider to the right until it stops just after the next step.
Keep duplicating the current slide to make a new one and adjusting the left and right Trim sliders until you have a few slides. Each slide should show a small section of the recording with one or two steps until you get to the end. At any time, click the play button on the recording itself to see exactly what it’ll play on that slide.
And if you spent a little too much time between steps, you can just trim a little of the recording to omit the unwanted time.
Step 8
Optionally, click View > Show Presenter Notes to add some discussion points for each slide. Presenter notes aren’t visible to your audience — only you can see them. But if you need to spend several seconds or several minutes explaining a step, the recording won’t progress until you transition to the next slide. Your audience will see you pausing between steps to explain what’s happening, but they won’t notice they’re seeing multiple slides.
You can also set your animations to automatically play after transitioning to the new slide. This keeps you from having to remember to click to start the movie.
Animated GIFs
Sometimes, I just want some motion on a slide.
Animated GIFs have been available since the early days of the web and can loop without end. I had a need for this in one of my JNUC 2022 presentations where I needed to show some cogs spinning and a person juggling. I couldn’t use a movie because a movie eventually gets to the end.
It took a little time to put together, but Keynote made it easy. It can create animated GIFs.
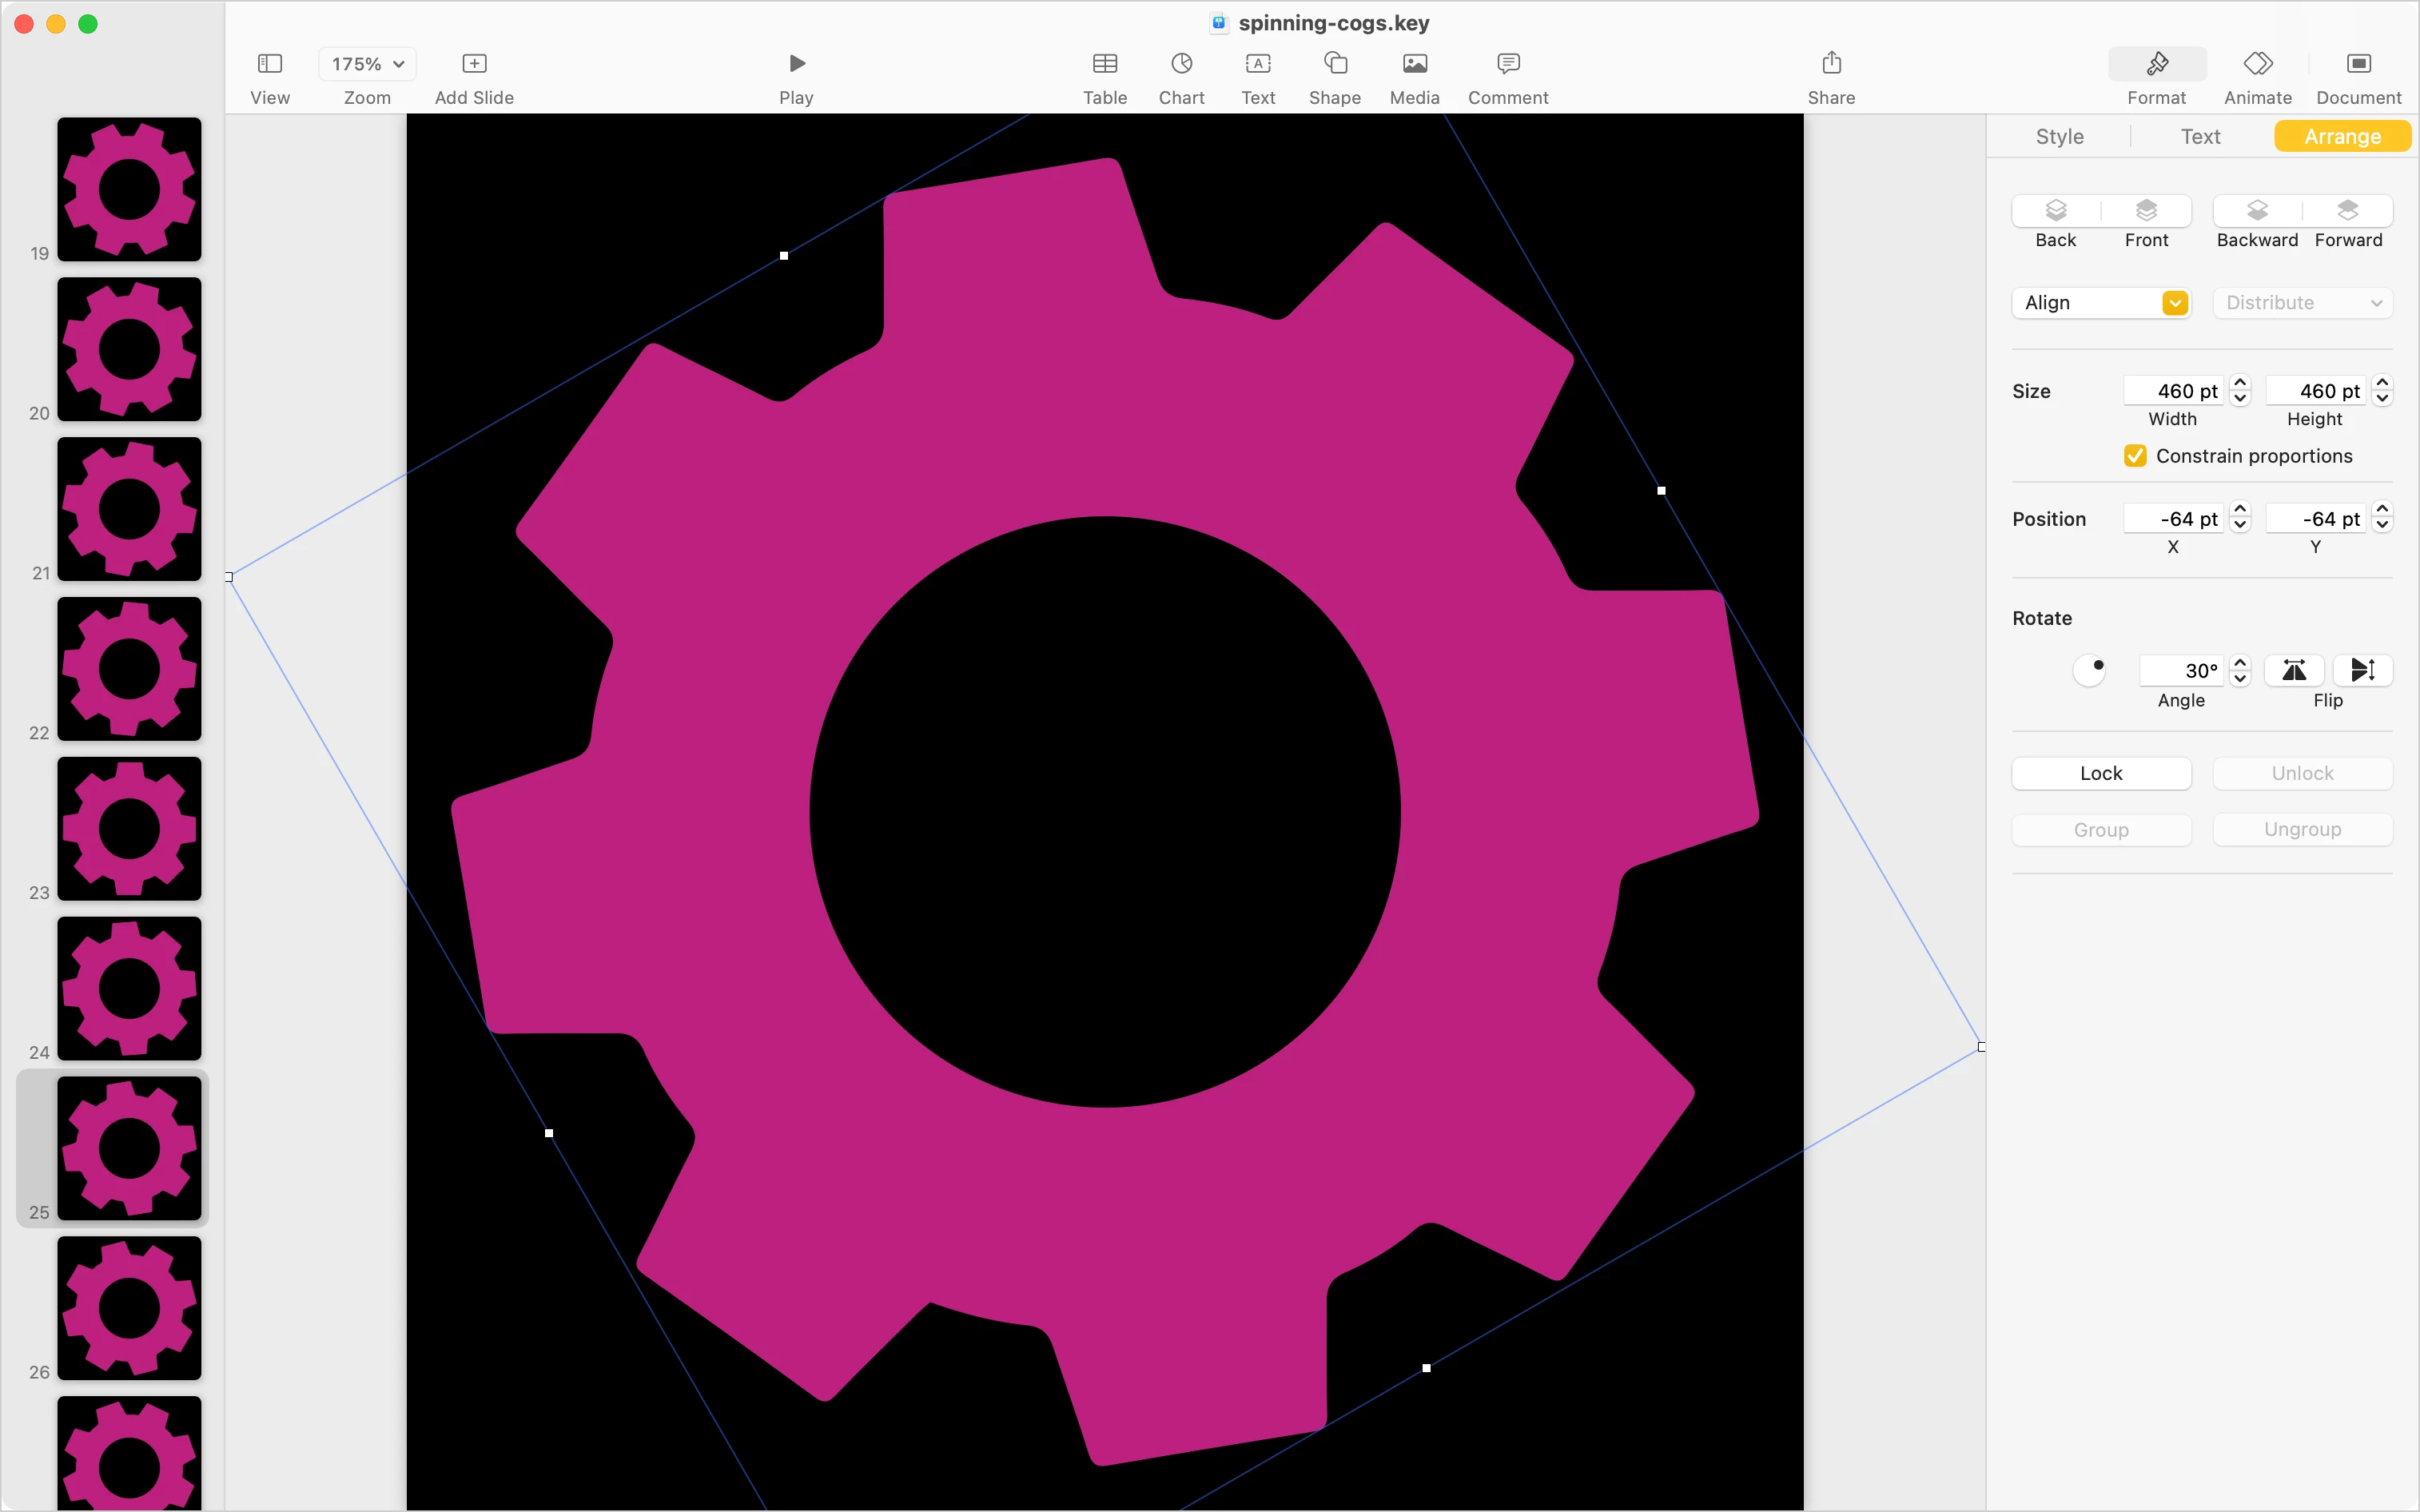
I used its Shapes tool to insert a cog wheel on a slide. To ensure the slide background was transparent, I selected the slide on the left and clicked Format > Slide. Here, I changed the Current Fill to No Fill. After centering and sizing the cog, and applying some color, I then duplicated the slide to create a second slide.
I selected the cog on the new slide, and then on the right I clicked Format > Arrange. The Arrange area gives me details about the position of whatever I’ve selected. One of those details is the object’s rotation, which by default is 0 degrees. In the Angle field under Rotate, I entered 5 degrees, and when I pressed enter, my image rotated exactly 5 degrees.
I duplicated this slide to make the next one and then changed 5 degrees to 10 degrees, and so on, until I had nine slides with slightly different rotations of the cog wheel.
Using the magic of Keynote, I clicked File > Export To > Animated GIF. I told it to advance to the next slide every 1/10 of a second, export with transparent backgrounds, and saved. The effect was perfect! And to make more, I just changed the color of the cogs and adjusted the direction of rotation.


Keynote can automatically start the animated GIFs after the slide transition.
Your homework
Just like stop-motion animation, creating movement gives the audience a believable illusion that supports your story. Look for ways to keep your presentation in motion and your audience’s attention focused on the big screen behind you.
Next time, I’ll cover the final part of putting together your technical presentation, which is to leave your audience with resources to keep leaning. Until then:
- Pick a default transition effect to apply from one slide to the next. A one second Dissolve is enough to keep from jarring the audience.
- Think about bigger and more noticeable transitions between major topics in your presentation but avoid the overly animated transitions like fireworks and sparkles unless they add some value.
- Remember that effects that you apply to slides are often available to objects on your slides too. These are great for calling attention to specific areas on the screen.
- Use Keynote’s built-in Shapes feature to create straight lines or lines around areas you want to call out to the audience and then use animations to draw them when you’re ready.
- Demonstrations are very important in technical presentations. Don’t be afraid to record a movie and insert it into your presentation. Take advantage of trimming to show different parts of your movie across multiple slides as you explain each step.
- If you’re feeling adventurous and want include some always-in-motion animation, consider using Keynote’s built-in option to export a series of slides to an animated GIF. It takes time, but the effect can be very powerful.
Remember, the purpose of animation in your presentation isn’t simply to show motion. It’s to facilitate movement through your presentation.
If you’d like to see how all this works, I’ve put all the examples in this post into a Keynote file you can download and explore. Open the file and then click Play > Play Slideshow. To transition between slides and watch the effects, press the spacebar or right arrow key.


