

Working with Internal Services and Jamf Safe Internet
Earlier in the year, we released our education-focused security tool, Jamf Safe Internet, which focuses on keeping students and teachers safe online. As the adoption of Jamf Safe Internet increases, so do the use cases. A common use case that has become clear in the months since release is the ability to connect to internal services, such as file servers (for storing data), web servers (for platforms like Moodle) as well as a host of others.
Due to the way that Jamf Safe Internet is designed to push all DNS requests to the DoH Gateway in our Security Cloud to evaluate domains against allow/block & security policies (fig1), education institutes aren’t able to access internal services without some advanced configuration.
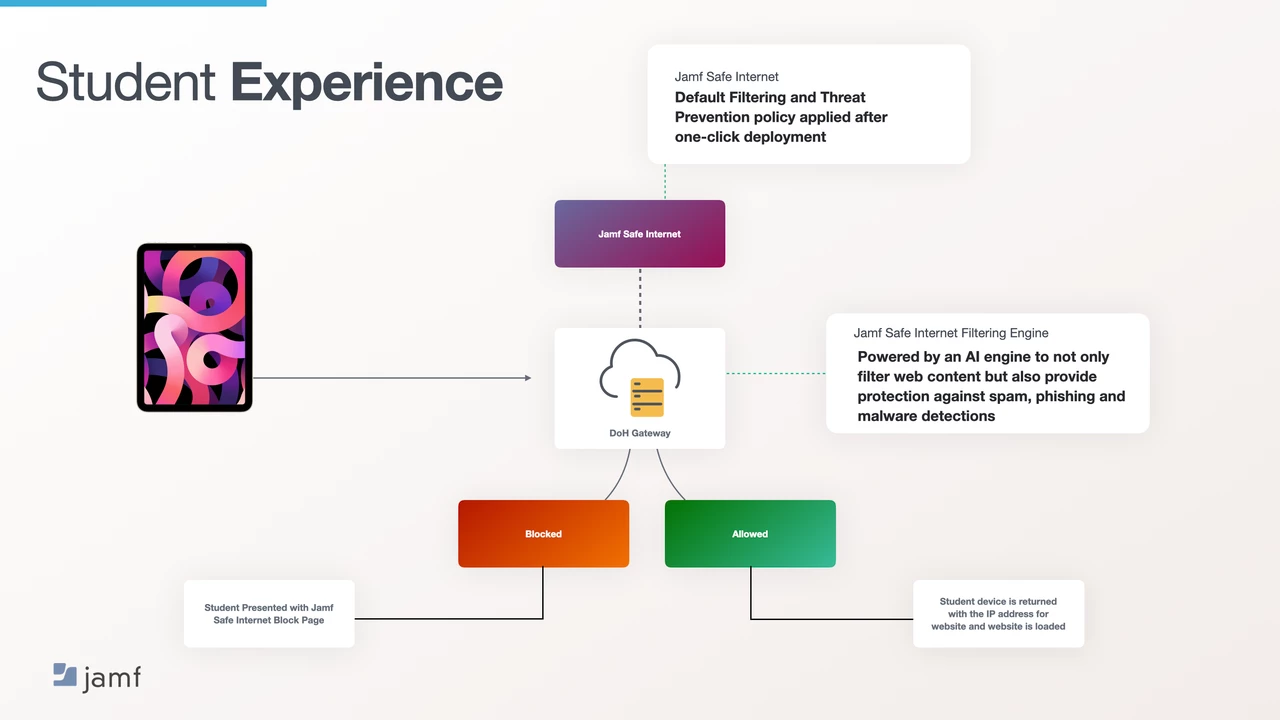
fig 1 - basic diagram of Jamf Safe Internet flow
In order to better understand why we need to add the advanced configuration to our Jamf Safe Internet deployment, you will require a basic knowledge of networking, particularly around what and how DNS works. If this is new to you or you would like a refresher, here is a video from AWS and in the first 5 minutes or so talks about DNS at a high level - What is DNS?
Accessing Internal Services Without Jamf Safe Internet
First, we’ll look at how a device would typically connect to an internal service, without Jamf Safe Internet. Let's take an example of a school that has a file server onsite, and this is where students store their data. When a device connects to the school’s network, thanks to DHCP, it gets given a number of networking information, including an IP address and a DNS server (where the device should look to convert IP addresses into human-readable addresses and vice versa). Generally, there is a local DNS server onsite which contains the entries for the internal domain (this is configured and maintained by the schools network admin) which in our example will be myschool.local
(fig 2) When the student tries to access the file server they type in “file.myschool.local” the device starts an exchange with the DNS server (whose IP address was given to the device via DHCP, when it connected to the network). If the device and the DNS server where people, the conversation would go something like this:
Device: “Hey DNS Server, the student is looking to go to file.myschool.local and I like numbers, not words. Can you tell me the IP address for file.myschool.local please?”
DNS Server: "Sure and if I don’t know what it is I can ask one of my friends out on the internet. Let’s see, myschool.local…..I know about that domain. Just let me check the IP address for file.myschool.local…..here you go, it’s 10.0.0.20."
The device then has the information that it needs talk to the file server by connecting via its IP address that it now knows, and the student is presented to the shared folder that they requested. The student is then able to get on with the tasks that have been set.
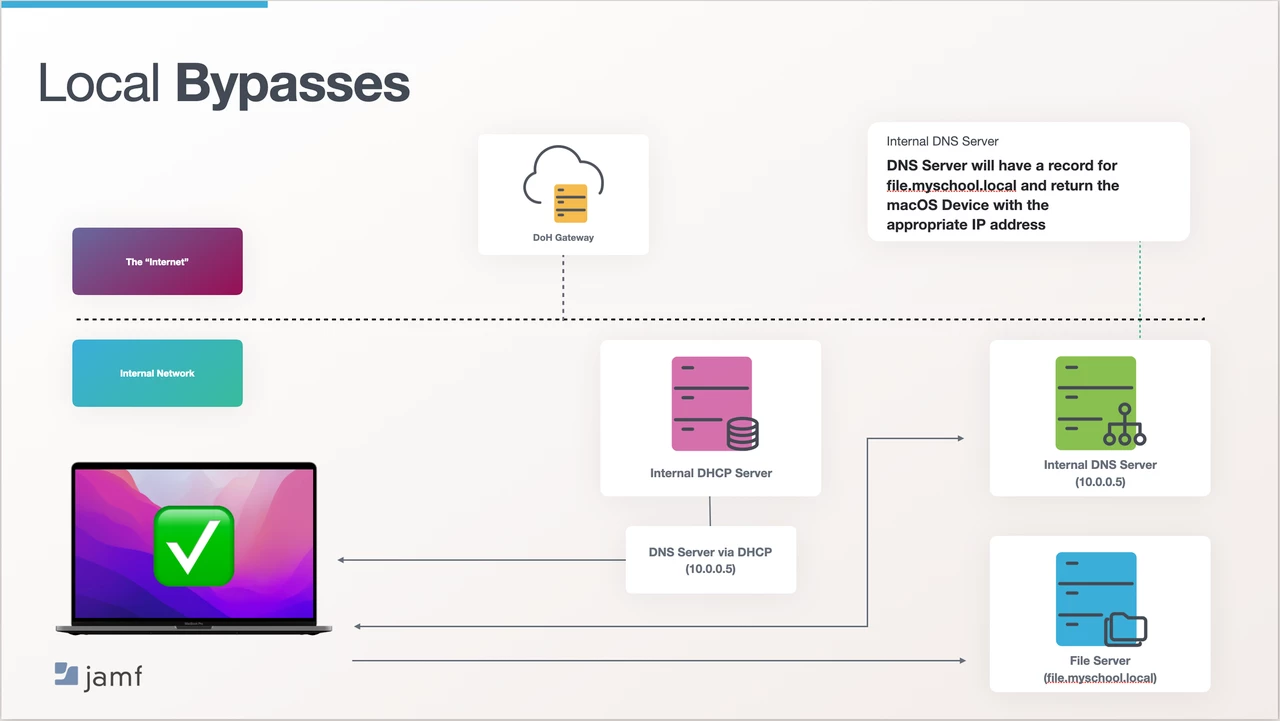
fig 2 - flow of accessing internal resources without Jamf Safe Internet
Accessing Internal Services With Jamf Safe Internet
This time we’ll take the same example but add Jamf Safe Internet into the mix. Everything starts the same as last time. When the device connects to the school’s network, thanks to DHCP, it gets given a number of networking information, including an IP address and a DNS server location (in the form of an IP address).
(fig 3) Only this time we have also installed Jamf Safe Internet. Jamf Safe Internet is installed through a Profile which was installed via MDM, containing a payload which includes a DNS setting. Therefore, the DNS setting is a managed preference.
Preferences managed via MDM on Apple Devices will always supersede any setting of the same kind that appears on the device (this is due to the way Apple devices look for resources, starting with managed, then user, then local, then system).
This means that although the device is given a DNS server address via DHCP the device will always use the DNS setting it was given via MDM. In this case the DoH Gateway in Jamf Security Cloud.
When the student tries to access the file server they type in “file.myschool.local” the device starts an exchange with the DNS server. This time, thanks to the managed preference, the DNS server is our DoH Gateway, which sits outside of the education institute’s internal network. If the device and the DNS server were humans, the conversation would go something like this:
Device: “Hey DNS Server, the student is looking to go to file.myschool.local, and I like numbers, not words. Can you tell me the IP address for file.myschool.local please?”
DoH Gateway: ”I don’t know anything about myschool.local. In fact, nobody on the internet knows anything about myschool.local. So…I can’t tell you the IP address, you’re looking for somewhere that doesn’t exist.”
Device: ”Oh okay, sorry. I’ll have to tell the user that I cannot find or connect to where they have requested.”
The student is then presented with a ‘cannot connect to server’ type of message and is not able to complete their tasks for that lesson.
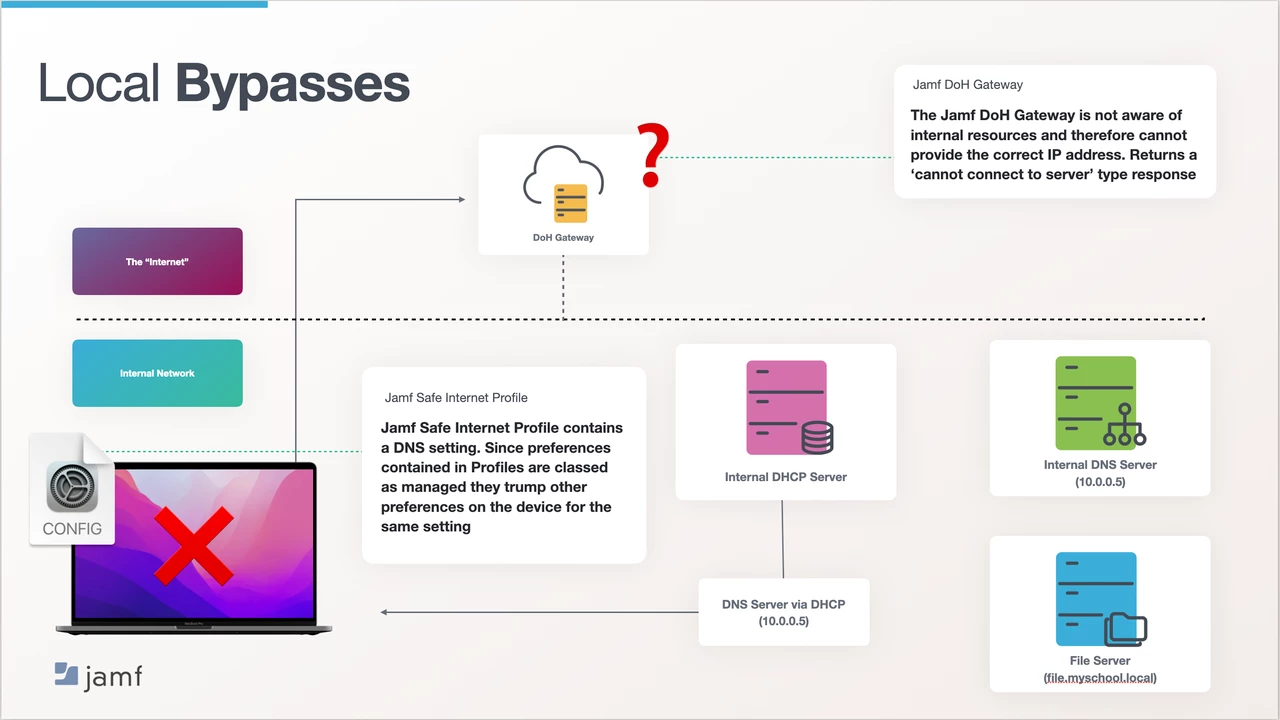
fig 3 - flow of accessing internal resources with Jamf Safe Internet
Local Bypasses
As you can see, since Jamf Safe Internet is pushing all DNS requests to an external DNS server (the Jamf DoH Gateway) the device is not able to communicate with the local DNS server which contains the information needed.
We can, however, add some additional key pair values into the Activation Profile that enables access to the internal services while keeping the device protected with Jamf Safe Internet. The information that we will add will essentially tell the device if it's trying to get an IP address of a particular domain (which we will list), then instead of using the DNS server listed in the managed preference, use your ‘default’ DNS server. Generally, this will be the one given to you via DHCP (the internal one that WILL know about myschool.local)
Below we will look at 3 ways to create these bypasses depending on platform or OS. All workflows do require modifications to a profile in XML, so you will need to be comfortable with this and have a suitable editing tool at hand.
Creating Local Bypasses for macOS
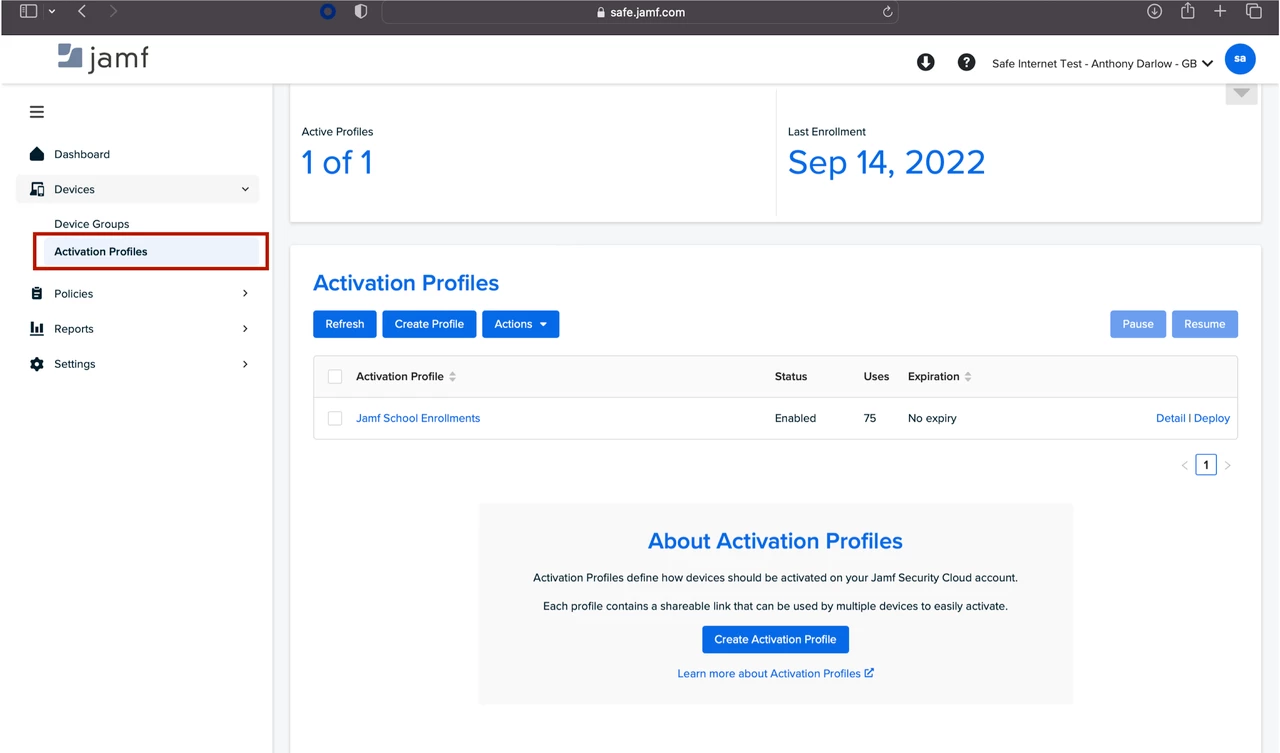
- First, log into Jamf Safe Internet and navigate to Devices → Activation Profiles.
- Then click on the activation profile.
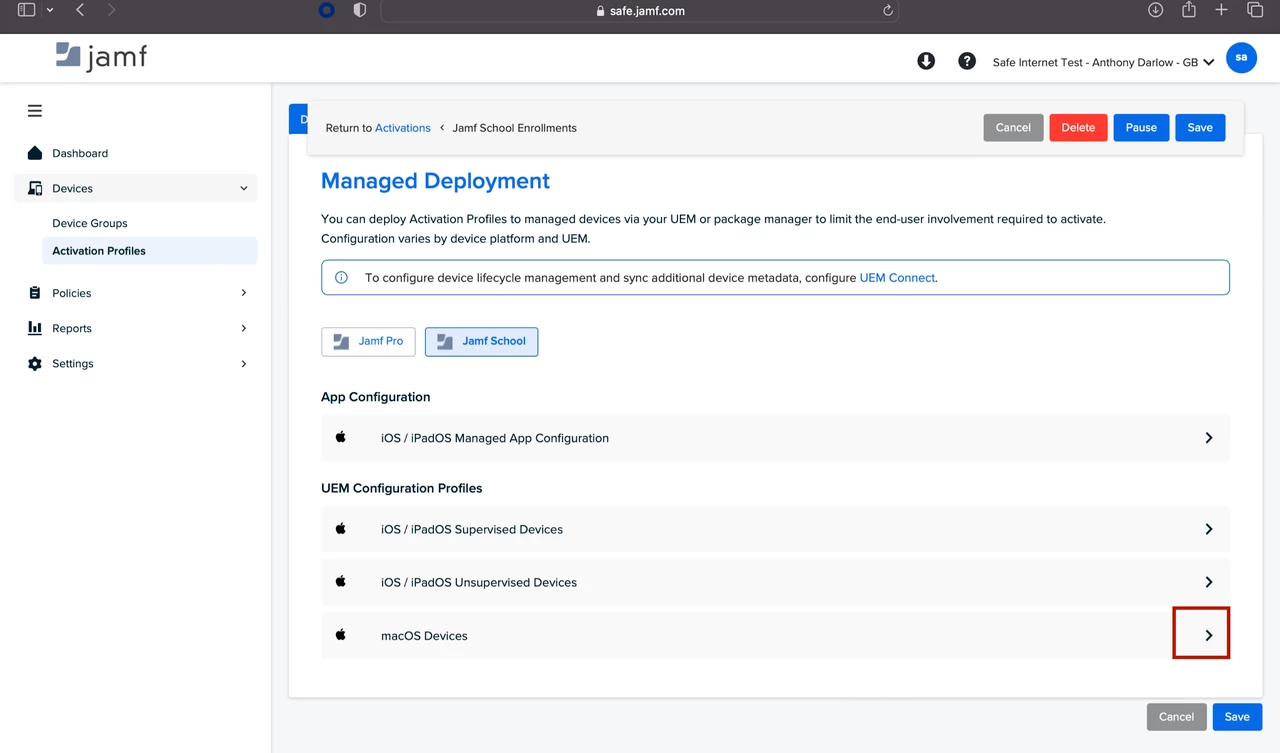
- Next, you will see under “UEM Configuration Profiles” the profile for macOS Devices.
- Click the > to the left-hand side and then click the words “this configuration profile” to download the profile to your computer.
- Once downloaded, find the profile and open it with your editor of choice.
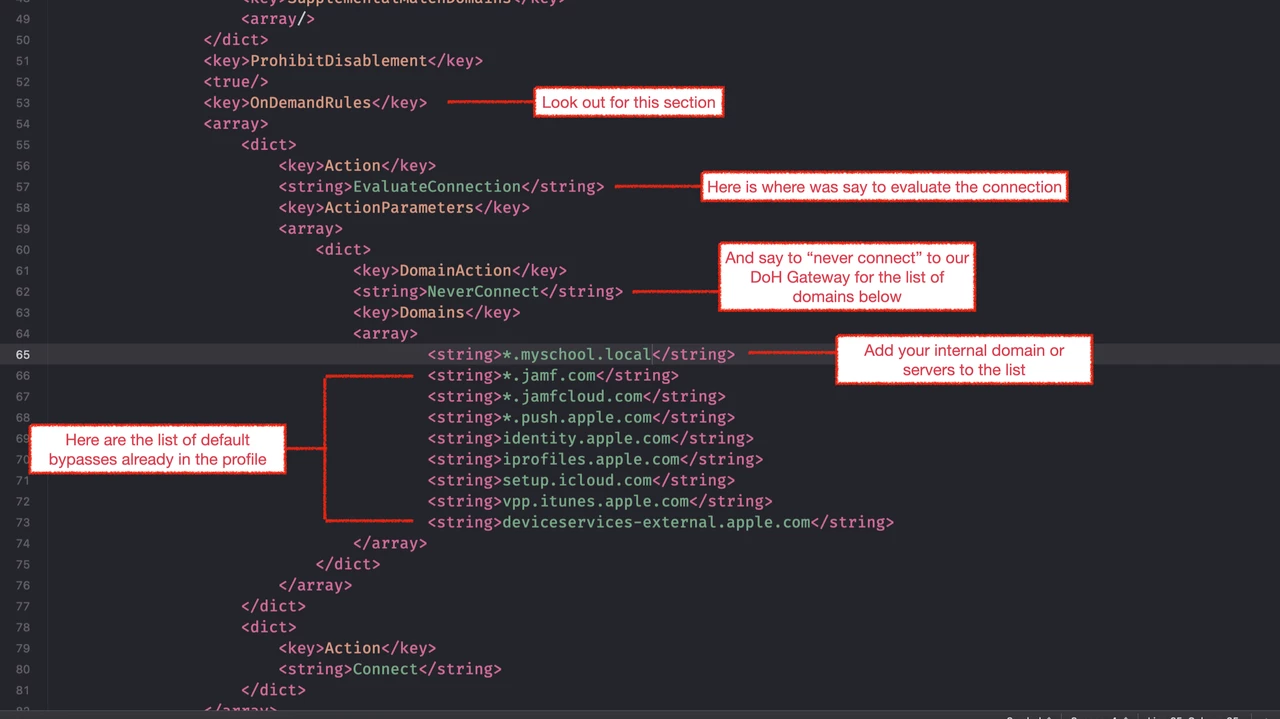
- Scroll through the XML until you find a section called “OnDemandRules”.
- From there you will see that we are evaluating the connection and never connecting to a list of domains.
- In our standard DoH profile, (which is currently used for macOS only) we already see a list of domains for Jamf and Apple.
- We simply add our local domain (or specific servers via FQDN) to this list.

- Once you’ve added the required bypasses, save the profile and upload it to Jamf School / Jamf Pro using the ‘Upload Custom Profile’ option.
- Then, scope this profile to the device instead of the standard macOS profile that is
- a) created as part of the ‘singleclick’ connection in Jamf School
- b) the standard macOS profile you download and install in Jamf Pro
Devices with an Activation Profile configuration as the above will then be protected via Jamf Safe Internet, but will also be able to reach resources located on the internal network such as file servers or web servers that aren’t externally accessible.
If you have devices already activated in Jamf Safe Internet and then need to issue a new Activation Profile with the local bypasses please note the “Device Enrollment” section of the Known Issues in the Jamf Safe Internet Documentation.
Creating Local Bypasses for iOS/iPadOS
Before looking at how to create local Bypasses for iOS/iPadOS we need to quickly understand why an iOS/iPadOS deployment of Jamf Safe Internet is configured in a different way than macOS.
With macOS we were able to deploy the “DNS settings” payload just the way it was intended by Apple as a management preference. When this setting was enforced on iOS/iPadOS 15 or below, there was a known product issue in the OS. Although the device will apply the managed DNS settings, if the device is turned off and back on again it ignores the managed DNS setting, though the profile is on the device.
To tackle this, Jamf Safe Internet was instead deployed through a VPN payload, ensuring that even after a device restart the device sent all traffic through the DoH Gateway.
With the release of iOS/iPadOS 16 the bug has been addressed and the DNS setting payload behavior is as expected. At the time of writing, Jamf Safe Internet is deployed via the VPN payload as default, regardless of if the device is running iOS/iPadOS 16 or greater. However, since you are editing the Activation Profile, if you would prefer to deploy to iOS/iPad 16 or greater via the DNS Setting payload you could.
At this point it’s worth noting that since the default (for all iOS/iPad versions at time of writing) vectoring of VPN is still valid on iOS/iPadOS 16 or greater, should you wish to move to using the DNS setting payload in your environment, rigorous testing is recommended.
Devices with iOS/iPadOS 15.7.1 or below & iOS/iPad 16 or Greater
For these devices we will use the standard vectoring method, using the VPN payload. This one is a little harder to configure since the groundwork is not there for us already in the Activation Profile. You can use the Apple Developer Documentation to help find the required keys.
Since iPhone and iPad can have both Cellular and Wi-Fi connectivity, we can add bypasses (or different bypasses) on both interfaces. However, as we are looking to connect to internal resources we are only interested in the bypasses when on Wi-Fi as this is the interface you’d expect to be connected to when on a local school network.
- First, log into Jamf Safe Internet and navigate to Devices → Deployment → Activation Profiles.
- Then click on the activation profile.

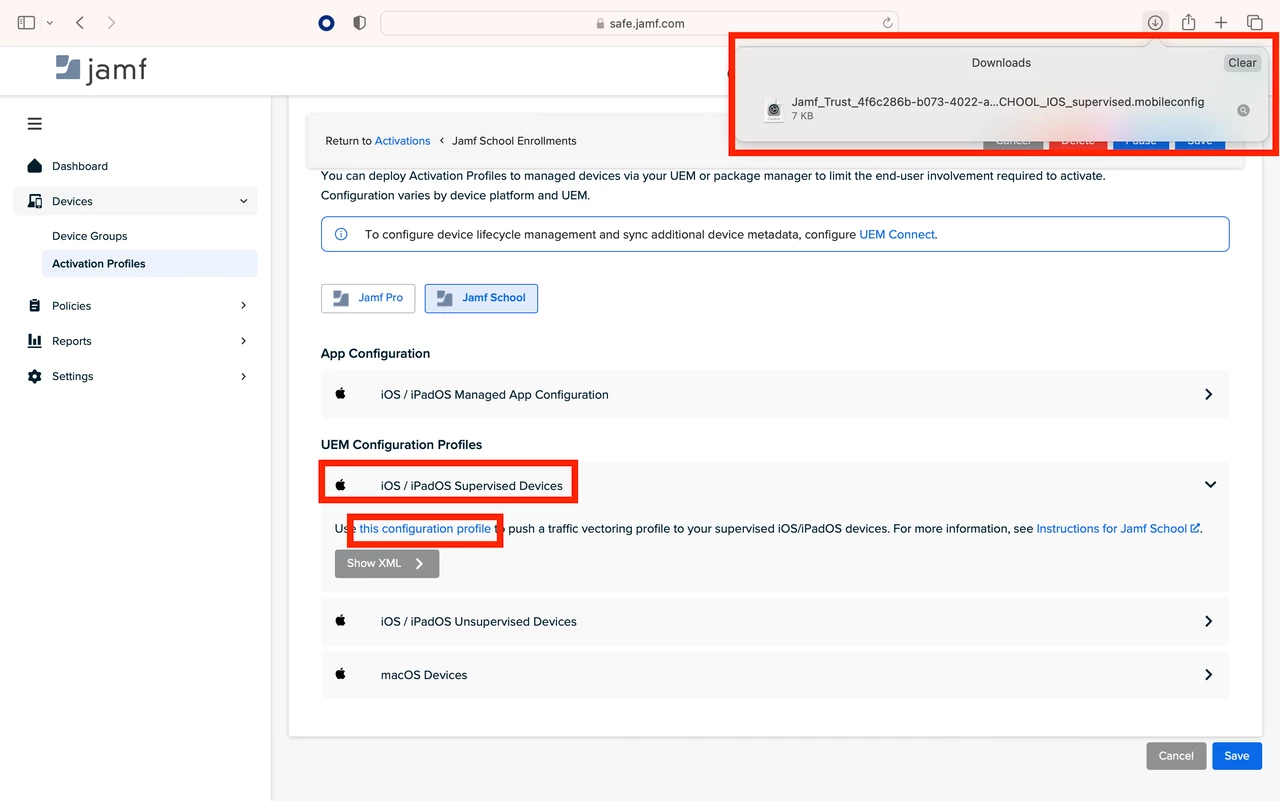
- Next, you will see under “UEM Configuration Profiles” the profile for iOS/iPadOS Supervised Devices.
- Click the > to the left-hand side and then click the words “this configuration profile” to download the profile to your computer.
- Once downloaded, find the profile and open it with your editor of choice.
- Scroll through the XML until you find a section called “OnDemandRules”.
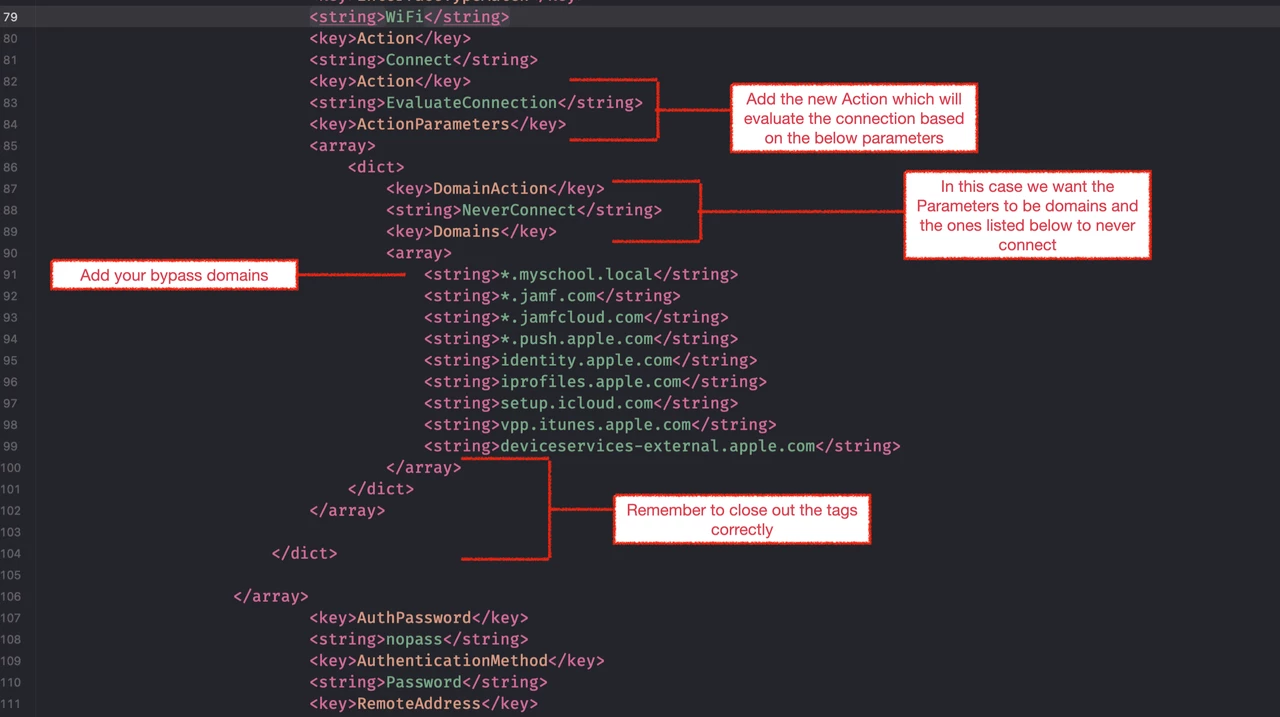
- Next look for the following section:
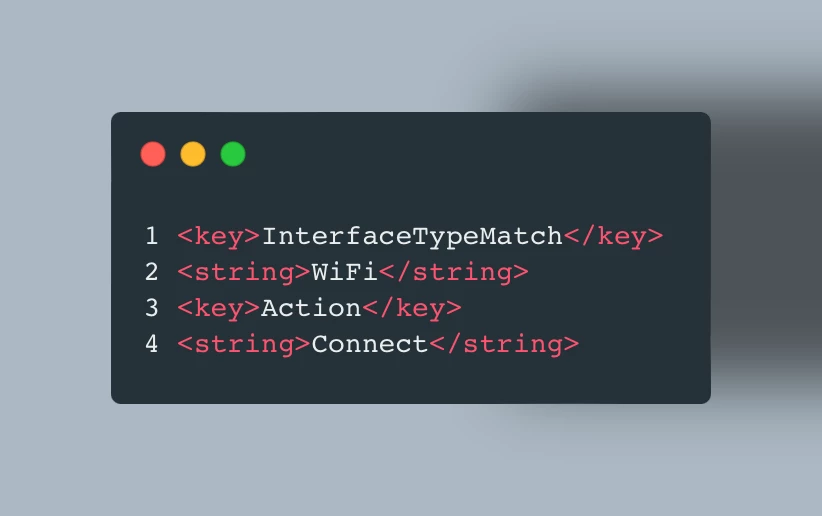
- Keeping the Action - Connect key in there will automatically bring up the VPN connection.
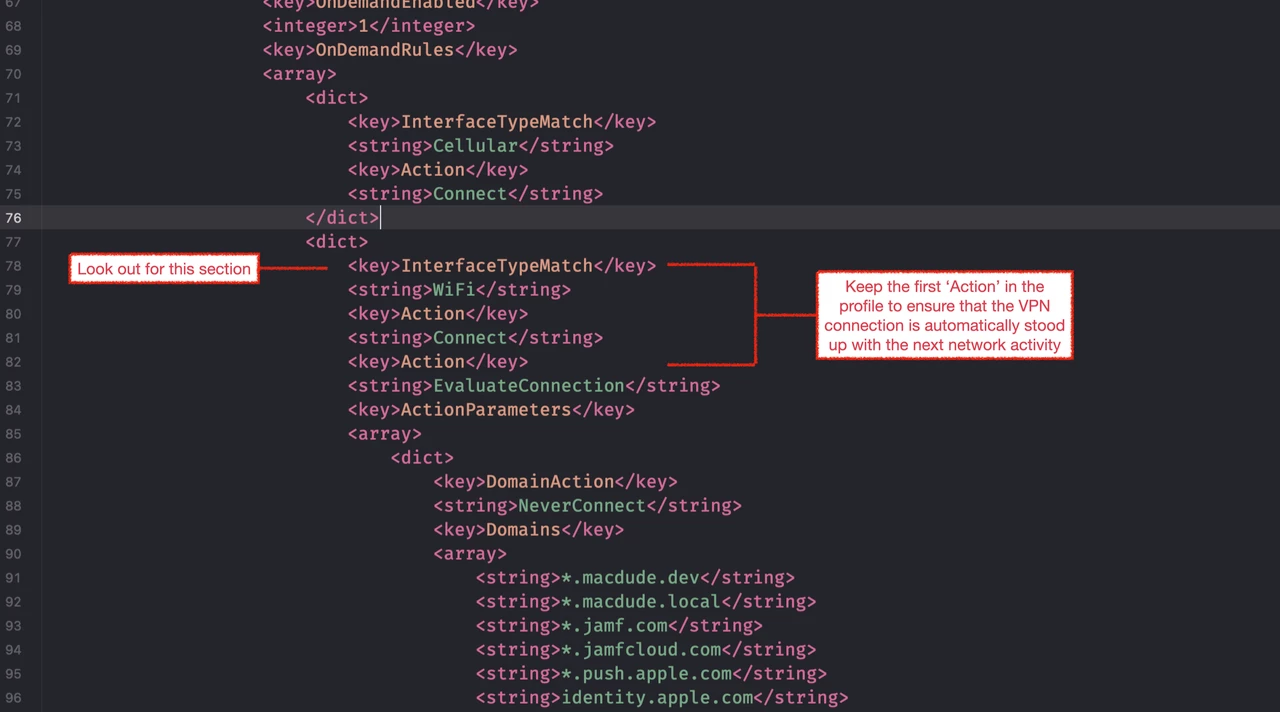
- Under this section, you’ll add some additional XML (you can refer to the Apple Dev Doc’s to find out more).
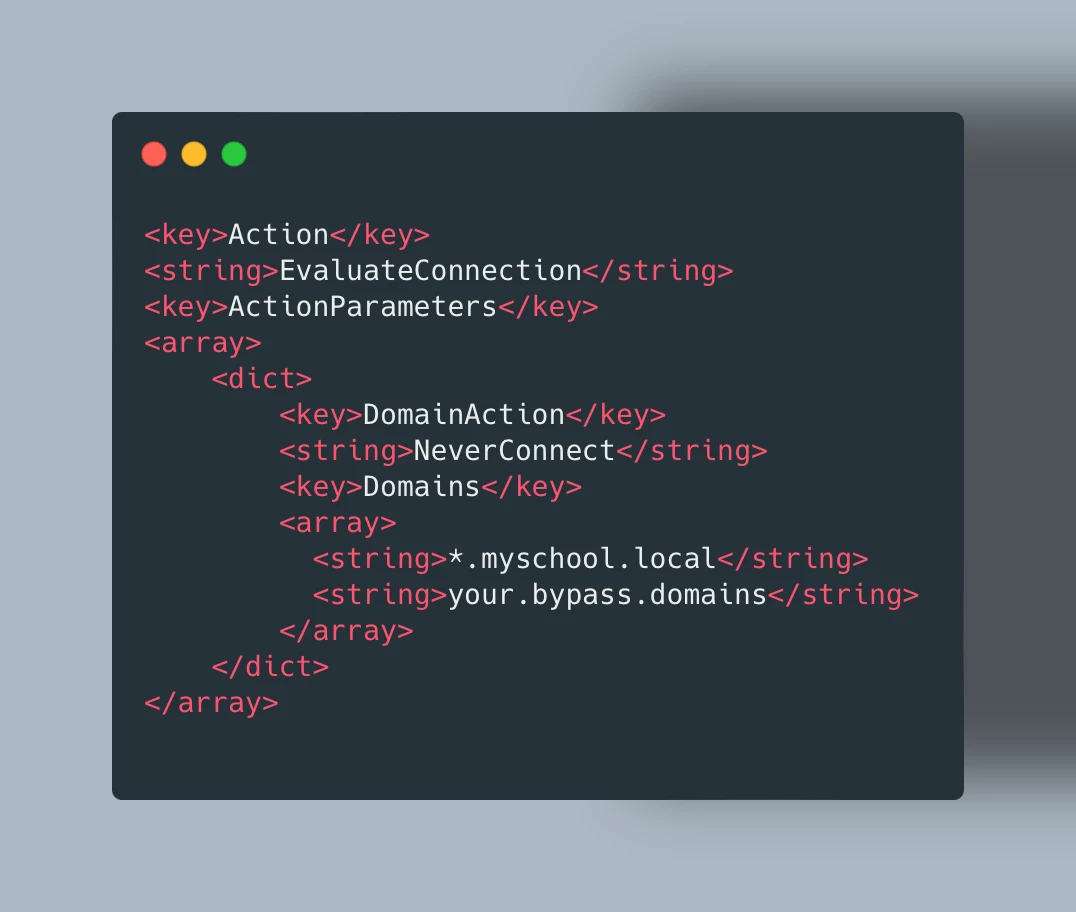
- Essentially you are saying, like with the macOS example, evaluate the connection and if it's one of the listed domains do not use the VPN to tunnel traffic.
- In the example I’ve also added the same bypasses as are in the macOS DNS Settings payload for Jamf & Apple, but this isn’t required.
- Once you’ve added the required bypasses save the profile and upload it to Jamf School / Jamf Pro using the ‘Upload Custom Profile’ option.
- Then, scope this profile to the device instead of the standard iOS/iPadOS profile that is
- a) created as part of the ‘singleclick’ connection in Jamf School
- b) the standard iOS/iPad profile you download and install in Jamf Pro
Remember, if you have devices already activated in Jamf Safe Internet and then need to issue a new Activation Profile with the local bypasses, please note the “Device Enrollment” section of the Known Issues in the Jamf Safe Internet Documentation.
Devices with iOS/iPad 16 or Greater
Once again, at this point it’s worth noting that since the default (for all iOS/iPad versions at time of writing) vectoring of VPN is still valid on iOS/iPadOS 16 or greater, should you wish to move to using the DNS setting payload in your environment, rigorous testing is recommended.
This is maybe the simpler of the two options. Since the “DNS setting” is a universal setting (it’s something that can be used on both iOS and macOS) and the DNS setting bug has been figured out, you simply just need to follow the same steps as above for creating a profile with local bypasses for macOS.
We still want to be installing the Jamf Trust app along with the config profile, which is not a requirement for macOS.
As a reminder, here is the part of the profile you are looking to edit:
When downloading the activation profile from the Jamf Safe Internet console, you still download the macOS profile (as per the screen shot), even though you are looking to configure this for iOS/iPadOS. Since it's a universal setting Jamf School / Jamf Pro will allow you to scope it to either macOS or iOS/iPadOS.
If you are running Jamf Safe Internet on both macOS and iOS/iPadOS, your iOS/iPadOS devices are on 16 or greater, and have already created a bypass profile for macOS. No need to create a second for iOS/iPadOS! You can use the same one since it’s a universal setting.

