Hi, I work for a large establishment with many students who use Mac Books etc. They do not have a managed service. We are manually adding there printers to there Macs which is time consuming. The printers use an smb address.
I have tried composing the printer setup using composer but each time I run the .pkg it fails to add the printer. I've tried using a script using the lpadmin command with no luck.
Having a .pkg to run on students macs would save a huge amount of time and hopefully would simplify matters.
Any help appreciated
Many thanks
Best answer by Jivebunny
So this is what I have so far.
It's a post install script that I use in composer. The .pkg that I have compiled, installs the printer drivers into the correct location. The post install script installs the printer fine. The output goes into a black hole i.e. disappears. I've noted that CUPS is showing; Connection: file:///dev/null. This needs to be set to the SMB path.
What am I missing to enable this to the correct connection?
@Jivebunny Use Casper Admin to capture a printer configuration, not Composer. If you're just talking about a small group of student printers, configure them on the machine you use for Casper Admin, then use it to capture them using the Add Printers button in the toolbar at the top of the Casper Admin window. Once captured, you can create Policies in your JSS to deploy the printer config to student machines (you'll also want to deploy the appropriate printer driver package with those polices).
@Jivebunny By the above, do you mean you don't use the full Jamf Pro product, only Composer? It's not exactly clear. If that is the case, then can you post your script utilizing lpadmin here so we can look at it and provide some help? I would think a script would be the way to go if that is the case, and not something like a Composer capture.
If the printers require a driver beyond just a .PPD you should probably upload that in Casper Admin, then deploy it prior to using the Casper print queue.
I remember quite a few Canon Fiery drivers that needed to be cached prior to installing.
Like @mm2270 I wonder what you mean isn't managed (the printers or the computers). Regardless, the computer will need the driver and the print queue installed. While you'd preferably have jamfPRO to distribute both the driver and the queue, you CAN package a full installer with Composer to send to your students. I do this over the summer when we have a lot of students on our campus, who need to print via our managed print service (Papercut) but are not managed by our jamfPRO.
Basically, I include a .PPD and Papercut installer along with a "postinstall" script that installs papercut and then whatever print queues I wish, via lpadmin. If this is what you're looking for I'd be happy to write it up. Basically, you'll end up with an installer package you can give to anyone, no matter if your printers or computers are managed or not. If you DO have jamfPRO you can automate this whole process and move on to other things in quick order. I still prefer to use lpadmin as opposed to capturing the printers via Casper Admin.
What i mean by not being managed is that none of the student macs are managed by casper. They are all brought in by the students. I've tried scripting but this is by far my weakest point. I will post a script in due course that ive been working on.
I've done the managed printer thing using casper admin, and pushing out drivers for years now and we've recently went to a third party vendor for the Mac side of the house. It will eventually replace the existing Micro Focus (old iPrint) or whatever the its called now. It's called The new service is called Printer Logic. It's cross platform, easy to deploy and very configurable. Currently we don't have students that print but it wouldn't be hard to incorporate with them using a Self Service policy. I was shocked how cheap it was to boot and it solved a huge work order issue we had for the teachers being 1:1 2000 or so in total.
It's a post install script that I use in composer. The .pkg that I have compiled, installs the printer drivers into the correct location. The post install script installs the printer fine. The output goes into a black hole i.e. disappears. I've noted that CUPS is showing; Connection: file:///dev/null. This needs to be set to the SMB path.
What am I missing to enable this to the correct connection?
There are some errors in your syntax that must be addressed: - You can't use curly quotes (“”) in the script, you must use straight quotes (" or ').
- The lpadmin command is not using the correct options, so no print job will ever reach the printer queue.
Below is a script that we use to install our printers:
To explain a bit: I have used variables to set the various settings, in order to be easy to edit afterwards. If you compare my script to yours, you will see that you are using some parameters wrong, and you are not providing lpadmin with a URL to send the print to (the -v parameter). For instance, your "smb://xxxxxx" URL goes in the PRINTER_URL section. The CUPS_NAME is the internal name used by CUPS, and should not include spaces or other special characters, as opposed to the DISPLAY_NAME or PRINTER_LOCATION texts. Also, I don't see why you are using the cupsenable commands, they look faulty and should be unnecessary when you have the -E option in the lpadmin command.
The first lpadmin command actually tries to delete any existing printer defined on the computer which has the same name. This makes it easier to update the settings when needed, without manually having to remove the printer(s) first.
All the "-o" parameters are optional, and must be present as options in the PPD file you are using in order to work. For your specific printer, though, all the options in our script are also compatible with your printer. So if you want the print to be 1200 dpi as default and to print using both sides of the paper, use our options. If the printer does not have the duplexer unit, you must remove "-o Duplex=DuplexNoTumble" from the script. You may also add more -o parameters, for instance if your printer has extras, like an additional LargeCapacityTray, Finisher or whatever. It is not easy to find the correct setting, but it isn't impossible, either...
Yes, the "-o cupsIPPSupplies=true" part may also be omitted if the print server does not support IPP.
I hope this can get you on your way to a working printer setup!
Hi @Chris_Hafner we just got JAMF and what you have describe is what I'm actually looking to do. If you don't mind I would love to read your write up on how you achieve it.
Many thanks for this. Doe this get round SIPS on El Capitan and above as I've noted that I can't install the package with SIPS enabled. Is there a workaround without booting into recovery mode and disabling SIPS.
@Thai No problem: I do just want to clarify that I do this two different ways. One for jamf Managed devices and one that can be installed on any un-managed macOS system. First, what you see above are all great ways to handle print queue installations via jamfPRO. In my case, I have a custom installer for PaperCut and separate policies for installing print queues. PPDs and other print drivers are installed during imaging/onboarding and updated via automatic policies when I update them. That aside, here's how I deal with unmanaged macOS devices
First, I want to install PaperCut. This is completely independent of any print queue I may want to install. This part is also unnecessary for anyone not using papercut (Or using papercut with un-authenticated queues). This is completely unnecessary is you do not use PaperCut. Feel free to use the rest of the instructions though.
•) Drag your custom PaperCut Client into Composer (I'm assuming that you would have followed CrashPlan/jamf's knowledge base article on just how to do so.)
** Since these are unmanaged systems I do not install our launchagent. These users will leave after a month or two and I won't have a chance to uninstall it for them.
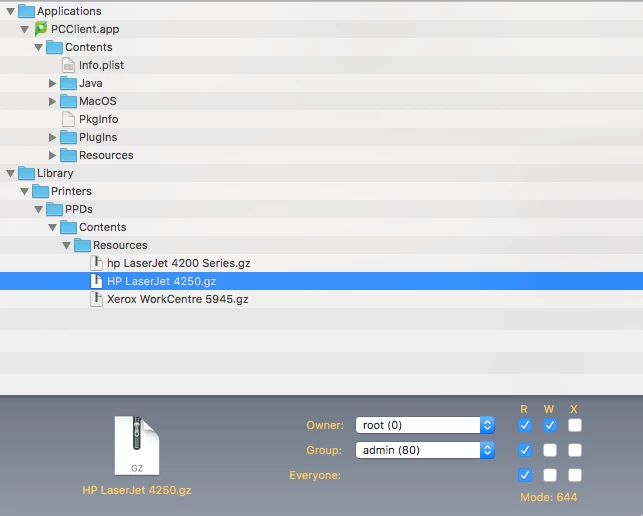
•) Drag any and all required PPDs into the same composer window. In my case I needed to cover HP4200 and HP4250 printers, as well as Xerox 5945 Copiers)
- You can also place any driver installer package in here to be installed by the "PostInstall Script". I tend to use "/private/tmp" or "/Users/shared/" for this.
•) Adjust permissions as necessary (PCClient should have the following permisisons)
The PPD files should have the following permissions (Wheel would also work for 'group)
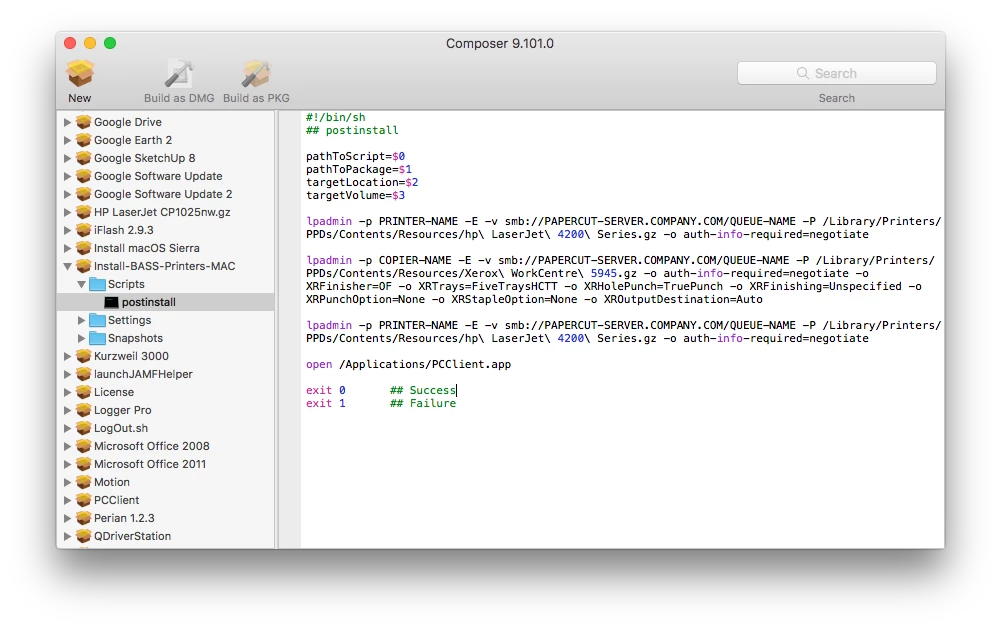
Now we need to put together the script to get this all up and running. The big difference is that we're not using jamf policies to manage the individual "pieces" of this as this package needs to setup everything our users need to print. This script is going to be written or copied into "postinstall", under scripts in Composer. The other PPDs are loaded into the directories shown in the Composer Screenshot.
** If you want to install a manufacturers driver .pkg (or any other .pkg for that matter) you can load that into Composer. I recommend using /private/tmp or /Users/Shared. Remember to use sudo to isntall as the final package will be isntalled by a users account, and not jamf's root access.
example install command for a HP driver package, loaded into /Users/Shared
Remember to use sudo as this will be running directly from the user account, NOT via root as a jamf policy normally would.
• It's important to remember to get all your drivers in place before setting up print queues.
• With that done you want to go ahead and install the actual print queues. I use lpadmin. I intend to set up three printers here. Each will get its own command.
Note: At the end of the script I simply open the PCCLient application to get it in the users face... otherwise, they won't really 'see' anything happen.
With all that written, you can then choose "Build as .pkg" at the top of the composer window and that's it. You'll have a .pkg that will install your print drivers, print queues and any other print management item you may need non-managed users to have.
I've read several posts of techs using Jamf Admin to capture the already-installed printer and then "packaging" the driver to run on the same policy. I can do the first part but get lost on how to "package" the driver using Composer. I used Composer and removed everything except the appropriate .ppd file (HP LaserJet Pro MFP M426-M427.ppd) before creating the pkg file. I then put both printer and printer driver in same policy to push out. However, when I go over to my test machine I see a generic printer installed and the driver is no where to be seen. What did I do wrong?
I feel like I need a script to install the driver in it's proper place (ex. /Library/Printers/PPDs/Contents/Resources/HP LaserJet Pro MFP M426-M427.ppd) but not sure.
Unless you simply do not want all of the HP drivers on the system for some reason, I would suggest installing the drivers from HP instead of trying to package your own. You can use HP Easy Admin to locate and download the appropriate driver package. Once you have that package, upload it to Jamf and add it to your printer install policy.
It's been a while (many, many years) since I've used a printer added via Jamf Admin in a policy, so I'm not 100% positive of the order of operations (install package then printer, or install printer then package), so if your printer doesn't install properly you may need to install the driver in a separate policy first, and then the printer. Test it out.
Previously I had a driver package that would install first then run a printer script with the IP address details, once it ran both the install would be complete.
@andrew-lee91 If you want to do this with Jamf Policy just add the driver package and then add a script marked as "after". If you want to do it in a .pkg installer then use composer to place the driver package in say /private/tmp and add a line at the top of the post install script that runs the command line version of the installer like:
/usr/sbin/installer /private/tmp/driver.pkg -target / Then add your printer script after that to complete the post install.