
Lightspeed just released the newest version of filter agent that completely changes how it works based on Apple's system extensions. This is completely different from the way it worked before. If I were to update it via auto update it would give the users a number of permission prompts that they could decline. LS released some documentation for updating these permissions automatically via MDM but frankly the instructions are kind of confusing for a relative newb. Could one of you kind experts perhaps take a look at these instructions and boil down what I need to do? Thanks in advance!
- Home
- Community
- Get Support
- General Discussions
- Lightspeed Filter Agent v2.0.0
Solved
Lightspeed Filter Agent v2.0.0
- June 9, 2022
- 11 replies
- 292 views
 +4
+4- Contributor
Best answer by mmcallister
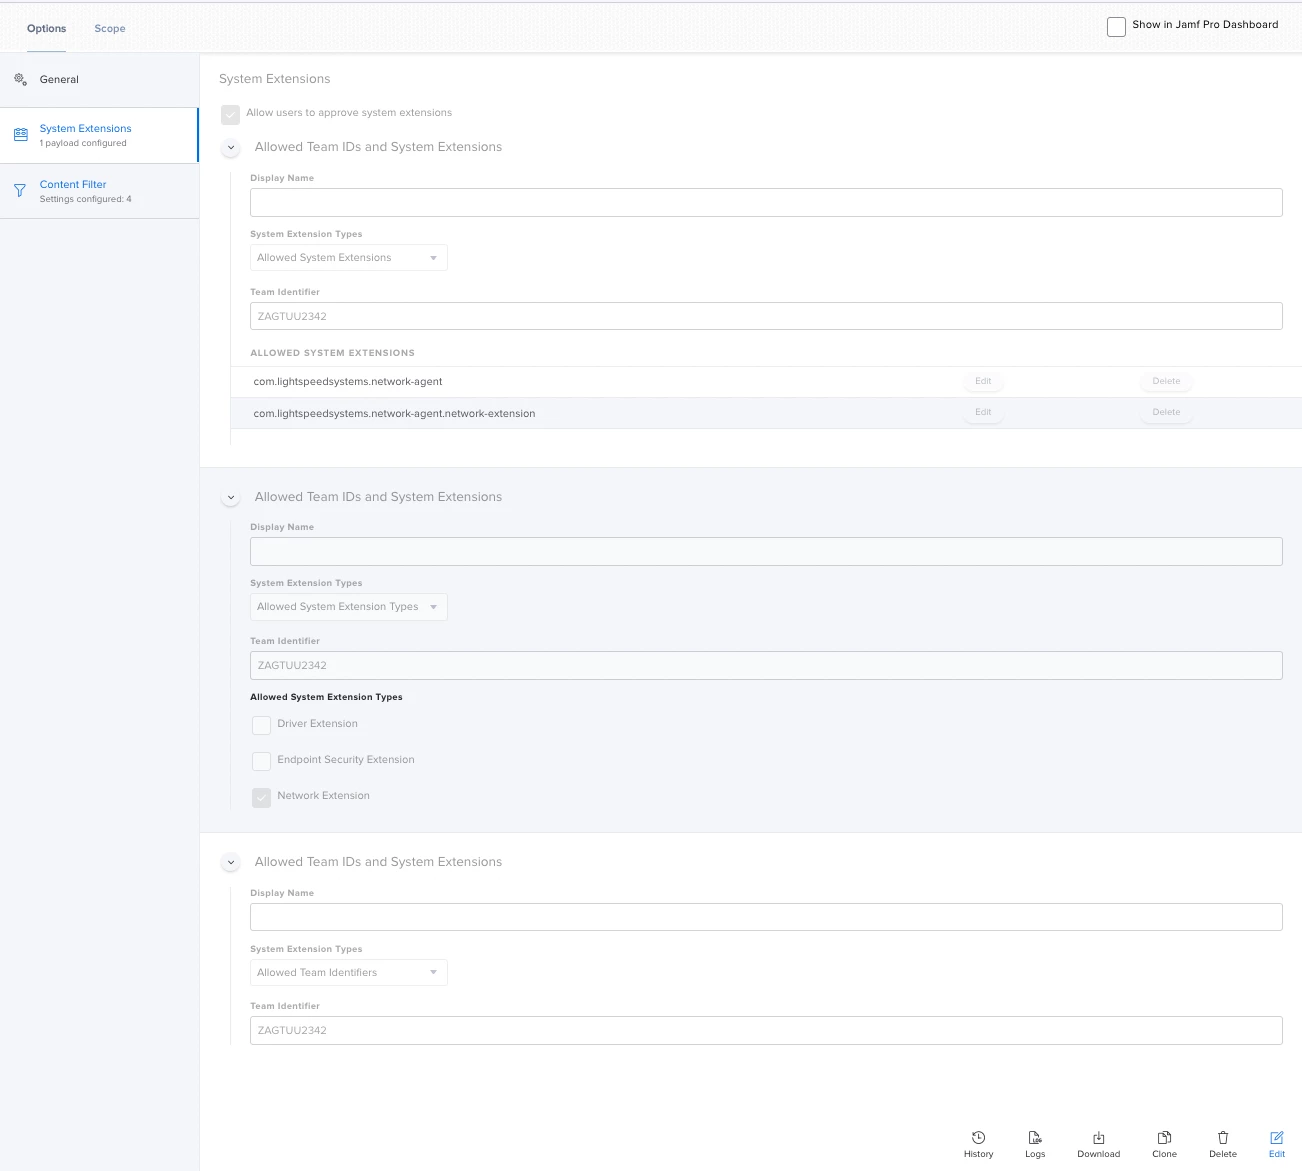
You'll want configuration profiles to install the ca.cer certificate (Certificate payload) and the deployment_jamf.plist (Application and Custom Settings payload). You will also want a profile for the System Extension to suppress the security prompts.
Scope the configuration profile(s), and then use a policy to install the 2 .PKGs.
The system extension was the bit I had to fiddle with the most to get correct, so I've included some screenshots from my JSS that might be helpful.
- Like
- Share
11 replies
 +12
+12- Honored Contributor
- June 10, 2022
It is very wordy. The process is not complicated, but there are a lot of pieces to making it work properly that have to be done in a certain order.
Basically, you need to create some new profiles that will pre-approve the network extension and socket filtering to suppress the permission prompts on devices, as outlined in steps 5 & 6 under MDM deployment in the guide that you linked.
5.) Configure Content Filter Payload
Jamf requires that the following Team ID and Bundle IDs are added as approved System Extensions. Jamf will also have you approve specific System Extension types. If this is the case, use the same information below to also approve these System Extensions with Network as the type.
- Team ID: ZAGTUU2342
- System Extension Bundle IDs
- com.lightspeedsystems.network-agent
- com.lightspeedsystems.network-agent.network-extension
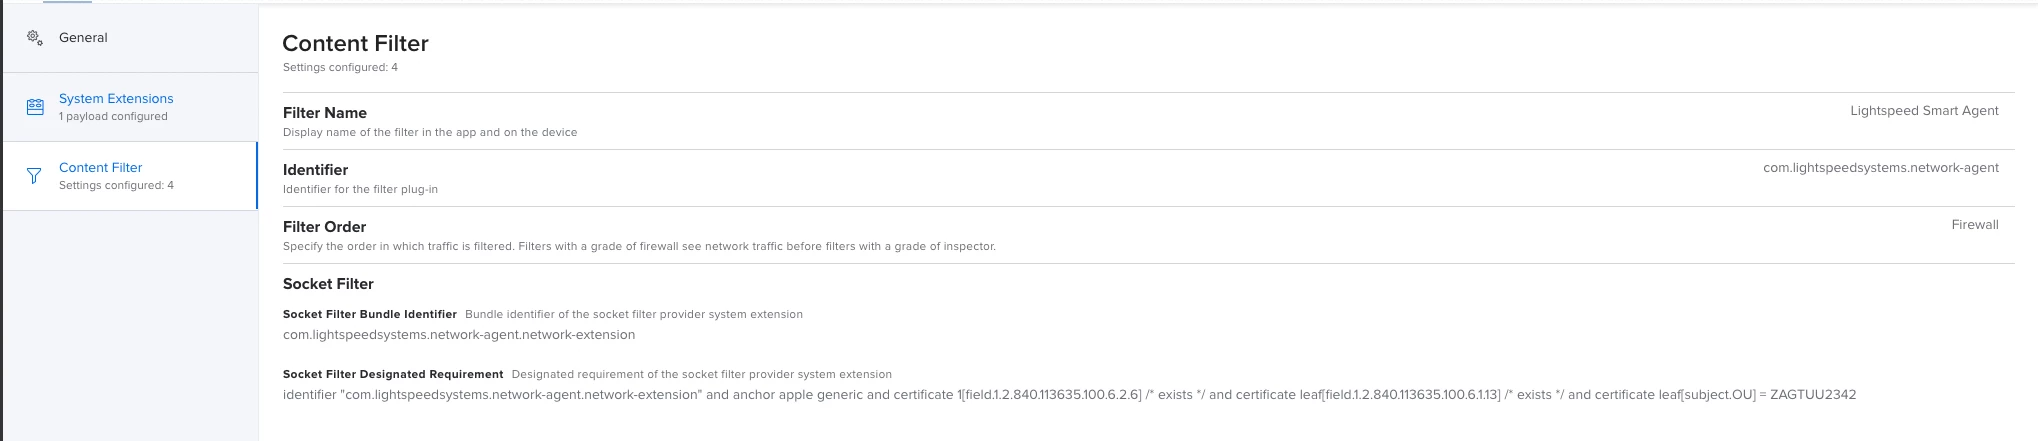
6.) Configure Content Filter Payload
Jamf will want to configure a content filter payload to pre-approve the security prompts when the Network Extension asks to filter the device. Use the settings below when setting this up.
- Filter Name (found at System Preferences > Network): Lightspeed Agent
- Identifier: com.lightspeedsystems.network-agent
- Filter Order: Firewall (Give this the highest priority setting available)
- When adding, select Socket Filter and use the following values:
- Socket Filter Bundle Identifier: com.lightspeedsystems.network-agent.network-extension
- Socket Filter Designated Requirement:
anchor apple generic and identifier "com.lightspeedsystems.network-agent.network-extension" and (certificate leaf[field.1.2.840.113635.100.6.1.9] /* exists */ or certificate 1[field.1.2.840.113635.100.6.2.6] /* exists */ and certificate leaf[field.1.2.840.113635.100.6.1.13] /* exists */ and certificate leaf[subject.OU] = ZAGTUU2342)
That's it for what's needed for the autoupdate to work successfully.
There is another consideration, however, that you will need to check on: the certificate utilized by Relay for filtering. The autoupdate will NOT renew the CA certificate used by Relay for filtering, so you will need to renew this certificate manually before the expiration date. You would use the create_deploy utility included on the SmartAgent.dmg that you can download from Relay to generate a new root CA and deploy to your fleet. By doing this, you will also need to re-deploy the necessary ETC files needed by the root CA. This can be done automatically with Lightspeed's new utility agent, also included on the .dmg. Please look at the Generate Certificate section of the documentation you linked for the steps on this.
Again, basically, you will use the create_deploy to generate the certificate and deployment files needed. Upload the new certificate to Jamf and deploy to fleet (this can be in a new profile deployed alongside your existing Relay certificate, the old one will be used until the other files are replaced and the services restarted). Upload the deployment_jamf.plist to a configuration profile, deploy to fleet. Once the profile is on the device, have a policy to install the LightSpeed utility agent. This will create the support files needed by the new CA, copy them to the ETC folder (overwriting the existing files), then restart the services to use the new files.
Test, test, test, and test some more to make sure everything works as intended before deploying anything to entire fleet.
+12- Honored Contributor
- June 10, 2022
There are 3 main scenarios that need to be planned for:
- Automated upgrade to 2.0 using the Relay portal from version 1.7.7
- Before upgrading, create two configuration profiles in Jamf and deploy to your target devices
- Configure Content Filter Payload
- Jamf will require that the following Team ID and Bundle IDs are added as approved System Extensions. Jamf also has you approve specific System Extension types. Use the same information below to also approve these System Extensions with Network as the type.
Team ID: ZAGTUU2342
System Extension Bundle IDs: com.lightspeedsystems.network-agent
com.lightspeedsystems.network-agent.network-extension - Jamf will want to configure a content filter payload to pre-approve the security prompts when the Network Extension asks to filter the device. Use the settings below when setting this up.
Filter Name (found at System Preferences > Network): Lightspeed Agent Identifier: com.lightspeedsystems.network-agent
Filter Order: Firewall (Give this the highest priority setting available)
When adding, select Socket Filter and use the following values:
Socket Filter Bundle Identifier: com.lightspeedsystems.network-agent.network-extension
Socket Filter Designated Requirement: anchor apple generic and identifier "com.lightspeedsystems.network-agent.network-extension" and (certificate leaf[field.1.2.840.113635.100.6.1.9] /* exists */ or certificate 1[field.1.2.840.113635.100.6.2.6] /* exists */ and certificate leaf[field.1.2.840.113635.100.6.1.13] /* exists */ and certificate leaf[subject.OU] = ZAGTUU2342)
- Jamf will require that the following Team ID and Bundle IDs are added as approved System Extensions. Jamf also has you approve specific System Extension types. Use the same information below to also approve these System Extensions with Network as the type.
- Manually install Relay 2.0 on a test device with the profiles to make sure the prompts don't show and that the filtering works as expected.
- After successful tests, set 2.0 as default install in Relay portal
- Configure Content Filter Payload
- Fresh install of Smart Agent 2.0 on a device
- Ensure that your current Relay certificate, corresponding ETC files, and 2 new configuration profiles are installed on the device before installing 2.0
- Updating the certificate used by Relay for filtering
- This is the most complicated part of the process
- Using the create_deploy script on the SmartAgent 2.0 dmg, generate the deployment files (new CA certificate, ETC files, and deployment plists)
- Upload the new CA to a new configuration profile in Jamf for deployment. (This profile can be deployed alongside the existing CA, the new one won't be used until the rest of the deployment files are in place and the services have been restarted).
- You can do the next part one of two ways
- Package the ca_key.pem, ca.pem, localhost.pem, and localhost_key.pem generated with the new certificate using Composer and deploy to /usr/local/etc
- Either manually restart the filtering service or restart the computer for the new files to be used
- Either manually restart the filtering service or restart the computer for the new files to be used
- Use Lightspeed's new Utility Agent to create the required support files and copy to the correct location
- Look for deployment_jamf.plist in the same place as the generate deployment files.
- Upload that to a configuration profile in Jamf and deploy to targets
- Deploy LightspeedUtilityAgent.pkg to targets (it will create the files in /usr/local/etc and restart the filtering service automatically to use the new files)
- Package the ca_key.pem, ca.pem, localhost.pem, and localhost_key.pem generated with the new certificate using Composer and deploy to /usr/local/etc
- This is the most complicated part of the process
- Before upgrading, create two configuration profiles in Jamf and deploy to your target devices
With any of these methods, test, test, test, and test some more to make sure that Relay is filtering properly after each installation type BEFORE mass deploying to your entire fleet. I am still in the process of doing my testing, which I hope to have completed next week. Also, you may want to wait on 2.0.3 before updating your clients, since that has some fixes they are working on for twitter and amazon decryption.
+12- Honored Contributor
- June 10, 2022
Ok, I've posted explanations three times now and each time the forum refuses to save my post. Please join the #lightspeed channel in MacAdmins Slack, there are lots of discussions there on how others are deploying the new agent.
 +9
+9- Valued Contributor
- Answer
- June 10, 2022
You'll want configuration profiles to install the ca.cer certificate (Certificate payload) and the deployment_jamf.plist (Application and Custom Settings payload). You will also want a profile for the System Extension to suppress the security prompts.
Scope the configuration profile(s), and then use a policy to install the 2 .PKGs.
The system extension was the bit I had to fiddle with the most to get correct, so I've included some screenshots from my JSS that might be helpful.
+4- Author
- Contributor
- June 10, 2022
You'll want configuration profiles to install the ca.cer certificate (Certificate payload) and the deployment_jamf.plist (Application and Custom Settings payload). You will also want a profile for the System Extension to suppress the security prompts.
Scope the configuration profile(s), and then use a policy to install the 2 .PKGs.
The system extension was the bit I had to fiddle with the most to get correct, so I've included some screenshots from my JSS that might be helpful.
Thank you! This helped. Successfully deployed.
+4- Author
- Contributor
- June 10, 2022
Ok, I've posted explanations three times now and each time the forum refuses to save my post. Please join the #lightspeed channel in MacAdmins Slack, there are lots of discussions there on how others are deploying the new agent.
Could you let me know how to join this Slack channel?
+7- Contributor
- July 8, 2022
There are 3 main scenarios that need to be planned for:
- Automated upgrade to 2.0 using the Relay portal from version 1.7.7
- Before upgrading, create two configuration profiles in Jamf and deploy to your target devices
- Configure Content Filter Payload
- Jamf will require that the following Team ID and Bundle IDs are added as approved System Extensions. Jamf also has you approve specific System Extension types. Use the same information below to also approve these System Extensions with Network as the type.
Team ID: ZAGTUU2342
System Extension Bundle IDs: com.lightspeedsystems.network-agent
com.lightspeedsystems.network-agent.network-extension - Jamf will want to configure a content filter payload to pre-approve the security prompts when the Network Extension asks to filter the device. Use the settings below when setting this up.
Filter Name (found at System Preferences > Network): Lightspeed Agent Identifier: com.lightspeedsystems.network-agent
Filter Order: Firewall (Give this the highest priority setting available)
When adding, select Socket Filter and use the following values:
Socket Filter Bundle Identifier: com.lightspeedsystems.network-agent.network-extension
Socket Filter Designated Requirement: anchor apple generic and identifier "com.lightspeedsystems.network-agent.network-extension" and (certificate leaf[field.1.2.840.113635.100.6.1.9] /* exists */ or certificate 1[field.1.2.840.113635.100.6.2.6] /* exists */ and certificate leaf[field.1.2.840.113635.100.6.1.13] /* exists */ and certificate leaf[subject.OU] = ZAGTUU2342)
- Jamf will require that the following Team ID and Bundle IDs are added as approved System Extensions. Jamf also has you approve specific System Extension types. Use the same information below to also approve these System Extensions with Network as the type.
- Manually install Relay 2.0 on a test device with the profiles to make sure the prompts don't show and that the filtering works as expected.
- After successful tests, set 2.0 as default install in Relay portal
- Configure Content Filter Payload
- Fresh install of Smart Agent 2.0 on a device
- Ensure that your current Relay certificate, corresponding ETC files, and 2 new configuration profiles are installed on the device before installing 2.0
- Updating the certificate used by Relay for filtering
- This is the most complicated part of the process
- Using the create_deploy script on the SmartAgent 2.0 dmg, generate the deployment files (new CA certificate, ETC files, and deployment plists)
- Upload the new CA to a new configuration profile in Jamf for deployment. (This profile can be deployed alongside the existing CA, the new one won't be used until the rest of the deployment files are in place and the services have been restarted).
- You can do the next part one of two ways
- Package the ca_key.pem, ca.pem, localhost.pem, and localhost_key.pem generated with the new certificate using Composer and deploy to /usr/local/etc
- Either manually restart the filtering service or restart the computer for the new files to be used
- Either manually restart the filtering service or restart the computer for the new files to be used
- Use Lightspeed's new Utility Agent to create the required support files and copy to the correct location
- Look for deployment_jamf.plist in the same place as the generate deployment files.
- Upload that to a configuration profile in Jamf and deploy to targets
- Deploy LightspeedUtilityAgent.pkg to targets (it will create the files in /usr/local/etc and restart the filtering service automatically to use the new files)
- Package the ca_key.pem, ca.pem, localhost.pem, and localhost_key.pem generated with the new certificate using Composer and deploy to /usr/local/etc
- This is the most complicated part of the process
- Before upgrading, create two configuration profiles in Jamf and deploy to your target devices
With any of these methods, test, test, test, and test some more to make sure that Relay is filtering properly after each installation type BEFORE mass deploying to your entire fleet. I am still in the process of doing my testing, which I hope to have completed next week. Also, you may want to wait on 2.0.3 before updating your clients, since that has some fixes they are working on for twitter and amazon decryption.
I'm confused as to which route would be better to go. Copy the /usr/local/etc files using composer and push it out.
Or
To push out the depoloyment_jamf.plist file and have a policy to Install the Lightspeed Utility Agent.pkg
Are there any major differences anyone has noticed to recommend one direction over another?
+9- Valued Contributor
- July 8, 2022
I'm confused as to which route would be better to go. Copy the /usr/local/etc files using composer and push it out.
Or
To push out the depoloyment_jamf.plist file and have a policy to Install the Lightspeed Utility Agent.pkg
Are there any major differences anyone has noticed to recommend one direction over another?
Both methods worked for me. @jbisgett mentioned in his writeup that placing the files directly into /usr/local/etc required a restart, but we have one set already as part of our deployment policy so I don't know if that's actually required.
It could be argued that placing the files directly is safer in some way, because the .plist/Utility Agent method leaves the RSA private key visible in System Preferences/Profiles
+26- Esteemed Contributor
- September 15, 2022
New info here regarding the error "The Team ID may not appear in both Allowed Team Identifiers and Allowed System Extensions"
 +16
+16- Valued Contributor
- January 8, 2023
I'm running macOS Ventura 13.1 and there might have been a change with base64. When I executed the create_deploy script it failed with an error about base64 I found that I had to edit line 22 of the create_deploy file from this:
CONFIG_DATA=$( base64 "${CONFIG}" )to this:
CONFIG_DATA=$( base64 -i "${CONFIG}" )it requires the -i between base64 and ${CONFIG}
I saved the file and execute it for it to complete without errors.
 +6
+6- Contributor
- March 27, 2023
In our testing - going from 1.7.7 to 2.0.2 - a reboot is required. We are public school K-12 and found our students were unfiltered until a reboot had happened. Possibly our environment, but a reboot is always a good thing right? I added a Jamf Helper prompt to let end users know an update was coming and a reboot would happen.
Enter your E-mail address. We'll send you an e-mail with instructions to reset your password.
Scanning file for viruses.
Sorry, we're still checking this file's contents to make sure it's safe to download. Please try again in a few minutes.
OKThis file cannot be downloaded
Sorry, our virus scanner detected that this file isn't safe to download.
OK